What are parapulp pins - features of the pins
The design is a pin of small thickness, which serves as a connecting element between dental tissues and restoration material. Pins are used for fixation in dentin, that is, in the area between the pulp chamber and the periodontium. Approximately half of its length should be in the dentin, while the second half will be located in the thickness of the filling material.
The width of such pins varies from 0.3 to 1 mm, and their length usually does not exceed 5 mm. The number of fixed rods directly depends on the location of the tooth, its anatomical features and the extent of destruction. To restore the anterior incisors, a pin from each corner of the crown is usually sufficient. When restoring chewing molars, most often a pin has to be placed in place of each missing cusp.
Pins are installed in dentin
Parapulpal pins can be fixed in various ways. There are 4 installation options:
- screw: fastening is achieved by screwing the product into dentin,
- frictional: the rods are fixed due to a very tight fit, when the diameter of the pin can be slightly larger than the width of the hole,
- cement: the structure is supported by a special adhesive composition,
- combined: there can be a combination, for example, of friction and cement methods of fastening.
The pins are implanted not into the tooth cavity, but into the dentin - this is their distinctive feature. They provide additional support for the filling material and are a reliable link between the tooth tissue and the composite.
What elements can be identified in the design?
Tooth restoration using parapulp pins involves working with four main components. Let's look at each in more detail:
- drill – to install pins, use special drills made of carbon steel. They are used to process dentin tissue, while diamond drills are used to process enamel. The tool has two cutting edges, as well as a immersion limiter to a depth of no more than 2-3 mm,
- pin - the product can be made of stainless steel, an alloy of titanium and gold. However, some such systems, when in contact with intradental fluid, cause the development of corrosion,
- dentin – the thickness of the layer varies from 2 to 6 mm, while the dentin tissue is quite elastic and successfully adapts to the implanted structure. However, intense chewing loads can lead to the formation of microcracks in the dentin in the area of contact with the pin. The risk of defects is reduced when installing products into a living tooth with pulp. For the restoration of pulpless elements, intracanal pins are usually used,
- filling - the rod remains approximately 2-3 mm of its length in the thickness of the composite material from which the filling is formed, designed to replenish the destroyed tooth tissue.
The decision to use pins as part of restoration work rests with the attending physician. Only a specialist will be able to correctly assess the clinical picture and suggest the best way to restore the destroyed element.
About the elements
The system for this technology of dental restoration includes the following components:
- filling;
- drill;
- rod.
The drill differs little from analogues from the field of carpentry; it is a pin made of metal (carbon steel is suitable in terms of hardness and cutting properties). At the end, two cutting edges are formed at a certain angle, which, with minimal force, bite into the tooth, forming a hole for the pin. There are grooves on the surface in the form of a spiral, along which the hard tissue destroyed during drilling is removed.
During the work, you need to achieve a certain depth of the channel. The optimal option is 2 mm, because the drills have a stop at this mark. The metal alloys used must have high hardness, since tooth enamel can quickly dull cutting edges. A good raw material option is titanium, which is widely used, for example, to create abutments or titanium bases.
The work is carried out slowly, the drill moves counterclockwise, the quality of sharpening the edges is first checked, they must be sharp. After passing a small part of the hole, the drill is removed, which allows you to pull out the formed chips and cool the working surface. It is important to completely avoid vibrations during operation, otherwise they will lead to an increase in the cross-section of the channel and increase the risk of breakage of the tip. The channel is formed at a right angle to the tooth surface, the area for processing is pre-leveled, for which a bur with a coarse abrasive is used. For precise positioning of the drill, a small depression is created on the surface using a ball-shaped bur with fine grain.
Rods can be of different sizes, most often work is carried out with sections of 0.7 and 0.8 mm, large and small (0.3 and 1 mm) are used much less frequently. Experts emphasize that as the diameter of the component increases, the rate of manifestation of retention in dentin increases. Thin parts are less durable and can easily break off under significant load; however, they are preferable due to a higher level of safety and do not require a large area for implementation. The more complex the configuration, the higher the likelihood of retention not only in the dentin, but also in the filling itself.
This is interesting: Inlay for a tooth under a crown: description, pros and cons, contraindications
The installation depth depends on the type of element. Screw-in ones are securely fixed in the canal already 1.5-2 mm, cemented ones - 3-4 mm. An important indicator is the observance of the relationship between the areas immersed in the dentin and those remaining in the filling. 1 to 1 is considered optimal.
Working with such small components requires a lot of attention; dentin itself is a fairly hard but elastic tissue. The mounted pin should not be closer to the border with the enamel than 0.5 mm. Screw-in systems push against the bottom of the hole, creating stress and increasing the risk of cracking the oral component.
This factor is eliminated thanks to complicated models of metal parts - with a platform in the middle part. Which creates support on dentin and distributes loads. Similar conditions can be achieved if you slightly unscrew the pin in the extreme position, about a quarter of a turn. You can work with adhesive and varnish spacers, but they reduce stability and the composition can get into the dentin canals; only the experience and professionalism of the attending physician will help to avoid problems.
The pin is located almost halfway in the filling material; a distance of at least 0.5 mm must be maintained to the outer surface of the artificial substance. The negative side is that the parts weaken the mineral components of the filling, and due to periodic loads, cracking occurs around the metal components. If the filling is not done correctly, these aspects together can lead to loss. One of the important points is the creation of a gap for amalgams, which must be maintained between the antagonist teeth, the value is up to 1.5 - 2 mm.
Cement has one unpleasant property in this case, it is the possibility of a metal part being visible through it. This quality is eliminated by applying special coatings: light-curing, plastic, gilding.
Drill
This is an element with two cutting edges and two helical grooves running along it and along which dentine filings come out.
Since the optimal insertion depth is considered to be 0.2 cm, this component has an immersion limiter. Due to the fact that its contact with the enamel layer is dangerous due to rapid failure, only carbon steel is used in manufacturing.
When drilling dentin, the dentist takes into account the following points:
- The drill moves counterclockwise.
- All movements are performed slowly.
- The edges of the drill must be sharp.
- To avoid clogging the channels with sawdust and to cool the entire system, it is advisable to periodically remove the drill.
- Vibration in the handpiece must be minimized, since it will lead to expansion of the artificial channel or breakage of the drill.
It is necessary to create a channel for inserting a pin into dentin at an angle of 90⁰ to the latter. Therefore, first the area designated for it is leveled with a coarse-grained bur, and then a recess is created with a spherical fine-grained bur. This sequence prevents the drill from slipping during operation.
Kernel
The materials used to make the element are titanium, gold or stainless steel. The diameter ranges from 0.3 mm to 0.8 mm, but sometimes reaches 1 mm. The most popular are rods of 0.7 mm and 0.8 mm in diameter.
It is noted that the greater the parameters, the stronger and faster the retention appears in dentin. Thin models are characterized by low strength and often break off under load, but they are safe and require less space for placement.
The complex configuration of the element, in addition to dentin tissue, creates retention in the filling. A depth of 1.5 mm to 2.0 mm is sufficient for insertion of a screw-in rod. For a cemented model, this figure increases to 3 - 4 mm.
An acceptable proportion of the length inside the filling and inside the dentin part of the entire device is 1:1. That is why the final length is 5 mm, at which it remains in the filling.
Dentine
The parapulpal pin is inserted into a strong but elastic tissue - dentin. The edges of the screw-in device fit freely into the artificial passage, without leaving cuts on the dentin that stretch and push the tissue apart.
The acceptable limit for the canal to the dentinal-enamel border is 0.5 mm, and the ideal distance between the rods is 5.0 mm.
The walls of cavities (classes I to IV) are considered the best site for the formation of a passage, and it is also important that the direction completely coincides with the dental axis.
The screwed-in rods rest against the bottom of the canal, and carry the greatest pressure and stress on the dentin, threatening the appearance of cracking. To prevent this phenomenon, a special form of pin has been developed with a platform in the middle, which rests on the dentin. The second method of protection is to turn the abutting pin back ¼ or half a turn.
This is interesting: Which is better, a bridge or an implant: comparative characteristics?
The use of varnish or adhesive spacers between dentin and the post causes deterioration of stability and poses a danger to the pulp due to the possible penetration of varnish through the dentinal canals.
In order for the dentist not to go beyond the boundaries of the “safe” zone when forming a passage, it is important to know well the anatomy of the cervical zone, i.e., take into account the shape and parameters, take into account the degree of curvature of the neck, the severity of bifurcations and grooves.
Seal
The rod, with an average length of 0.5 cm, is almost half contained in the filling material. Ineffective filling, i.e. when the filling falls out, is the result of both a weak connection of the pin with the dentinal tissues and with the filling mass.
The dentist needs to ensure that the part of the pin located in the cavity does not touch the walls, and there remains a space of at least 0.5 mm.
The device negatively affects the rigidity of amalgams, composite and mineral cements. Due to regular stress, these materials crack around the pin and some fragments fall out.
Based on this, there is a requirement that between the pin and the antagonist tooth there is a clearance for amalgams of 1.5-2.0 mm. It is not recommended to use cement in combination with parapulp devices . This requirement for a composite is of little significance.
But the pin can be visible through the composite, which is a significant drawback. Special formulations have been developed to reduce translucency. Such compositions include gold plating, light-curing coatings and plastic.
Indications for installation
Pins are used for the restoration of teeth with damage of varying degrees of complexity. Such pins can be used both to eliminate a chip and in case of almost complete absence of a crown. Experts in the field of dentistry highlight the following indications in this regard:
- carious destruction, in which severe damage to the enamel and cavity is observed,
- trauma or destruction of the front teeth,
- the need for restoration of chewing molars,
- creation of supports for fixation of removable and fixed dentures,
- restoration of the integrity of the crown in the presence of living pulp.
Such pins are used for restoration of anterior teeth.
“I had 2 molars restored on pins, about 3-4 years ago. The teeth are still in excellent condition, no chips or other problems. I remember that a couple of weeks after installation the sensations were unusual, it was not very convenient to get used to, but maybe it’s just like that for me...”
Timur1, from correspondence on the forum www.32top.ru
The main condition allowing the installation of parapulpal pins is a sufficient layer of dentin between the gum and the root. If this area is too thin, the structures will not be able to be securely fixed. In such a situation, you will have to turn to alternative restoration options.
In what cases is installation contraindicated?
In addition to the fact that a sufficient thickness of the dentin tissue layer is required for smooth pin installation, working with such systems also places some demands on the clinical picture. So, for example, a contraindication to fixing such pins is the complete absence of the coronal part. It will also not be possible to fix the products if the height of the planned crown exceeds the length of the roots, and the root walls are of insufficient thickness - less than 0.2 mm.
Also, certain restrictions on restoration are imposed by blood diseases, psychoneurological disorders, serious damage to periodontal tissue, the presence of cysts and granulomas, and large areas affected by caries.
How does the fixation procedure go - the main stages
The technique for placing a parapulp pin does not involve any complex manipulations or the use of advanced technologies. This is a standard dental procedure, the steps of which are performed in a specific sequence.
Preparing the channel for the structure
After preparing the working area, isolating it from saliva and treating the tissue with an antiseptic, a hole is made in the dentin. In this case, the distance between the wall of the hole and the border of dentin and enamel should be at least 0.5 mm. Using a wide bur, the area is processed, after which a hole for the pin is made with a small bur. The main danger at this stage is damage to the pulp or periodontal tissue. An experienced doctor will not allow this situation to happen by accurately determining the appropriate location for installing the structure.
Inserting a pin into a tooth
Insertion of the pin can be done carefully by hand or using a bur. First you need to install the structure in a special clamp - an angular type clamp is usually used to restore chewing teeth. The optimal depth for pins that are set on cement is considered to be 3 mm, for structures with screw fixation - 1.5-2 mm1. Some systems have a support platform approximately in the middle - it helps to correctly distribute the load on the entire tooth, and therefore extend the service life of the restoration.
PIN insertion can be done carefully
Final crown restoration
Next, the specialist begins layer-by-layer application of the filling material. After completing the formation of the anatomical shape, the restored area is ground and polished. High-quality installed pins increase the reliability of the entire structure - such a filling can last 7-10 years, of course, with proper care and respect for the teeth.
Primary requirements
In dentistry, a number of requirements have been developed that will help the dentist place the pin correctly and accurately and avoid complications:
- The main site of insertion of the rod is dentin.
- The drilled channel should be at least 0.5 mm from the dentinal-enamel border, and 1-1.5 mm from the dental edge.
- The pin from the proximal surface should be at a distance of at least 0.5 mm.
- When installing, it is important to take into account the curvature of the roots, their bifurcation and the location of the longitudinal grooves.
- You should start forming the passage with the smallest bur (No. 1).
- The immersion depth of the pin is 2 mm (when using a screw-in model) and from 3 mm if a cemented version is implanted.
- The number of pins depends on the group affiliation of the tooth. For frontal units you need 2-3 models, for lateral ones - one device corresponds to one mound or one lateral surface.
What complications can there be?
Restoration using parapulp pins is a standard procedure in dentistry, and the technique of placing pins has long been worked out by specialists down to the smallest nuances. However, in rare cases, mistakes on the part of the doctor can lead to unpleasant consequences - let’s look at them in more detail:
- Damage to periodontal tissue – periodontal perforation usually leads to an aesthetic problem in which the root area turns red and sag, exposing the neck of the tooth. The defect can be corrected by filling the canal with phosphate cement or amalgam. Another option: insert a pin into the canal at the level of the hole and seal it again,
- breakage of the rod or drill - such a nuisance can happen when bending the drill or the pin itself. To avoid such a problem, the instrument and rod must be inserted into the canal and removed as carefully as possible, without sudden rotational movements,
- difficulties when working with a drill - the tool may be dull or the specialist may choose the wrong direction of movement. Another option is that the drill rests on the enamel, which also creates difficulties with sawing fabrics,
- excessive channel width that does not correspond to the diameter of the structure - to solve this problem, you can resort to using a cementing composition.
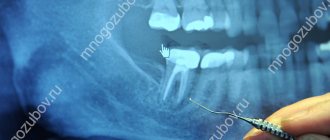
To assess the quality of the work done, after about 6 months it is worth taking an x-ray and showing it to the doctor. The specialist will assess the condition of the restored element under operating conditions and will be able to promptly notice signs of complications, if any.
Possible complications
Placement of a parapulpal pin is a safe dental procedure, the technology of which has been worked out to the smallest detail.
But, in isolated cases, complications may occur due to inaccurate actions of the doctor.
Opening of periodontal tissues
The danger of this phenomenon is the appearance of a pathological gum pocket at the perforation site, which leads to the development of an aesthetic defect - redness and exposure of the root.
The complication can be corrected in several ways. The canal is filled with phosphate cement or amalgam. Or a pin is inserted into it at the level of the perforated hole and sealed again.
Cases are described when the perforation is closed with a gingival flap, suturing, surgical opening of the perforation and alignment of the material on the roots.
Important: none of the above methods of correcting the problem prevents the development of periodontitis.
Breaking the pin (drill)
Happens when they bend. To prevent fracture, both devices must be inserted and removed from the canal carefully and without rotating movements.
Doesn't cut the drill
Typically this problem happens for the following reasons:
- the direction of movement is incorrectly chosen;
- the tool is dull;
- the device rests on the enamel.
The first two reasons can be quickly resolved or prevented. Before the procedure, the enamel must be pre-treated with a carbide or diamond bur.
The pin channel is wide
If the rod does not screw in, then to hold it you need to either cement it or take a thinner drill and a pin suitable for it.
Dentists recommend checking the quality of the work performed after 6 months. perform a control examination of the condition of the restored unit .
Indications for installing a ceramic inlay on a tooth and expert reviews about this method of dental restoration.
In this publication we will talk about ways to combat pathological abrasion of hard dental tissues.
General requirements for installing pins
To summarize all of the above, it’s worth formulating the basic requirements for installing pins. Key points are listed below:
- the pin is inserted into the dentin,
- the wall of the hole for the pin should be no closer than 0.5 mm from the border of enamel and dentin, and 1-1.5 mm from the edge of the tooth,
- installation should be carried out taking into account the curvature of the roots and the location of the longitudinal furrows,
- Drilling a canal in dentin should begin with the smallest bur,
- The depth of placement of the rod should not exceed 2 mm for models with screw fixation and 3 mm when seated on cement.
The number of rods directly depends on the location of the tooth.
The number of rods directly depends on the location of the tooth and its role in distributing the chewing load throughout the jaw. For a front cutter, 2-3 additional supports are usually sufficient. As part of the restoration of the masticatory element, up to 4 parapulpal pins may be needed.
What materials are they made from?
Parapulpal pins are made of metals, covering them with polymer fiberglass, ceramic composite or carbon fiber materials.
The following metals are used for manufacturing:
- gold;
- palladium;
- platinum;
- brass;
- titanium;
- stainless steel;
- alloy of gold and titanium;
- alloy of gold and platinum;
- stainless steel coated with titanium nitrite;
- other alloys of these metals.
The choice depends on the patient’s capabilities and desires, as well as on the dentist’s recommendations.
Review of popular systems
Today, several different types of pins are used in dentistry. Below in the review are the most popular systems from brands that have established themselves as manufacturers of high-quality, safe and reliable parapulpal pins.
"Stabilok-pin" from Fairfax Dental
The US manufacturer markets titanium structures and pins made of stainless steel. The company's product range includes 2 variations in different diameters - 0.76 and 0.6 mm. The kit also includes drills of appropriate parameters. A special feature of the system is the ability to use an angled tip, which helps the doctor to make the placement as accurately as possible, without the risk of damaging the walls of the formed canal.
Fihol Dental system "Philpin"
The products of the Irish company Fihol Dental are titanium pins designed for installation in the tooth stump. The kit includes a special bending tool that helps bend the structure in the desired direction and direct its top correctly in relation to the stump.
Restaurant pin system RT from Martteler
The Marteler company produces pins in diameters of 0.6 and 0.75 mm. The products are made of titanium or medical steel, reminiscent of the Stabilok-pin, but in this case the pins are bent manually. The kit also includes a special adapter for the drill.
Parapost by Coltene/Whaledent
The Coltene/Whaledent concern offers its model of a parapulp pin, the design of which is also similar to the Stabilok system. However, here one holder combines 2 pins at once. Each of the products has a small protrusion in the middle - a small detail that ensures a more correct distribution of the load on living tissues.
PCP system then Komet
One of the disadvantages of pins is the risk of them showing through the seal. To disguise such a defect, various coatings are used, including gilding. A special feature of Komet systems is the presence of a plastic coating, which certainly will not be visible through the restoration material. In addition, the filling part of the structure has a special shape to hold the amalgam, which is a definite advantage when restoring chewing molars.
How much do parapulp pins cost?
The cost of installing parapulp pins includes the price of the products and the work of a specialist. So, one set with 12 pins and a tool for fixing them will cost approximately 1000 rubles. The average cost for installing rods as part of the restoration of one tooth is the same. To calculate the full cost of treatment, you will have to add other costs to this amount: consultation, x-ray examination, tooth preparation, use of anesthesia and antiseptics, filling material.
Price policy
Despite the simplicity of the technology, this option for restoring damaged teeth can hardly be called budgetary. The components themselves will cost around 1200-1400 rubles per piece, but the price tag will increase significantly after an initial examination, consultation, x-rays, preparation carried out by the treating expert, treatment with antiseptic compounds, anesthetic materials and the cost of a filling compound. In our store you can order parapulp pins at a price of 99 rubles per unit.
However, the costs are paid off by a multiple increase in the reliability of the resulting structure, the ability to live life to the fullest and not be embarrassed by dental problems, because with pins they become a thing of the past.
Sources:
- https://MikDent.ru/protez/protezi/parapulparnye-shtifty-metodika-postanovki.html
- https://dentazone.ru/protezirovanie/rekonstrukciya/parapulparnymi-shtiftami.html
- https://DentConsult.ru/restavraciya/parapulparnie-shtifty.html
- https://www.32Dent.ru/parapulparnye_shtifty_piny.html
- https://abatmenty.ru/spravochnik/piny
- https://www.vash-dentist.ru/krasota-i-uxod/narashhivanie/shtiftyi/parapulparnyie-kak-sposobov-vosstanovleniya.html
- https://stomatologliliya.ru/protezirovanie/parapulparnye-shtifty-piny-v-stomatologii-metodika-postanovki-pokazaniya-i-protivopokazaniya
- https://zubovv.ru/krasota-i-uxod/narashhivanie/shtiftyi/parapulparnyie-reshat-problemu.html
- https://stomatologiya-medison.ru/shtifty/parapulparnye-shtifty-podrobnoe-opisanie-protivopokazaniya-metodika-postanovki