L. M. Lomiashvili Doctor of Medical Sciences, Professor of the Department of Therapeutic Dentistry of Omsk State Medical Academy
S. G. Mikhailovsky intern at Omsk State Medical Academy
S. V. Vaits postgraduate student of the Department of Therapeutic Dentistry of Omsk State Medical Academy
“Going there, I don’t know where, and doing something, I don’t know what” is a difficult task! This applies to almost all areas of our lives, including dentistry. Even if you imagine the future design of the tooth being restored, your hands do not always reproduce the correctness of its shape and volume.
Students of the Faculty of Art and Graphics are taught that “one hundred still lifes must be written in order for the one hundred and first to turn out correctly”! Unfortunately, in universities, dental students are given limited knowledge about the shapes of teeth, and an insufficient number of hours are devoted to reproducing teeth from available materials (clay, plasticine, plastic). But the correctness of the newly created forms is the path to the solution to harmony!
The ability to correctly restore the shape of missing hard dental tissues in clinical dentistry is of paramount importance.
The dentist's hands are the main tool for modeling teeth! You can develop this skill through artistic modeling classes.
The purpose of the classes: development of visual memory, manual skills, creative thinking and the ability to perceive shapes in space. Anyone who wants to know the stages of recovery can begin the first exercises with a minimum of conditions - material and simple tools.
Dental modeling is a creative process where, in addition to knowledge of anatomy, there must be freedom to choose the material from which models can be created. Before you begin, you need to familiarize yourself with the basic properties of the materials and choose which one suits you best.
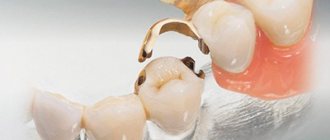
When cutting out a form from hard materials: wood, stone and others , the sculptor gradually, step by step, cuts off the material, freeing the form contained in it. This technique is widely used in therapeutic dentistry, for example, at the stage of competition of the filling surface.
Modeling is the making of sculpture from soft materials. For modeling, you can choose any material that has plasticity. It can be plasticine, sculpture clay, plastic, wax.
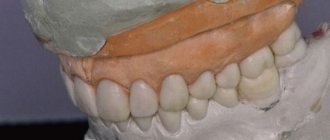
The main stages of modeling the 16th tooth from sculptural clay
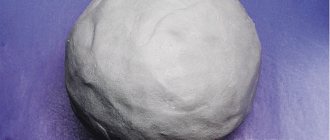
Sculpture clay has long been used in art to recreate shapes. This inexpensive material is ideal for sculpting teeth; working with clay is pleasant in its own way, it is soft, does not stick to your hands, and hardens gradually. Sculpting clay requires longer preparation for work than plasticine, which is most often used for modeling teeth. If the clay is dry, then first you need to mix it with water to the consistency of sour cream, leave for some time until it dries and forms a plastic mass. After this, the clay becomes hard only after a few hours, this time is quite enough to successfully complete the work. The smaller the volume of available material, the faster it hardens. When the desired consistency is obtained, the clay is shaped into a ball (Fig. 1).
Rice. 1. The material has the necessary plasticity and is ready for use. Giving the future model a ball shape
Let's consider modeling the first right molar of the upper jaw (16th tooth). The overall outlines of the model of the 16th tooth are set (Fig. 2, 3), the location of the main surfaces is outlined: medial contact (M), distal contact (D), vestibular (V) and palatal (P).
Rice. 2. Giving the overall outline of the model
Rice. 3. Modeling the tops of the main tubercles.
The tops of the main hillocks are determined. Markings are applied on the chewing surface (Fig. 4), corresponding to a first-order H-shaped fissure.
Rice. 4. Applying markings corresponding to the first-order fissure, H-shaped, on the occlusal surface
Completion of the formation of the external contours of the model and the equator (Fig. 5) is done by hand.
Rice. 5. Smoothing out irregularities and shaping the equator
Before this stage, all actions were performed by hand (Fig. 6).
Rice. 6. Working with your hands allows you to better feel the basic properties of the material
To model the chewing surface of the tooth, it is better to use tools. The first-order fissure is deepened with a spatula (Fig. 7, 8).
Rice. 7. Deepening of the fissure of the first order, separating the anterior buccal tubercle (2) from the posterior buccal (1) and anterior palatine (4). Posterior palatine tubercle (3)
Rice. 8. 1 - posterior buccal tubercle, 2 - anterior buccal tubercle, 3 - posterior palatine tubercle
When modeling, there is no need to draw fissures, but it is necessary to divide the main tubercles so that an H-shaped fissure appears between them (Fig. 9).
Rice. 9. Completing the modeling of the first-order H-shaped fissure
Tools for work are chosen that are more convenient to work with: it can be a spatula, a smoothing iron. A fissure shaping tool, such as a probe, is required. 2-3 tools are enough.
After completing the work, the model can always be corrected by cutting off excess with a scalpel or spatula. The resulting tooth model can be stored for a long time, reminding of the results of the work.
Rice. 10. Modeling of the longitudinal (2), medial (1), distal (3) ridges of the anterior buccal tubercle
Rice. 11. Second-order fissures are formed on the anterior buccal tubercle
Rice. 12. Modeling of the main (2) and additional (1, 3) ridges of the anterior palatine tubercle
Rice. 13. Final view of the 16th tooth model
Rice. 14. Appearance of the 16 tooth model. Occlusal surface
Rice. 15. Appearance of the 16 tooth model. Palatal and chewing surfaces
Methods
The following techniques are used for dental wax modeling:
- direct with making an impression in the Patient’s mouth;
- indirect, requiring preliminary production of a plaster product; it takes less time, but there are some features of the procedure.
Each method has its own pros and cons:
- the indirect method is more convenient for the Patient, since the time spent in the chair is reduced, in addition, the edges of the product can be processed more accurately;
- with the direct method it is better to produce single models;
- the indirect technique is recommended for hard-to-reach areas.
Modeling from plastic
Plastic is another material from which you can create a beautiful tooth model. This is a fairly dense, non-sticky material that does not require special preparation for work, but it is necessary to observe the conditions for its storage: temperature changes at which the material is stored can have a negative impact on its properties. Plastic is convenient because you can work with it for an unlimited amount of time, it does not harden, which makes it possible to work out the microrelief of the future model in more detail and clearly, and make the necessary adjustments during the work.
Hardening of the material occurs when it is placed in hot water or heated to 110-120 degrees in an oven for 5-10 minutes. The possibility of long-term work and fixation of the result by heating - this is the similarity between plastic and composite. Plastic cannot be reused. Well suited for creating phantom teeth models.
The first stage of working with this material will be to warm it up in your hands and shape it into a ball, then give the overall outline of the model, determine the main surfaces of the tooth model (Fig. 16) (M - medial contact surface, D - distal contact surface, V - vestibular surface, L - lingual surface), applying markings corresponding to the first-order fissure of the F-shaped form.
Rice. 16. Giving the overall outline of the model, applying markings corresponding to the fissure of the first order, F-shaped. M - medial contact surface. D - distal contact surface, V - vestibular surface, L - lingual surface
On the chewing surface with a tool, spatula or trowel, according to the applied markings, a fissure of the first order is deepened, five main tubercles are identified (Fig. 17) (1 - anterior lingual, 2 - posterior lingual, 3 - anterior buccal, 4 - posterior buccal, 5 - distal ).
Rice. 17. Tops of the main tubercles: 1 - anterior lingual tubercle, 2 - posterior lingual tubercle, 3 - anterior buccal tubercle, 4 - posterior buccal tubercle, 5 - distal tubercle
The equator of the 36 tooth model is also formed. The formation of second-order fissures occurs by modeling the longitudinal, medial, and distal ridges of the four main tubercles (Fig. 18-19).
Rice. 18. Modeling of the longitudinal (b), distal (a), medial (c) ridges, anterior lingual tubercle (1). 1 - anterior lingual tubercle, 2 - posterior lingual tubercle, 3 - anterior buccal tubercle, 4 - posterior buccal tubercle, 5 - distal tubercle
Rice. 19. 1 - anterior lingual tubercle: (a) longitudinal ridge, (b) distal ridge, (c) medial ridge. 2 - posterior lingual tubercle. 3 - anterior buccal tubercle: (a) longitudinal, (b) medial ridge, (c) distal ridge. 4 - posterior buccal tubercle: (a) longitudinal ridge, (b) distal ridge, (c) medial ridge. 5 - distal tubercle. 6 - additional tubercle. Rice. 19. 1 - anterior lingual tubercle: (a) longitudinal ridge, (b) distal ridge, (c) medial ridge. 2 - posterior lingual tubercle. 3 - anterior buccal tubercle: (a) longitudinal, (b) medial ridge, (c) distal ridge. 4 - posterior buccal tubercle: (a) longitudinal ridge, (b) distal ridge, (c) medial ridge. 5 - distal tubercle. 6 - additional tubercle
The distal tubercle has a less differentiated surface (Fig. 20).
Rice. 20. The final result of the simulation. 1 - anterior lingual tubercle. 2 - posterior lingual tubercle. 3 - anterior buccal tubercle. 4 - posterior buccal tubercle. 5 - distal tubercle
Models made of plastic can be stored for a long time; they will remind you of the results achieved in modeling.
Rice. 21. Lingual and medial contact surfaces of the mandibular molar model. M - medial contact surface. D—distal contact surface. V - vestibular surface. L - lingual surface
Rice. 22. Vestibular and chewing surfaces of the mandibular molar model
What is caries and why is it dangerous?
Caries is a sluggish pathological process in the oral cavity. It progresses in the hard tissues of teeth.
The disease occurs due to the complex effects of unfavorable factors, which we will discuss below.
If you do not remove caries from your teeth, they will gradually begin to decay. But the negative consequences do not end there. There may be a constant bad breath, as well as inflammatory processes that can result in purulent formations and even blood poisoning.
Caries can provoke the appearance of diseases such as pulpitis, gumboil, periodontitis, and cysts.
Therefore, it is important to cure caries as early as possible, and for this you need to identify it in time - independently examine the oral cavity and visit the dentist annually for a preventive examination.
Modeling tooth 36 from plasticine: main steps
Plasticine is perhaps the most common material; it is easily accessible and does not require special preparation for work. Having taken the required amount, just warm it up, knead it in your hands, and you can start working. Having no experience working with this material, in the first stages it is better to work without tools to feel its properties, and then create shapes using tools. After kneading, the plasticine is ready for modeling, but it does not need to be heated for long, as it becomes too soft and sticky and will not hold its shape well.
Let's consider the main stages of modeling the 36th tooth from plasticine. We give the plasticine the shape of a ball (Fig. 23).
Rice. 23. Giving the material a ball shape
Having outlined the main surfaces and tops of the tubercles of the future model, we deepen the first-order fissure of the F-shape. As a result, five tubercles are formed on the chewing surface (Fig. 24) (1 - anterior lingual, 2 - posterior lingual, 3 - anterior buccal, 4 - posterior buccal, 5 - distal).
Rice. 24. Formation of the overall outlines, the tops of the main cusps: anterior lingual (1), posterior lingual (2), anterior buccal (3), posterior buccal (4) and distal (5). Surfaces: M - mesial, D - distal, V - vestibular, L - lingual
Using the tool (Fig. 25), modeling of the distal ridge (B), longitudinal ridge (A), medial ridge (C), anterior lingual tubercle (1) and modeling (Fig. 26) of the medial ridge (B), longitudinal ridge ( A), distal ridge (C), posterior lingual tubercle (2).
Rice. 25. Modeling of the distal ridge (B), longitudinal ridge (A), medial ridge (C), anterior lingual tubercle (1). (2) posterior lingual cusp, (3) anterior buccal cusp, (4) posterior buccal cusp, (5) distal cusp
Rice. 26. Modeling of the medial ridge (B), longitudinal ridge (A), distal ridge (C), posterior lingual tubercle (2). Modeling is carried out with a spatula
Rice. 27. The final result, the model of the lower jaw molar is made of plasticine
Is it possible to get rid of caries at home?
When medicine was not as progressive as it is now, people often got rid of caries at home using unconventional treatment methods.
Some methods of traditional medicine are still cultivated today. People are offered to prepare their own tinctures for rinsing, use propolis, soda, laundry soap, fir oil, camphor alcohol and much more.
At best, the effect will not be achieved, and at worst, a person may harm his health. Most traditional methods can damage enamel and soft tissue.
Medical representatives do not recommend treating caries at home.
If you decide to effectively fight caries, it is best to contact professionals in dental clinics in a timely manner.
Dental clinic "ORTHODONTICS" will make your teeth healthy and your smile snow-white!
Our ORTHODONTICS clinic in Krasnodar will stop caries at different stages of its progression. We offer high-quality and completely painless treatment of dental pathologies.
We employ experienced specialists who regularly improve their skills and exchange their experience with leading doctors from different countries. There is no one way for everyone to remove caries, since for each client we develop an individual strategy to make teeth healthy.
To carry out manipulations, we use advanced equipment in specialized rooms. Our clients are always satisfied with the results, delighting themselves and others with beautiful smiles. Remember that caries can be cured, the main thing is to turn to professionals in time!
A few words about additives
The list of recipes for making homemade soap with natural ingredients is endless. To create a product with a scrub effect, you can use ground coffee and loofah.
Not only essential oils, but also food flavorings and special cosmetic fragrances will help make soap fragrant.
You can get a pleasant brown tint by adding cinnamon to the mixture, and calendula flowers will give you a yellow-orange color. Among the harmless synthetic dyes, it is worth noting pigments that dissolve in the finished product and quickly and effectively color the soap base in the desired color. Additionally, you can add mother-of-pearl to the composition, and for transparent varieties, choose shiny glitter.
And finally, it remains to mention how to make the shape of the bars original. To do this, you can use ready-made silicone molds, which are sold in abundance on various resources. And, of course, don’t forget to fantasize and make your fantasies come true!
Everything for soap making