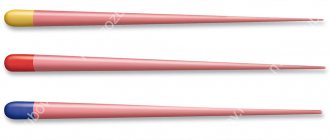
Pins and pin joints consist of parts that are connected using pins.
Pin connections are used to fix the relative position of parts (Fig. 1; a, b, c, d), when transmitting relatively small torques (Fig. 1; e, f). A common example is the fixation of the relative position of the gearbox body and cover with two conical pins (Fig. 1, b), which ensures that their relative position is maintained during joint machining, assembly and disassembly of the gearbox.
Rice. 1. Pin connections
The advantages of pin connections: their simplicity, manufacturability and low cost. The disadvantage of some pin connections is the weakening of the shaft cross-section by the hole and the associated stress concentration.
The main types of standard pins are shown in Fig. 1.
In addition to the above designs, there are many other pins that are used in mechanical engineering. These include: conical and cylindrical with a notch on the outer surface, spring, cylindrical and conical pins with internal thread (the thread on the pins serves either to secure them or to remove them from the hole during disassembly); conical adjustable pins, hardened cylindrical pins and cylindrical rivet pins (these pins have grooves and are used instead of nails or screws, etc.).
Cylindrical pins are usually placed on the workplace with a guaranteed interference fit K7/m6 or with a transition fit H7/m6, and in moving joints - with riveted ends (Fig. 1, e).
The hardness of unhardened pins is at least 145 HB and hardened ones - 58...62 HRC.
Conical pins are made with a taper of 1:50, ensuring their self-braking. Ordinary conical pins (Fig. 1, b) are placed at through holes, when they can be knocked out from the opposite side. For blind holes, conical pins with threads are installed for pulling out (Fig. 1, c). Conical with a thread at the end (Fig. 1, d) and adjustable pins are installed in connections experiencing dynamic loads, shocks and impacts, as well as in connections moving at high speed. After installing the adjustable pins on the workplace, their ends are slightly spread apart.
Pins are made from steel St4, St5, Steel 35, 40 and 45. It is recommended to make drilled pins from spring steel (steel 65G). If necessary, use pins with heat treatment of 45..65 HRC. Roughness of the landing surface Ra = 0.8…0.4 µm. Plastic pins are used to connect plastic parts.
Where are they used?
Such connections are generally used to transmit only very small loads. Sometimes pins are used to secure parts together. There are also special shear elements of this type used as fuses. In addition to assemblies with shafts, such products are very often used to connect covers and housings.
Another purpose of pin connections is prosthetics in dentistry. Using such elements, artificial teeth are attached.
Cotter pins
A cotter pin is an elastic product made of metal; it is a wire rod of a semicircular cross-section, bent in half and with an eye formed at the bend. The length of such a product is measured from the short end of the rod to the point where the eye is formed.
Cotter pin DIN 94 Cotter pin length
Cotter pins are used mainly with castle nuts, bolts and pins with holes (pins) when it is necessary to connect and fix lightly loaded parts, as well as to protect against unscrewing. To install the cotter pin, you need to insert it into the intended through hole and bend the ears.
Other types of cotter pins:
Spring DIN 11024 (needle) in two versions: D with a double loop and E with a single loop.
Execution D Execution E
The figure below shows a diagram of installing a spring cotter pin into a hole on the shaft:
The TsKI assortment also includes a ring cotter pin and a cotter pin with a ring (pin) DIN 11023.
Ring cotter pin Ring cotter pin
Types of pins
When assembling various types of components, two main types of similar products are used:
- cylindrical;
- conical
Cylindrical pins, in turn, can be:
- spring split;
- perforated (with grooves).
Additional design elements of the pins may include threaded holes or protrusions. They are used for removing products from blind holes.
According to the functions performed in the assembly, three groups of pins are distinguished:
- installation;
- guides;
- fastening.
Dowels
Dowel - wooden or plastic fasteners in the form of a cylindrical rod with rounded ends or a chamfer. They can have different corrugation parameters and require extreme precision in production. The main purpose of dowels is to connect and position parts:
- Wooden - for products made of chipboard, plywood, MDF, solid wood, etc.
- Plastic - for parts of prefabricated cabinet panel furniture.
The figure below shows the dowel installation diagram:
Pin connection: GOST
In most cases, when assembling assemblies, standard pins are used, manufactured in compliance with GOST standards. They are different for each specific type of product. Thus, the production of simple-shaped pins is regulated by GOST 3128-70 (cylindrical) and GOST 3129-70 (conical). Such parts are usually made from steel grade 45. But GOST allows the use of material grades A12, 10 kp, 20 kp, etc. for this purpose. Expanded products are made from spring steel. Sometimes pins of different types are made from non-ferrous metals.
Of course, the nominal dimensions of these elements are also regulated by standards. GOST also provides for permissible deviations of the latter. This allows you to assign typical pin fits to the holes of bushings, shafts, covers and housings.
The designation of these products includes:
- the word "pin";
- product type;
- its dimensions;
- designation of the standard.
The type is indicated only if it is clearly defined by the standard. In the “dimensions” field, the diameter of the product and its length are indicated. Sometimes tolerance fields are also entered here.
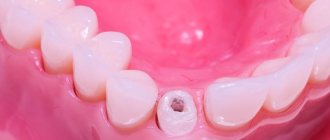
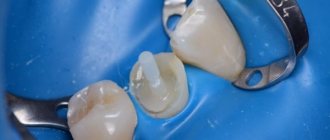
Clinical case
A 40-year-old female patient with severely damaged maxillary central incisors. There is a significant change in color. Both teeth had received inappropriate endodontic treatment. The left incisor has lost a significant part of its crown. The gum is hypertrophied and occupies the coronal cavity. (Fig. 1-3).
Rice. 1
Rice. 2
Rice. 3
The long-term joint work of the endodontist and orthopedist begins.
The hypertrophied gum was removed from the cavity using electrosurgery, and a rubber dam was then properly placed. The risk of bacterial infection due to the lack of a rubber dam increases with an additional root canal or insufficient apical obturation. (Goldfein J et al, 2013).
The existing endodontic filling was removed using a rotary system (Protaper Next, Dentsply Maillefer). The length of the root canal was checked using an apex locator (Proper II, Dentsply Maillefer) (Figures AB).
Immediately after removal of the root canal filling, automated root canal instrumentation was performed using the Protaper Next system (Dentsply Maillefer) (Figure C).
Washing was performed with 2.5% sodium hypochlorite solution. A suitable gutta-percha point was then selected for apical sealing (Figure D). (Fig. 4)
Rice. 4
A hybrid Tagger technique was used for root canal obturation.
Lateral condensation of gutta-percha points was enhanced using the Gutta Condensor device (Dentsply Maillefer). In this way, gutta-percha was thermally plasticized and compacted apically (Fig. 5).
AH 26 (Dentsply) was used as a root canal sealant.
Rice. 5
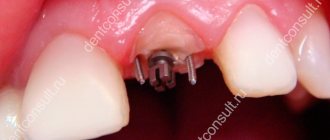
After trimming the gutta-percha points using hand instruments, vertical condensation of the endodontic filling was performed (Figures A and B).
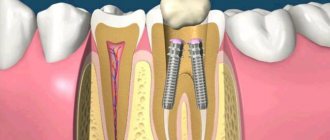
Immediately thereafter, the root canal filling was partially removed to drill a hole for a post of the desired length using a Peeso No. 1 drill bit with a standard blue-rimmed pneumatic contra-angle (2000 rpm) (Figures C and D).
Simultaneous obturation and preparation of the bed for the pin reduces the likelihood of apical leaks and improves the quality of endodontic obturation. (Perdigao J, 2016) (Kim HR, 2017).
Removing the filling becomes easier if it is performed immediately after obturation of the root canal. No plasticizers are required for gutta-percha. Heating pluggers or an electronic thermal attachment can also be used for this purpose. (Perdigao J, 2016).
Because this is a collaborative workflow, there is no need to plan instrumentation of the pin site using X-ray or CT imaging. The orthopedist has all the information necessary for the job. Given the circumstances, the endodontist may be able to perform the entire procedure himself (Bertoldi Hepburn A, 2011).
Cleaning the dentinal walls of the post tray before inserting the post is also easier and faster if the post tray is prepared immediately after removing the filling from the canal. To ensure reliable apical sealing of the root canal, 6 mm of gutta-percha is left.
Rice. 6
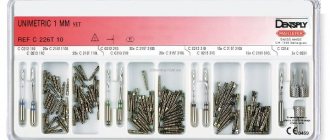
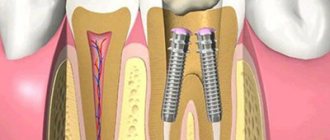
The Macro-Lock Oval UPS system (RTD, France) was chosen.
After the Peeso drill No. 1, channel expanders were used. Four dilators corresponded to four pins of different sizes and with individual geometry modifications.
In this case, the drill bits used were No. 1 (yellow code), No. 2 (red code), and No. 3 (blue code). The #4 pin drills were green coded.
Canal expanders will ensure sufficient compatibility of the root canal with the shape of the post and, therefore, friction of the post and dentin, at least in the apical third of the root canal.
In many SWS systems, the shape and dimensions of the pin are not consistent with the channel expanders and holes for the pin. Differences in the shape and/or size of the post and its hole in the root canal can result in poor fit of the post and the appearance of gaps between the root canal filling material and the top of the post. (Portigliatti RP et al 2017).
To prevent the generation of heat due to friction with dentin, preparation of the post hole using channel expanders must be carried out in stages. Therefore, tooling must begin with the first drill.
However, in clinical cases similar to the one described, due to the need to treat the canal with rotating instruments during repeated endodontic treatment, which, in turn, increases the taper of the root canal, only drills No. 2 and 3 are used (the drill corresponded to the pin).
During root canal treatment, constant rinsing with a sterile water-based liquid (distilled water, saline solution, etc.) is recommended. (Bertoldi Hepburn A, 2011).
It is necessary to check whether the drills retain their cutting properties. The manufacturer indicates that these drills can be used 12-15 times.
One of the most important ways to prevent heat generation is to reduce the drill speed. To prevent heat generation, it is recommended to use a speed of 800-1200 rpm. Pneumatic micromotors are not suitable for use at these speeds as they lose torque. Electric micromotors are better because they can be precisely set to the appropriate speed and torque. In this clinical case, the x-Smart Plus endodontic motor (Dentsply, Maillefer) was used. It was applied at a speed of 1000 rpm and a torque of 3 Ncm.
After creating a hole for the post using channel expanders, it must be cleaned and sterilized.
Cleaning of the post bed was done with hand instruments, followed by the use of a conical interdental brush with distilled water/cleaning solution. For the final rinse, distilled water and alcohol were used to promote drying using sterile paper points. A microscope was used during cleaning. The microscope illuminates the pin bed and enlarges the operating space. Thus, the microscope helps control the cleaning process and contributes to a successful result.
Cleaning was easy and quick since the endodontic sealant had not yet cured. (Fig. 7).
Rice. 7
The selected SWS (Macro-Lock Oval No. 3) was pre-installed in the hole after disinfection in alcohol. The fit turned out to be very accurate. Friction between the tissues was evident and hence the post was stable and had high retention. There was no need to add any other materials to customize the pin and thus achieve reliable mechanical fixation. As can be seen in the photograph, the taper of the pin increases in the coronal part and gradually changes the round geometry to oval, thereby achieving friction and increasing the cross-section.
However, some clinical cases still require the use of additional materials (composite, fiber reinforcement, additional pins, etc.) to achieve proper mechanical fixation. In other clinical situations, good post fit may require adjustments to eliminate excess friction. To do this, you can use regular drills or diamond discs.
This SHS system uses Illusion technology (color coding), when the pins change color from yellow, red, blue and green depending on the pin number to the natural color of the tooth after installing the pin, and vice versa, if the surface is cooled to a temperature below 22 degrees using a cool water. This technology is designed to make it easier to locate a post in a composite core material in cases where the post needs to be removed to access the root canal.
An x-ray will be required to verify proper fit of the post.
At the end, the pin was cleaned with alcohol (35-40% phosphoric acid can also be used) and dried with dry and clean air. It is not necessary to apply any binders (silanes or composites) to the post if the fixation is with self-etching cement. With the standard protocol, resin is definitely needed. The pin is ready for cementing (Fig. 8).
Rice. 8
Self-adhesive (self-etching) cement (SmartCem 2, Dentsply) was used as a cementing material. Self-adhesive resin cements can be used without dentin adhesives, thereby facilitating cementation.
The effectiveness of simplified cementation of ultrasonic cement using self-adhesive polymer cements is described in several publications. (Hannau M et al, 2008) (Huber L et al, 2007) (Samah S & Özcan M, 2015). Although in reality there is no adhesion (mechanical fixation of the post will ensure its retention), self-adhesive polymer cements can create micromechanical and/or chemical bonding mechanisms between the post and dentin. (Hannau M et al, 2008).
Resin cement was injected into the pin hole from the apical end to the cervical approach using a fine injection tip. This procedure prevents the formation of air bubbles and ensures uniform distribution of the material inside the root canal. Lentulo channel fillers should not be used for this purpose.
Immediately after the injection of resin cement, a pin was inserted, which took its final position after three light pressures to squeeze out excess cement.
After removing the residue with a suitable brush, the material was photoactivated using a blue curing lamp for 1 minute on the buccal and lingual surfaces and directly above the post to illuminate the deepest parts of the post bed (Figure 9-11).
Rice. 9. A flowable opaque composite was used to fill the coronal part of the tooth. A clinical process similar to that described above was also performed for the adjacent central incisor during the second clinical session
Rice. 10. During the second clinical session, cores were formed and temporary crowns were made. The results of the procedure were monitored using x-rays.
Rice. eleven
The situations before and after surgery can be seen and compared on x-rays. SWS demonstrates proper integrity of the filling material in the root canal. There are no gaps between the endodontic filling and the post. The taper of the root canal that appeared after repeated treatment was almost completely preserved (Fig. 12).
Rice. 12
Temporary acrylic crowns are customized to enhance appearance.
A finely dispersed composite was applied to the buccal surface after grinding; the layering technique was performed using masses of varying chromaticity and brightness.
Then the final finishing and polishing was done. The crowns were cemented with temporary cement (Provicol, Voco GmbH) (Fig. 13).
Rice. 13
The aesthetic appearance of the temporary crowns turned out to be very natural, and the patient was satisfied with them.
During the second clinical session, restoration of the lateral incisors was also performed. The entire clinical process (both endodontic treatments, insertion of the CVS, core formation and creation of highly esthetic temporary crowns) was completed in two clinical sessions.
What is
Connections of this type are of the detachable type. When creating them, the parts of the assembly are first drilled. Moreover, it must be joint. That is, the parts are first stacked with each other in the same way as they will be located in the unit later during its operation. After this, the actual drilling takes place.
At the next stage, the pins themselves are inserted into the resulting holes. Cylindrical elements of this type are installed very tightly. That is, the pin always has a slightly larger diameter than the hole prepared for it.
In the event that the unit will be subjected to repeated assembly/disassembly during operation, conical pins rather than cylindrical pins are provided for it. This allows you to extend the service life of the structure. Since the cylindrical pins are inserted into the holes of the parts very tightly, after disassembly and assembly the assembly may lose its original performance qualities. That is, the connection may simply not be too strong.
The pins work during operation:
- for cutting (along the joint surface);
- to crumple.
It is based on these characteristics that calculations are made to determine their suitability for use in a particular unit. The working surfaces of both the pins and the parts being connected can be subject to collapse.
Purpose
Pin connections are widely used in mechanical engineering, medicine, instrument making and other industries. It is used in the automotive industry and in the manufacture of household appliances, wherever fixed detachable joints are made.
The use of pins simplifies the fixation of parts during repair and processing.
Conical clamps are used to secure elements of body parts during their joint processing. For example, the gear housing is first processed along the parting plane. Then they drill along the flanges, install pins and bore holes for shafts and bearings with H7 accuracy.
After any number of disassemblies, all treated surfaces are precisely aligned.
Advantages and disadvantages
In the manufacture of various types of assemblies, in addition to pin connections, wedge, key, and spline connections can be used. All of them are of the detachable type. Threaded connections of this type using screws, studs and bolts, profiles, and terminals are also very often used. Each of these types has both its advantages and disadvantages.
The advantages of pin connections include primarily:
- simplicity of design;
- ease of assembly/disassembly;
- precise centering of the parts to be connected.
Such connections have basically only one drawback. In any case, a hole drilled for the pin will weaken the part in the future. Terminal connections, for example, do not have such a disadvantage.
At the same time, the sockets for the pins must be processed very carefully. Otherwise, the product may subsequently bend. The need for precise processing of the hole increases the cost of manufacturing the assembly part.
Features of using cylindrical pins
The assembly of pin connections when fastening machine parts is usually performed using smooth products. In the same way, the usual fixation of structural elements of the machine during its operation is usually carried out. In this case, two smooth pins are most often used.
To fix the position of parts, perforated products of this type can also be used. Their main advantage, compared to smooth ones, is that they do not require reaming the holes. In the absence of additional fastenings, such elements are also more reliable in terms of falling out. As with the use of conical pins, when using drilled cylindrical pins, assembly/disassembly of the connection can be carried out repeatedly during operation.
In static connections, cylindrical products are installed with interference. In moving ones, they are mounted with the obligatory riveting of the ends. Spring cylindrical pins are usually mounted in lightly loaded connections. The tension when using them is created by reducing the diameter of the hole. Installation types of pins in fit connections are installed with an interference fit with one of the parts. On the other hand, they are mounted with a H7/h6 or H7/js6 fit.
How long does it take to install a pin and how painful is this process?
The duration of the procedure directly depends on the initial condition of the oral cavity. If there are no problems, the pin is placed in one visit to the dentist. If periodontal diseases and other pathologies are present, a pin will be installed in the tooth root only after they have been eliminated.
Since the doctor touches soft tissue during the implantation of the supporting element, the procedure is often accompanied by painful sensations. The occurrence of pain after nerve removal is a natural process. But if a long-depulped tooth hurts, it is possible that the rod has entered too deeply into the canal. X-rays will help identify the cause of the pain.
Conical products
Pins of this variety are made with a taper of 1:50. This ensures their subsequent self-denial in the nodes. Such products are used to transmit torque and to connect covers with housings almost as often as cylindrical ones.
Simple conical pins are usually installed in through holes. In this case, during installation they are simply driven in from the opposite side of the connection. If the hole is not through, a tapered pin with a thread is installed into it for pulling out.
Adjustable products of this type are used in connections that may be subject to shocks and shock loads during operation of the mechanism. In addition, they are installed in those units in which parts move at very high speeds. The ends of such pins are usually separated after installation.
Tags
Fluoridation of teeth for milk teeth for milk teeth for milk teeth for milk teeth for teeth for Silvering of teeth Restoration of teeth for teeth for teeth Prosthetics for milk Prosthetics for Prosthetics for Prosthetics for Treatment of caries Treatment of caries Treatment of pulpitis Treatment of periodontitis Treatment of teeth Treatment of teeth Treatment of caries Treatment of caries Treatment of pulpitis Treatment of periodontitis Doctors Doctors that's why doctors install
prices articles gum braces reviews indications sign up implant whitening promotions summer contacts cyst specialists what work veneers removable contraindications personal children's orthopedics Moscow data our pulpitis professional treatment compliance new flight telephones mandatory
Features of installation in the node
The parts are drilled for connection with a pin, as already mentioned, in the assembly. In some cases, these elements are additionally fixed to avoid falling out. This is done, for example, when installing dismountable connections. In this case, additional fixation is provided with a ring of 0.5-0.8 mm wire.
In non-separable connections, the pins are usually cored. But in some cases, products with drilled ends can also be used. After assembly, such pins are flared.
When using conical products, in some cases the self-rejection condition may not be met. This happens quite often, for example, in units subject to vibration or operating under conditions in which the temperature changes sharply. In such connections, conical pins must be secured additionally.
Questions and answers about dental posts
✅ I was interested in the procedure for installing a pin in a tooth! I am missing 5 teeth, have caries and slight periodontal inflammation. Tell me, is this procedure suitable for me? Thank you!
The procedure for installing a pin in a tooth is indicated in your case, but before it is carried out, it is necessary to cure caries and eliminate inflammation in the periodontal tissues. Come to us for a free consultation so we can choose effective treatment and proper dental care for you! Waiting for you! Pastyan Andrey Albertovich implantologist, dental surgeon
Selection and calculation of pin connections
The dimensions of the products used to transmit torque depend primarily on the diameter of the shaft (within d pcs.<0.3d). The shear strength of the pin is selected using the following formula:
- t av=4T/dxd2pcs.<.
Here T is the torque and is the permissible shear stress. The last parameter is looked at in special tables. The connection is checked for collapse with a thin hub using the formula:
- Q av=2T/d(Dd)d pcs.<.
Here /d(Dd)d pcs. — conditional crushing area, — permissible bearing stress for steel.
How to install a titanium pin
The procedure for installing a titanium pin is not complicated or painful. The root canal must first be properly prepared. To do this, the nerve is removed, the canal is expanded and filled with special cement. If the tooth has already been depulped, the root canal is simply expanded using special instruments. Then, depending on the structure of the tooth and the anatomical features of the root canals, the doctor selects the optimal shape of the titanium pin and places the structure in the tooth. At the end of the procedure, an artificial crown is fixed on the installed pin or the tooth is built up with a composite material.
Repair
In addition to crushing or shearing, in connections of this type, defects such as wear of the hole and the appearance of cracks in the parts themselves can also occur. It is not allowed to further operate the units if any of the four problems occur. Repair of the unit must be carried out. In any case, a unit with a defect will not work for very long.
The actual repair of pin connections is, of course, carried out in compliance with certain standards. In most cases, defective pins are discarded and replaced with new ones. However, GOST still allows, for example, to expand worn holes for another larger pin. It is also allowed to weld old holes and drill new ones in their place.
What to do if a tooth with a pin hurts
In the first hours, rinsing the mouth with a soda solution (1 teaspoon of soda per glass of water) will help relieve toothache. A decoction of chamomile and sage has a similar effect. You can also take painkillers and apply ice to your cheek in the area where the pin was placed.
It is important to know. The occurrence of slight swelling and pain in the first days after installation of the pin is normal. But if these symptoms persist for a long time and the patient experiences an elevated body temperature, you should consult a dentist.