Rogatskin D. V. Radiologist, Ortos LLC (Smolensk)
Until recently, radiation diagnostics in dentistry was considered as an additional examination method, that is, optional, without which, in principle, full treatment could be carried out. However, in the 21st century the situation has changed dramatically, new technologies, new specialties and new requirements for the examination and treatment of patients have appeared. Currently, not a single civilized dental appointment is complete without a detailed radiodiagnostic examination of the patient, and it can be argued that radiodiagnostics in dentistry is now one of the main and most popular research methods.
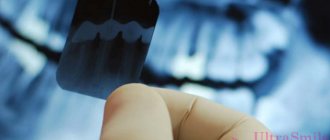
The main difference between digital radiography (radiovisiography) and traditional one is that in this case, instead of film, the image receiver is a sensor that perceives radiation and transmits information to a computer. The equipment required for radiovisiography consists in sequence of a radiation source, a device for reading information, a device for digitizing information, and a device for reproducing and processing images.
Modern low-dose generators with a minimum timer value, designed to work as part of a visualization complex, are used as a radiation source. The visual imager itself consists of a sensor, which is a sensor based on a CCD or CIMOS matrix, an analog-to-digital converter and a computer program designed to optimize and store images.
At first glance, the original digital photographs may differ slightly from the usual film ones, and therefore require processing using software options. The highest quality image is the one that is closest in visual perception to analogue, therefore, even despite the highest technical characteristics of the visiograph, the quality of the final image largely depends on the capabilities of the program and the ability of a specialist to work with it.
What is a targeted dental photograph?
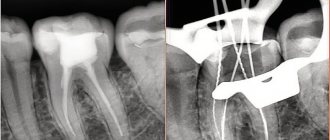
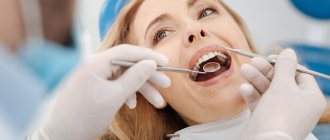
Another name for the procedure is targeted intraoral contact radiography - this is a simple and fast method of X-ray diagnostics in dental practice. Research is carried out in clinics using analog X-ray machines or digital radiovisiographs. The doctor gets the opportunity to examine both the condition of the tooth being examined and those located nearby.
- Carry out diagnostics. For example, detect the development of an inflammatory process.
- Evaluate the results of the therapy. This is necessary not only in the treatment of pulpitis, caries or other dental diseases, but also in preparation for prosthetics.
When using analog X-ray equipment, an image is created on film and then transferred to special paper. A digital device allows you to obtain an electronic photograph. If necessary, any area of the image can be enlarged on the monitor for a more thorough examination.
- Interproximal. Allows you to diagnose pathologies of the crown part of the tooth, detect the presence of carious cavities, as well as defects that can form under fillings and crowns.
- Periapical, allowing to assess the condition of bone tissue. This type of imaging helps monitor the quality of therapy provided.
The radiation dose for a dental x-ray is 2-3 μSv, which is very small. For comparison, with fluorography we receive a radiation dose of 500-800 μSv.
Indications for use
Dental radiography is used for two main purposes: to diagnose and evaluate the quality of treatment performed.
Allows you to detect the following diseases:
- hidden carious lesion;
- pulpitis (inflammation of the neurovascular bundle of the tooth);
- cyst at the roots of the teeth;
- periodontitis (purulent inflammation of the tissue between the root of the tooth and the hole in which it is located);
- gum disease, in which bone tissue atrophies (periodontitis, periodontal disease);
- neoplasm.
Intraoral radiography also helps evaluate the results of procedures such as:
- root canal filling;
- treatment of periodontal diseases.
Pros and cons of the diagnostic method
The use of a dental visiograph has a number of advantages compared to analog X-ray machines. First of all, it is an opportunity to get a clear picture of the tooth and the tissues around it. It is convenient to store the resulting images on a computer or other electronic media, printing them if necessary. A digital image allows a more detailed assessment of the clinical picture, since the image can be enlarged several times. In addition, digital dental radiography is a safe procedure. If necessary, multiple procedures may be performed. For example, during implantation, control images are taken before and after each implant is installed. And also after complete completion of prosthetics. The equipment used is characterized by a reduced level of radiation exposure. The dose of radiation that the body of the person under study receives is so small that it does not cause any harm to health. Most often, it does not exceed the natural background recorded in some megacities. Despite the large number of advantages, this method has disadvantages. For example, the image can be performed only in 1 plane covering a small area of tissue. Therefore, the maximum effectiveness of the method is achieved at the stage of early diagnosis or to control the quality of therapy already carried out.
Intraoral photograph. Classic radiography in dentistry
Film for intraoral films is traditionally cut from sheets of blue-sensitive general purpose X-ray film.
Pieces of film are wrapped in light-proof paper and photographs are taken on them. This rather labor-intensive technology for “manufacturing” intraoral films has taken root with us since ancient times. On the one hand, the domestic industry did not produce sufficiently high-quality intraoral film, on the other hand, there was an opinion that cut film was significantly cheaper than specialized intraoral film. The last statement can be considered fair if we do not take into account a number of circumstances discussed below. The properties of general purpose X-ray film differ significantly from the properties of specialized film for intraoral imaging. General purpose film is intended for use only with so-called intensifying screens. These screens are not essentially amplifying: they act as a converter of X-ray radiation quanta into light. When X-ray radiation passes through the system (film + intensifying screen), the image on the film is formed mainly due to the light radiation of the intensifying screens, since the intrinsic X-ray sensitivity of general-purpose X-ray films ranges from fractions to a few percent of the sensitivity to light generated by the intensifying screen . Therefore, X-ray films for general use are generally photosensitive, but not X-ray sensitive.
When creating new films for general use, the main task has always been to use the existing manufacturing technology with minimal silver deposits to achieve compliance of the properties of these films in the system (film + intensifying screen) with existing standards for sensitivity, maximum optical density and contrast. Older films, such as PM films and the like, used silver halide with a bulk structure. Silver has a maximum sensitivity in the ultraviolet - blue radiation region. Therefore, the intensifying screens were selected such that the maximum of their light radiation coincided with the maximum of the intrinsic light sensitivity of silver halide. Thanks to the selection of the system (film + screen), the X-ray sensitivity can be increased tens and even hundreds of times compared to the film’s own X-ray sensitivity.
Since the volumetric structures of silver halide poorly blocked the light flux, in order to achieve the required optical density, it was necessary to make a film with a relatively large emulsion thickness. Increasing the specific amount of silver for older types of films meant achieving greater contrasts. But at the same time, the film’s own sensitivity to X-ray radiation also increased, since as the thickness of the emulsion increased, the amount of silver halide increased and, as a consequence, the probability of interaction of X-ray quanta with silver atoms increased. This created the prerequisites for the use of old general purpose X-ray films for intraoral imaging.
New general purpose X-ray films feature a new flake-based silver halide emulsion that provides the same, and often better, film performance with significantly less silver deposit. At the same time, the thickness of the emulsion decreases significantly, which leads to a multiple decrease in the intrinsic X-ray sensitivity of new films compared to that of old films. These films, when used without intensifying screens to obtain intraoral images, require radiation doses up to ten times higher than those required for specialized intraoral films. From the above, the conclusion follows: modern X-ray films for general use cannot be used for intraoral radiography due to the very low intrinsic X-ray sensitivity, which leads to large doses of radiation during shooting.
Execution steps
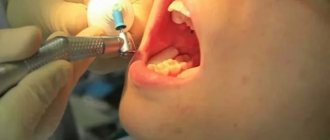
Interproximal radiography is one of the types of intraoral examination that allows you to obtain a picture of 1 section of the oral cavity with an image of the upper and lower dentition. To obtain the image, a special holder is secured between the closed teeth. It allows you to identify interdental caries and various changes in bone tissue due to gum disease. And also check the correct installation of crowns, dentures or fillings. An X-ray of the tooth is taken by a doctor in an office specially equipped for this. Before taking an X-ray of a tooth, the doctor gets acquainted with the problem and studies its location.
To obtain a clear image of the problem area, the patient's head is fixed in the required position. The process of visiography takes a matter of seconds, but during this time the patient is required to remain completely still. The video in this article shows how to take targeted photographs of teeth so that the image is as informative as possible. Using a digital sensor, the radiologist directs a beam of rays to the required area. The photograph is taken either from the inside of the mouth or from the face. During the manipulation, the patient does not feel any pain or discomfort.
The original digital image differs from the traditional film image because it is processed using a special program in a few seconds and transferred to the monitor screen.
Indications for use
Factors that determine recommendations for radiovisiography include:
- Pain in the dental area.
- Routine diagnostics prescribed to detect pathologies.
- The need to identify the degree of bone loss before implantation.
- Identified diseases of gum tissue, including periodontal disease.
- Determination of the severity of mechanical damage received.
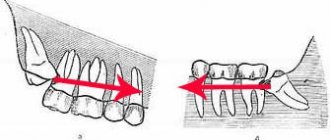
- The need to control the growth of “eights”, or wisdom teeth.
- Checking the quality of root canal cleaning.
The procedure is mandatory before installing prosthetic structures or orthodontic devices, as well as when planning surgical intervention.
Features of the procedure in children
Contact intraoral radiography can be prescribed for children in cases where tooth damage cannot be examined in any other way. The technique allows early detection of disturbances in the process of teething, bone tissue diseases, and prescribing effective treatment. In addition, this method allows you to control the implementation of orthodontic manipulations if the child has problems with the formation of the jaw.
The study is carried out in the same way as in adult patients. Children under 2 years of age are recommended to undergo x-rays only in case of urgent need. For example, in case of injury during childbirth, to monitor the development of the jaw, or after a fall from a height, to assess the integrity of the teeth.
General overview
From a technical point of view, the procedure is an X-ray analysis of the state of one or more adjacent units, characterized by the speed of obtaining complex data and ease of execution. The resulting image allows the dentist to:
- To formulate a correct diagnosis, the formulation of which on the basis of visual examination data alone may be impossible.
- Determine and prescribe an effective course of treatment, as well as control its pace.
- Monitor the intensity of the spread of pathology formed in the oral cavity.
- To study the condition of the structure of bone tissue and root canals, dentin and blood vessels.
- Identify hidden anomalies and pathological processes, determining their localization.
To obtain targeted dental images, digital equipment is used - a radiovisiograph, one of the functional advantages of which is the minimum radiation dose to the patient during the shooting process. The directed beam flow maintains focus, affecting only a selected area of the jaw row, which makes the diagnostic procedure safe for the patient’s health.
Restrictions and contraindications
How often a dental x-ray can be taken can only be determined by a doctor, guided by the severity of the problem and the patient’s condition.
It is forbidden to take dental x-rays during pregnancy, especially in the early stages. A woman needs to take care of the condition of her teeth in advance in order to eliminate the need for treatment while carrying a child. X-rays are contraindicated for children under 2 years of age.
In case of urgent need, an x-ray can be performed, but not earlier than the second trimester. The only exception is when emergency assistance is needed. Manipulation must be carried out using all possible means of protection. The period of breastfeeding is not a limitation for the study.
General information
An X-ray examination that allows you to get a real clinical picture of one or more teeth located nearby. A simple and reliable method for accurate diagnosis, used in most dental clinics.
Problems that can be solved by analyzing a targeted X-ray image:
- making an accurate diagnosis;
- drawing up a treatment plan with monitoring the dynamics of the condition;
- assessment of the degree of development of pathology;
- assessment of the restoration of hard tissues and the condition of the dental canals;
- assessment of the actual condition of blood vessels, soft tissues, rudiments;
- identification of pathologies in a latent course;
- identifying the area affected by caries, as well as identifying the source of inflammation.
Targeted X-rays are done using a digital radiovisiograph, which minimizes the radiation dose. The equipment produces a direct beam beam that directly affects the area being examined. The technique is absolutely safe for health.
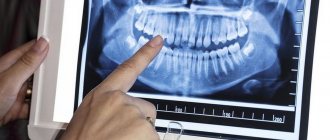
Interpretation of a dental radiograph
Only a dentist or radiologist can decipher and describe a dental image. The image shows the tooth: its root, internal canals, shape, anatomical features.
- Examines the rigidity, density and uniformity of the bone structure. Evaluates the location of each element of the dentition.
- Determines the presence of signs of clearing or darkening, indicating the development of an inflammatory process, cysts, granulomas, neoplasms.
- Depending on what the dental x-ray shows, a diagnosis is made.
Carious formations in the picture look like light areas of various shapes with unclear boundaries. The development of pulpitis is characterized by bone damage. The image shows a violation of its homogeneity in the interroot space. With the development of periodontitis, a granuloma appears in the area of the tooth root in the form of a darkened round shape with clear contours. With periodontitis, the image shows a decrease in the density of the bone structure, a decrease in the height of the partitions between the elements of the dentition, and the formation of “pockets.”
Difficult Questions in Intraoral Photography
E. A. PACHINA
, dentist, private practice, Da Vinci Clinic
So, we already have a SLR camera with a macro lens and a macro flash. Before you start taking photographs, you should understand the camera “menu”.
This is important, as it will allow you to very quickly change the desired parameter if necessary. All dental photography is performed in manual mode, or “M” (manual). In this mode, there are certain settings for each type of shooting that interests the dentist.
Having set the desired settings on the camera and flash, it is recommended to take test photographs. Their analysis allows us to draw conclusions about whether the photographing parameters are correctly selected for this type of shooting. As practice shows, it is enough to calibrate the camera once under certain lighting conditions, and the set values for ISO, shutter speed, aperture size, white balance and flash power will always be relevant, requiring only minor adjustments. The values of these parameters can be saved and in the future you will not waste the doctor’s precious time searching for the best exposure for a particular type of shooting. It is equally important to position the patient correctly in the chair. It is convenient when it is in a horizontal position and the angle of the chair changes depending on the photographing angle. Since this type of shooting is carried out without the use of a tripod, it is very important that the doctor is in a stable position and the camera is not balanced in his hands. To ensure that the proportions of the size of the teeth do not change, it is important to correctly position the lens axis to the photographed plane. The angle at which photographs are taken is very important. If the camera is positioned too low, the resulting image will give the impression of shortened teeth in the frontal region.
If the camera position is too high, the opposite is true. To take mirror photographs, the lens axis is perpendicular to the front of the mirror.
Regarding the choice of flash, it is worth noting that in this section there is a predominant number of SLR photographs. For them, it is recommended to use a ring macrophoto flash, since the light from it goes parallel to the optical axis. This circumstance allows you to remove inaccessible objects deep in the oral cavity. If you are the owner of a segmented macro flash, you need to position the light sources as close as possible to the lens in order to take a mirror photograph.
Accessories will be required for intraoral imaging. They have been written about in detail previously. It is important to remember that the appearance of retractors, mirror edges, assistant’s fingers, nose and reflected teeth is undesirable in the frame. The doctor determines the procedure for photographing teeth independently.
An important part of the photography process is knowing the focal points. To do this, you need to determine a point in the center of the photographed space and focus slightly distal to it. In this case, it will be possible to obtain maximum depth of field.
Before taking photographs, the patient is told in detail about the upcoming actions. Some manipulations may cause discomfort, and therefore it is better if he is warned about this in advance.
Rice. 1. Example of a focus point. The center of the image is indicated in yellow. Green is the focus point.
Rice. 2. Example of a focus point. The center of the image is indicated in yellow. Green is the focus point.
Rice. 3. Example of a focus point. The center of the image is indicated in yellow. Green is the focus point.
PHOTOGRAPHING OF THE FRONTAL GROUP OF TEETH
For this type of shooting, you need to use a retractor to move your lips and cheeks away from your teeth. The soft tissue retractor is held by an assistant or the patient himself. A series of photographs is taken with the teeth fully closed and at different degrees of disocclusion. If necessary, photographs are taken using photocontrast.
“To prevent the appearance of glare in the area of the cutting edge, the camera is slightly tilted towards the neck of the tooth. This causes the highlights to shift to other areas of the tooth, allowing hidden optical characteristics to be visualized” (Aesthetic & Restorative Dentistry: Material Selection & Technique Douglas A. Terry, DDS, Willi Geller, MDT, 2013).
But this camera position can give a false impression of the shape of the teeth, so such photographs can only be used to analyze the internal effects of the tooth.
Rice. 4. Photographing the frontal group of teeth in full closure.
Rice. 5. Scheme of photographing the frontal group of teeth in full closure.
Rice. 6. Photographing the frontal group of teeth using photocontrast.
Rice. 7. Scheme of photographing the frontal group of teeth using photocontrast.
Rice. 8. Camera position to prevent glare in the incisal area.
SHOOTING THE FRONTAL TEETH AT AN ANGLE OF 45 AND 90 DEGREES
This type of shooting involves the use of soft tissue retractors and photocontrasts for the lateral groups of teeth. Lip retractors are fixed in the oral cavity, on the side opposite to the camera, a photocontrast is placed. If it is impossible to position two soft tissue retractors in the patient’s mouth, proceed as follows. A retractor is placed on one side, and on the other, retraction is carried out with a photocontrast made of hard material. When photographing, the camera is positioned at an angle of 45 or 90 degrees relative to the sagittal plane.
Rice. 9. Photographing the frontal group of teeth using photocontrast at an angle of 45 degrees.
Rice. 10. Scheme of photographing the frontal group of teeth using photocontrast at an angle of 45 degrees.
OCCLUSAL IMAGES OF THE MAXILLA
For this type of shooting, an occlusion mirror and a photocontrast are required. They are selected individually according to the size of the patient’s dentition. The contraster must be made of a rigid material so that the curved edge can easily move the lip and cheeks away from the alveolar process and teeth.
This prevents soft tissue, nose and whiskers from being included in the frame. The mirror is positioned in such a way that the entire row of teeth is reflected. If the doctor does not have the required size of mirror in his arsenal, photographs can be taken in segments, and the images can later be compared. The patient is instructed to breathe through the nose to avoid fogging of the mirror surface. By slightly changing the position of the mirror and its angle, we can obtain photographs of the occlusal surface of the incisal edge of the frontal group of teeth and their palatal surface.
Rice. 11. Photographing the occlusal surface of the teeth of the upper jaw.
Rice. 12. Scheme of recording the occlusal surface of the teeth of the upper jaw.
Rice. 13. Photographing the occlusal surface of the cutting edge of the frontal group of teeth.
Rice. 14. Scheme of recording the occlusal surface of the cutting edge of the frontal group of teeth.
OCCLUSAL IMAGES OF THE LOWER JAW
Using labial retractors, soft tissues are moved away from the teeth and alveolar process. An occlusal mirror of the required size is positioned in the mouth so that the tongue is pressed to the floor of the oral cavity or pushed backward by it as a retractor. Fogging of the reflective surface can be prevented if the assistant warms the mirror in advance or periodically directs air from the gun onto its surface. By slightly changing the position of the mirror, we can obtain additional photographs of the occlusal surface of the cutting edge of the incisors and canines, as well as their lingual surface.
Rice. 17. Photographing the occlusal surface of the lower jaw teeth.
Rice. 18. Photographing the occlusal surface of the lower jaw teeth.
SAGGITAL FIGURE. VIEW FROM THE OCCLUSAL SURFACE
To obtain this image, soft tissue retraction is performed. The occlusal mirror has a semilunar notch on one of the lateral faces. It is with this notch that we turn the mirror to the alveolar process of the lower jaw. By changing the angle of the mirror, we achieve the desired reflection in it.
Rice. 19. Sagittal fissure. View from the occlusal surface.
Rice. 20. Scheme of shooting the sagittal fissure. View from the occlusal surface.
SHOOTING THE LATERAL GROUPS OF TEETH. BUCHAL SURFACE
The lip retractor is placed in the oral cavity, on the side opposite the camera - a special narrow mirror designed for photographing the lateral groups of teeth. Consequently, on the one hand, retraction is performed with a labial retractor, on the other hand, with a mirror. The mirror is positioned in such a way that the elements of the dental system of interest to the doctor are reflected. Of all types of imaging, this is the most unpleasant for the patient, since the edges of the mirror can injure the mucous membrane of the cheek or alveolar process. As practice shows, patients feel less discomfort if they hold the mirror themselves and independently control the force of retraction.
As mentioned in the previous article, this type of photography is quite complex. And it is not always possible to capture the distal and frontal sections of the lateral projection in one image. In this case, this type of shooting can be carried out in two stages. First: filming a segment that includes several teeth, molars and premolars. Second: shooting the segment that includes the frontal section.
Rice. 21. Photographing the buccal surface of the lateral groups of teeth.
Rice. 22. Scheme of recording the buccal surface of the lateral groups of teeth.
SHOOTING THE LATERAL GROUPS OF TEETH. LINGUAL AND PALATAL SURFACE
Soft tissue retraction is performed first. A special mirror helps take pictures of the lingual and palatal surfaces of the teeth. It has a notch on the side edge, which simplifies the positioning of the mirror in the oral cavity.
Rice. 23. Photographing the lingual surface of the lateral groups of teeth.
Rice. 24. Photographing the lingual surface of the lateral groups of teeth.
Table 1. Recommended DSLR camera settings.
INTRAORAL PHOTOGRAPHY | SMILE, MINI AESTHETICS | PORTRAIT | SUBJECT PHOTOGRAPHY | |
| ISO | 100-400 | 100-400 | 100-400 | 100-400 |
| diaphragm | 22-32 | about 16 | about 8 | 8-22 |
| shutter speed/speed | 200 | 200 | 200 | 200 |
| photoflash | 1/4 | ½-1/4 | 1/1 | 1/1-1/4 |
| focusing | "M" mode (manual) | |||
| shooting mode | "M" mode (manual) | |||
| flash control | "M" mode (manual) | |||
| white balance | Kelvin "K" 5560 or manual setting | |||
| image format | in everyday practice jpg, in “special” cases RAW | |||
| image size | Large "L" | |||
Where can I take a photo and how much does it cost?
Targeted radiography can be performed in any specialized medical institution. The average cost of the procedure is about 400-450 rubles. Some clinics include in the cost of conducting several studies at once, which involve monitoring the treatment being carried out.
All categories of patients, both adults and children, can take a targeted photograph of a tooth. The procedure is prescribed with caution to pregnant women and infants under 2 years of age.
A referral for a radiovisiographic image is given by a dentist. The resulting image makes it possible to determine the presence of a problem, confirm or refute the diagnosis, and prescribe treatment. To monitor the patient’s condition during treatment, the doctor may recommend taking a second photo of the tooth.
Indications
Radiophysiography is prescribed to patients with the following symptoms:
- toothache;
- carious lesions;
- cystic formations in the root of the tooth;
- pulpitis;
- periodontitis;
- bone tissue deficiency;
- atrophy and tooth destruction;
- pathologies of soft tissues of the oral cavity;
- tooth damage due to trauma;
- malocclusion.
The image is prescribed before the installation of removable and fixed dentures, braces, plates, implants, as well as before surgery.