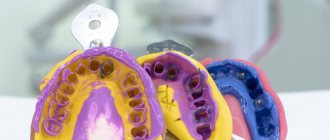
Silicone impression material and mechanical manual mixing gun
An impression tray with perforations is coated with a thin layer of special adhesive. To carry out the manipulation you need: 1) a set of tools (mirror, tweezers, angled probe, smoothers of different sizes, a special shaped knife); 2) means for retraction (knitted rings or cotton threads).
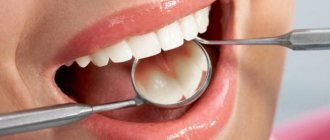
Double impression technique.
As a rule, this procedure is carried out in two stages.
In the first of them, a basic dense paste (Ortosil, Zetaplus, ZM Express, Bisico, Speedex) mixed with a catalyst is applied to a release tray lubricated with adhesive and an impression is taken. At the same time, in order to create space for the corrective paste, the procedure is carried out before preparing the teeth, without removing the provisional (temporary) crowns or by first covering the impression material with a strip of thin polyethylene film. In this case, there will be some space for the clarifying (correcting) layer, which will facilitate obtaining a more accurate impression without excessive pressure on its individual areas.
Filling the tray with the main impression material (explanations in the text)
Preliminary impression of the upper jaw
After preparation, a pharmacomechanical expansion of the gingival groove (pocket) of the supporting teeth is carried out, a linen or cotton thread or a knitted ring is introduced there, pre-impregnated or ex tempore with solutions of a vasoconstrictor and an astringent.
Insertion of a retraction thread into the gingival grooves of prepared teeth: a - beginning; b- end of the procedure
Hollow cotton cylinders are used to dry (including stop bleeding from the gingival sulcus) the hard tissues of the tooth and fix the retraction thread when taking double impressions After inserting the retraction cord into the gingival sulcus, a cotton cylinder is placed into the prepared tooth. The dentition is then fused to provide a clean, dry, and open gingival sulcus. The cotton cylinder and retraction thread are removed immediately before taking the corrective impression. The first layer of the impression personalizes the standard tray with which it was produced. A layer of paste is cut off on it at the top of the roof of the palate and along the edges of the impression for its free reintroduction into the oral cavity. In addition, the interdental septa are removed to prevent compression of the interdental papillae. Finally, the outlet grooves are engraved from the tooth impressions to the top of the palatine vault, radially, to prevent elastic deformation of the impression.
Preparation of the first layer of double impression for applying the corrective mass
Then the first layer of the print is dried and filled with a low-viscosity clarifying paste (Xantopren, Oranwash, Thixoflex, Bisico, etc.).
Application of a low-viscosity corrective impression mass to obtain a clarifying impression
The threads are removed from the pockets, and the pockets themselves are dried with a stream of warm air. They can be filled with corrective paste using a special syringe with a curved cannula.
Filling gum pockets with corrective paste using a syringe with a curved cannula
You can take an impression without using a syringe by filling the impression with clarifying paste and reintroducing it into the oral cavity. After the corrective paste has hardened, the impression is removed from the patient’s mouth.
Double impression after removal from the patient's mouth
Implantology is one of the most promising areas of development of modern dentistry. Prosthetics using dental implants is the most functionally and aesthetically effective method of replacing dentition defects [8]. The introduction of dental implants into clinical practice as supporting elements of orthopedic structures can reduce the use of removable dentures or significantly improve their fixation in the oral cavity [38].
The absence of internal stresses and the precision of the structures on the abutments of osseointegrated implants are 2 of the most important factors in ensuring the longevity of fixed implant-supported prostheses. Fulfillment of these conditions allows not only to guarantee the passive fit of the structure, but also to prevent the formation of microgaps between its internal surface and the abutments of the supporting implants [36]. The presence of such gaps leads to the fact that, under the influence of functional loads, the prosthesis begins to perform oscillatory movements with a gradually increasing amplitude, which can ultimately lead to breakage of the fixing screws. Without an accurate impression, it is almost impossible to achieve precision quality of an orthopedic design [26, 57]. Increased requirements for the accuracy of fit of implant-supported prostheses are due to the fact that, unlike natural teeth, there is no periodontal ligament around osseointegrated implants and therefore they have practically “zero” physiological mobility [59].
The challenge of taking impressions to make implant prostheses is to find technologies that can reproduce the soft tissue around the implants along with a three-dimensional image of the implant itself. It is necessary that the structure of the working model reflects as accurately as possible all the individual features of the current clinical situation and conveys as accurately as possible the positions of the laboratory analogue of the implant corresponding to the position of the implant in the patient’s jaw, eliminating the possibility of medical error at this stage of manufacturing dentures [5]. Only a high-precision impression makes it possible to obtain plaster models that have minimal dimensional errors and make it possible to produce a high-quality denture [40].
One of the important aspects when taking impressions on implants is also a clear display of the mucous membrane of the perigingival part (in the marginal gingiva area) [7, 63]. To obtain a highly aesthetic orthopedic design for implant-supported prosthetics, the connection of the crown with the superstructure must be located submarginally, within the free gum [30].
Currently, methods of immediate implantation after tooth extraction have emerged, in which there is a need to obtain an accurate impression immediately after the operation of implant installation [38]. Impression materials must be bioinert to exclude pathological changes; they must have specific properties, the most important of which are sterility and lack of cytotoxicity. In such cases, when choosing an impression material and a method of taking an impression, the goal of this stage of prosthetics should be taken into account - to achieve maximum accuracy and reduce time costs [45].
When taking impressions of prepared teeth and implants at the same time, new challenges arise. The precision of the impression is expressed primarily in the accurate and detailed representation of the finest structures in the area of the periodontal sulcus [12]. In order to correctly produce the edge of the crown, it is necessary to obtain a clear image of this area on the impression [2, 3, 10].
To obtain impressions for implant-supported prosthetics, the most widely used impression materials are from the group of anhydrous elastomers—polyester and A-silicone [9, 25, 26, 43, 47, 49, 65, 66]. The great practical importance of viscosity for impression materials explains the principle of their classification. According to ISO 4823:1992 they are classified into materials of high, medium and low viscosity. The revised ADA specification No. 19 added a very high-viscosity type [22].
Polyester materials perfectly reflect the relief of the tissues of the prosthetic bed. Their main advantage is their pronounced hydrophilicity, which is important, since it is not always possible to achieve dryness of the reproduced surface [1, 29]. Polyesters exhibit very little linear shrinkage, since the polymerization reaction occurs as a polyaddition, i.e. without releasing any by-products. Superior to A-silicones and C-silicones in terms of volume recovery after deformation (99.6%), polyester materials can be successfully used even in the presence of significant undercuts without the need for additional blocking of the latter [27, 55]. However, the impression is quite rigid and difficult to remove from the oral cavity [13].
Currently, new automatic mixing systems are used to mix the main and catalytic masses to prevent the formation of bubbles. At the same time, mixing time is significantly reduced: about 30 s is required to fill a medium-sized impression tray [17].
During disinfection, polyesters actively absorb moisture, and during storage they adsorb it, so prints change their dimensional accuracy. To avoid deformation of impressions, they must be stored dry [22, 56]. It should be borne in mind that catalyst paste can sometimes cause an allergic reaction [51]. M. Ree (2001) described a case of inflammation of the marginal gingiva caused by a fragment of polyester material stuck in the gingival sulcus [62].
Many authors have determined the cytotoxicity of polyester impression materials [44, 64, 70]. It is emphasized that, despite significant toxicity, the influence of the impression material in the clinic is small, its contact with oral tissues is very brief, and toxic molecules cannot easily penetrate the barrier membranes of the mucous membrane during hardening when taking an impression.
In implant-supported prosthetics, A-silicone impression materials are also widely used, which have a combination of qualities that best meet all the requirements for impression materials [15]. Numerous clinical data indicate the high quality of models obtained from impressions from these materials [32, 61]. Additive silicones offer the highest quality of detail reproduction due to a well-balanced combination of fluidity and structural viscosity. In addition, they are dimensionally stable, since the polymerization reaction occurs without the release of by-products, which causes minimal shrinkage of the material [26].
A-silicones are tasteless and odorless, have sufficient tensile strength and elasticity, are characterized by optimal compatibility with the skin and mucous membrane of the oral cavity, which makes them well tolerated by patients, restore volume after deformation when removed from the oral cavity by 99.84% , thixotropic, pressure-resistant, and have good layer-by-layer bonding [28, 34, 35]. A-silicones are hydrophobic, therefore, to impart hydrophilic properties to them, polyester components or surfactants are additionally introduced [54].
Among the disadvantages of A-silicone impression materials are: the negative effect of latex gloves on the speed and quality of polymerization, poor adhesion to the impression tray (this problem is solved by applying a special adhesive composition (adhesive) to the impression tray). Hydrogen peroxide, anesthetics, and retraction solutions inactivate the catalyst; it is necessary to work in a thoroughly washed and dried oral cavity [25, 32].
There are various options for classifying impressions according to the method of their production, proposed by domestic [5, 6, 32] and foreign scientists [49]. One of the latest classifications proposed by A.N. Ryakhovsky (2002), takes into account the stages of obtaining the print and the number of layers that make up the print. According to this classification, among modern methods of obtaining an impression using elastic materials, one-stage and two-stage methods are distinguished. In a one-stage impression taking, a tray with impression material is applied once and after removing it from the oral cavity, the impression is sent to the laboratory. In the two-stage method, the impression is taken one by one: first with the base mass, and then, after structuring it to clarify the details of the prosthetic bed, the resulting impression is reapplied, adding corrective material. In implant-supported prosthetics, a one-stage (single-layer or two-layer) method is mainly used [11].
The single-phase impression technique is the most common. For one-stage monophase impression, the materials belong to the group of medium- and viscous-flow, the authors give preference to polyester mass [27]. This method reduces material consumption and reduces time spent at the stage of obtaining an impression. However, such an impression will not provide a clear image of the subgingival part of the prosthetic bed, since there is no dynamic movement of the impression mass under the gum, which deteriorates the quality of the impression during simultaneous prosthetics on implants and natural teeth. In such cases, it is necessary to individualize the impression tray as much as possible [12]. The best result is observed when adding a mass of material into a tray, and additionally from a syringe directly into the periodontal groove [21].
The “sandwich technique” of taking impressions from installed transfers is not much different from a similar technique in classical orthopedic treatment. The work must be done “with 4 hands”. With a one-stage, two-layer impression, no elastic deformation of the base layer occurs. In the case of closely spaced transfers, as well as when visible undercuts are detected between the transfers and the gingival margin, it is necessary to cover the transfer with a corrective layer and fill the undercuts in excess to prevent the accumulation of air bubbles that prevent the penetration of the base layer [33]. To take two-layer impressions, impression materials having several degrees of viscosity are used. Of particular importance is the balance of material characteristics for the first and second layers [1].
The shape and size of the impression tray are determined by the shape of the jaw, the width of the dentition, the topography of the defect, the height of the crowns of the remaining teeth, and the severity of the edentulous alveolar process. A well-selected tray makes it easier to obtain an impression, and the more complex the conditions for obtaining it, the more carefully the tray should be selected [24, 53].
There are standard and individual impression trays. Using a standard impression tray, the impression is taken with base and corrective layers of silicone or polyester materials using the standard “sandwich impression” technique. An example of a standard tray is the Wintray, which has segments in the occlusion area corresponding to the location of the implant, which can be removed by unscrewing the fastening bolt. This tray cannot be used if the angle of inclination of the implant is greatly increased.
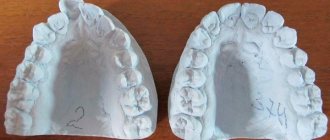
In most cases, in implant-supported prosthetics, a custom impression tray is used [4]. An individual impression tray differs from a standard one in that it makes it possible to obtain a uniform impression material thickness, taking into account the structural features of the patient’s oral tissues. The uniformity of the thickness of the print, in turn, guarantees against noticeable distortions and reduces material costs, and also gives a more accurate print that matches the original [39]. It has been established that impressions obtained using individual impression trays are more accurate compared to impressions using standard trays [16, 18, 58, 69].
Individual trays are made in the mouth or in a dental laboratory from plastic using various methods: manual molding, pressing, casting, light-curing, vacuum-temperature stamping. Materials for the manufacture of individual spoons can be metal (steel, aluminum), self-hardening plastic, hot-curing plastic, light-curing plastic, wax, thermoplastic plastic [13, 32].
The most widely used are individual trays made of self-hardening plastic, manufactured in a dental laboratory according to a model obtained using a preliminary impression taken with a standard impression tray (free molding method on a plaster model) [8]. However, this method cannot be considered promising, since significant deformations are observed that distort the surface macrorelief; the edges of the spoons very often move away from the boundaries in the region of the transition fold [20]. In this case, the inaccuracy is compensated for relatively effectively by impression compounds. Light-curing (or photo-curing) wafer-shaped resins that follow the shape of the upper or lower dentition for impression trays are an excellent alternative to self-curing materials because the impression tray can be fully formed from these materials before curing with ultraviolet light. The disadvantages of such an individual spoon during the period of its fitting include: increased hardness associated with the structural characteristics of light-polymerizing materials; the fact that when grinding the edges of the spoon, a significant amount of fine dusty mass is formed, which makes it difficult to fit the spoon; the need for ultraviolet light curing equipment, an ultraviolet light chamber; higher cost of photocurable material [20, 23].
The thickness of the impression material, which is established using a layer of wax, must be uniform. Gordon (1990) et al. suggested an impression material thickness of 3 mm [50], Smith et al. (1999) - 1.5 mm [68], Castellani et al. (1997) - 1.5-2 mm [42]. Ortensi (2000) suggests that this thickness should be 3–4 mm [60]. Tjan et al. (1997) believe that the thickness of the material does not affect the accuracy of the impression [71]. R. Marchkors (2006) states: in order to avoid plastic deformation, the thickness of the impression material should be 4 times the depth of the undercut [57].
In the clinic, taking impressions for implant prosthetics is a complex process that includes a number of subjective variations of the technique, taking into account the characteristics of each clinical case [73].
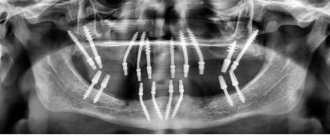
These features include: variants of the anatomical structure; number and location of implants; implant divergence; numerous elements of implant designs; accuracy of impression materials and process hardware. Today there are more than 500 implantation systems in the world, and each of them has its own distinctive features and characteristics. Depending on the type of implantation system, impression taking technologies may vary. A special device for transferring the spatial position of the implant to the model is an impression transfer. It usually consists of 2 parts: the actual impression part and the screw. Sometimes radiographic control is necessary to confirm that the transfer has been properly seated [15]. Phillips et al. (1994) believe that giving the impression coping a rectangular shape allows a statistically significant reduction in the amount of dimensional deviation and distortion, which are higher with conical copings.
There are 3 standard methods for obtaining impressions used in dentistry [40]:
- prepared abutment; an impression of the abutment(s) is taken directly in the patient's mouth, in the same way as when taking impressions for traditional fixed prosthetics; impressions of the prepared abutment are always obtained using a closed tray [31];
— an impression at the implant level is obtained using a special carrier (transfer), which is fixed directly to the implant; such a transfer allows you to convey the location and inclination of the implant;
— an impression at the abutment level, which is used for the subsequent manufacture of a screw-retained structure; special transfers are installed on abutments pre-fixed to the implants; This impression allows you to display the location and inclination of the screw-retained abutments.
Impressions taken at both the abutment and implant levels can be made using one of the following techniques: closed tray, i.e. indirect method; transfer method, or open spoon, i.e. direct method or capture method.
Indirect transfer transfer method. This technology is used mainly for prosthetics on single implants, but can also be used for the manufacture of an individual open impression tray and for the manufacture of temporary dentures [59]. When taking an impression with a closed tray, the indirect transfer remains in the oral cavity after removing the impression from the oral cavity. The transfer is then removed and connected to the implant replica and carefully placed into the appropriate hole in the impression. At the same time, resistance is felt and a click is heard, which indicates a correct fit; there should be no mismatch [31]. Additional transfer of the transfer from the oral cavity to the finished impression causes errors. If it is difficult to remove the impression tray with the impression material from the oral cavity, the true position of the impression coping may be disrupted, and errors may occur as a result of tilting, rotation and displacement along the axis of the impression copings [4, 46]. The greater the residual deformation of the impression material, the less retention of the indirect impression coping and the more its position in the impression changes [59]. Vigolo et al. (2003) suggest sandblasting the surface of the cap and then applying an adhesive for impression material to its surface, which will eliminate distortion as a result of possible rotational movements [72].
The direct method of transfer transfer is used for prosthetics on 1 or several implants. Taking impressions with an open impression tray is the most common technique. Almost all implantation systems have a system of direct impression transfers from the implant or its abutment [33]. The method allows both to register the location of the implants and to display the contour of the soft tissues. When using an open tray, the transfer remains in the impression after the latter is removed from the oral cavity [14]. To obtain an impression using this method, it is necessary to make an individual impression tray or modify the standard one so that there are holes in the projection of the implants for unhindered insertion of screws. The transfer should not come into contact with the edge of the spoon and interfere with its free movement. Therefore, the perforation hole must be formed with an excess of 5 mm for each installed transfer. In case of multiple implants, it is better to make 1 window for all transfers [31]. The outside of the window should be covered with soft wax to prevent leakage of the impression material when filling the tray [40].
The screws that secure the open tray transfers during the impression making stage are removed through the holes in the tray after the material has hardened. Then the impression is removed from the oral cavity along with the transfers located in it. After this, analogues of the implants are attached to the transfers located in the impression and a working model is cast from plaster, the location of the analogues in which completely corresponds to the position of the implants in the patient’s oral cavity.
When implants have divergence, the use of a closed tray technique is practically impossible; The open tray method allows the impression to be removed from the oral cavity along with transfers, which eliminates deformation and damage to the impression material [11, 47, 59]. However, this technology of taking an impression is more labor-intensive and requires more attention from the dentist.
The direct method gives the best results, although its use is not always possible. In restless patients or patients with a tendency to bleed, it is better to first evaluate the possibility of using the direct method of taking an impression, since it requires keeping the impression tray in the mouth longer [40].
When there are 2 or more implants, the main task is to ensure immobility of the impression copings, which is achieved by connecting them [28]. A piece of wire, floss, or retraction thread can be used as a frame between transfers. The transfers are then splinted with self-hardening plastic. If there is a large distance between the implants, the dental technician can prepare the plastic on transfers using a pre-cast model, after which the plastic is sawed, and the model with splinted transfers is sent to take an impression. This avoids distortions that occur during plastic polymerization [48]. There is evidence that patients are able to feel the effect of shrinkage pressure during acrylic bonding of transfer copings inside the mouth [41].
C. Hsu et al. (1993) compared the accuracy of implant placement between transfer impression techniques using plastic splints, ordontic wires and without splinting when using polyester impression materials [52]. No difference was found between the listed techniques, so it was assumed that the use of splinting is not necessary. D. Assif et al. (1996) believe that with splinting the results are better than without it [37].
It will probably be possible in the future to scan oral tissues using an optical, mechanical or laser reader to obtain data necessary for prosthetics, but at present the use of impression materials remains a necessary step in prosthetics [67].
In connection with the increasing requirements for the aesthetics and functionality of dentures, the attitude towards impressions moves to a qualitatively different level [19].
An analysis of literature data suggests that taking an impression during implant-supported prosthetics is a pressing, but not fully understood, problem.
An algorithm for selecting an impression material and a technique for making impressions taking into account a specific clinical situation has not yet been developed.
Further work in this direction should be aimed at creating a unified approach to the selection of material and the method of obtaining an impression for implant-supported prosthetics, which would allow the doctor to apply the optimal option for orthopedic treatment.
There is a one-step method for obtaining a double impression (sandwich method).
At the same time, having filled the spoon with the main paste, the doctor makes indentations in it, in the area of the projection of the supporting teeth. A corrective infusion is injected there. It is applied from a syringe to the prepared teeth. After this, a spoon with two pastes is inserted into the oral cavity to take an impression. With a one-step method of obtaining a double impression, it is preferable to use silicone materials with a polymerization type of vulcanization, which ensures a more accurate dosage of their components (group A-silicones, for example President, Contrast, ZM Express Bisico). Modern silicone materials, a day after receiving an impression, have small volumetric changes - 0.14-0.60%, residual deformation - 0.2-0.5%, relative compression - 1.3-2.5%, reproduction of parts - 22 µm, fluidity - 0-0.1%. The shrinkage of silicone impression material is small, but the model must be cast within the first hours after taking the impression. To disinfect silicone impressions, solutions of various substances are used: hydrogen peroxide, sodium hypochlorite, glutaraldehyde, deoxane. A double impression is considered suitable if the relief of the prosthetic bed is accurately imprinted (including the contours of the gingival margin, interdental spaces, the stumps of prepared teeth, the area of the ledge) and there are no pores or smears of the relief with mucus on its surface. The basis for re-taking an impression is the following defects: • smearing of the relief due to the quality of the material (bracing) or the ingress of oral fluid or blood; • discrepancy between the impression and the future dimensions of the prosthetic bed; • lack of clear design of the edges of the print, presence of pores.
Source: Orthopedic treatment using metal-ceramic dentures. Ed. V.N. Trezubova 2007
Related materials:
- Gum retraction methods
- Preparing teeth for metal-ceramic crowns
- Preparing a patient for prosthetics with metal-ceramic prostheses
- Indications and contraindications for prosthetics with metal-ceramic prostheses
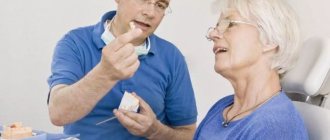
Why is it important to have a professional create your impression and model?
A well-made prosthesis is the key to your health. This is why it is important to make the correct impression and model. The success of prosthetics depends on the level of professionalism of the specialist. What are the responsibilities of a dental technician? He manufactures and repairs prosthetics, orthodontic and maxillofacial devices, and implants. Among this, we highlight other works performed by a specialist:
- makes a tooth model based on a cast made by an orthodontist;
- selects the material and decides what the design of the prosthesis will be;
- carries out modeling;
- makes a tooth model;
- creates devices of removable and non-removable types;
- manufactures maxillofacial and orthodontic appliances;
- does finishing and repairs of dentures.
As you can see, the list of works includes a lot. And experienced specialists cope with this easily and simply, applying their knowledge, skills and abilities in practice.