Composition and application of microprosthesis
Compound
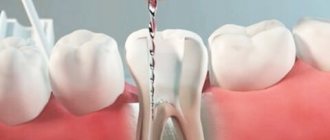
The prosthetic structure consists of a pin part that completely follows the shape of the root canal, and a stump that imitates the crown being restored. Most often, stump inlays are made from various metal alloys through precision casting. However, zirconium or aluminum oxide can also be used to produce prostheses.
Application
Standard cast pins are used to create tooth stumps with pronounced destruction of their supragingival part and the presence of healthy, strong roots. In this case, the tab is tightly fixed in the root canal so that its stump part protrudes above the gum. The stump can be used as a support for crowns, splinting structures, removable and fixed dentures.
In modern dental practice, collapsible and non-removable stump inlays are used.
Non-removable structures are used to restore teeth with one root, and collapsible ones are used to create tooth stumps with two or more roots.
Anchor pins for tooth restoration
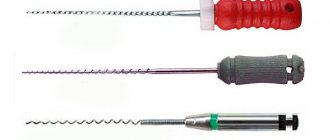
Anchor pins are often used to restore pulpless teeth. Anchor pins are metal pins that are fixed into a canal to build a tooth stump for a future crown or direct restoration.
They are threaded and fixed into the root canal using special cement. At one time they were very widely used in dentistry. However, they soon began to be abandoned, and we tried to figure out why.
Positive and negative properties of anchor pins
If we talk about the advantages of using anchor pins for restoration, they include:
- strength - such pins do not break
- affordable price
- speed and ease of use
What's wrong then? Let's look at all the shortcomings:
- low connection - there is no chemical connection between the intra-root and coronal parts, so they can easily separate
- poor aesthetics, especially if the work is done on the front teeth
- high risk of root fracture, since when installing an anchor pin, tension occurs inside the tooth root, which leads to a wedging effect, plus necrosis of the tissue around the tooth root, which leads to tooth extraction
The speed of installation of the anchor pin also plays an unpleasant role here. Fast does not mean easy. After all, each anchor pin system has its own installation rules and special auxiliary tools, which, unfortunately, are often neglected.
Indications and contraindications for the installation of stump inlays
Indications for installation
Restoring teeth with core inlays is possible only if there is firm confidence in the reliability of the root and in the absence of any pathological processes in the periodontal tissues. The length of the root canal into which the cast post is installed must be greater than the height of the artificial crown, and the walls of the tooth must be thick enough to withstand the chewing load.
Contraindications for use
The main contraindications to prosthetics with stump inlays are:
- obstruction of the root canal or its curvature;
- pronounced changes in periodontal tissues in the absence of the ability to block the development of the pathological process;
- improper root length or tooth wall thickness;
- pathological mobility of teeth;
- incomplete filling of root canals.
Let's sum it up
When a carious lesion occurs, it is important to understand why dental inlays are needed, why they are better than a composite filling, and when they are contraindicated. It is important to understand that installing such structures is not always advisable and in some cases can lead to complications, which are much more difficult to get rid of than preparing a cavity and pouring filling material into it or installing a microprosthesis on cement.
Before starting treatment, you need to choose a good doctor who will prescribe diagnostic procedures, carefully study the research results and give recommendations during the recovery period. Although almost the entire process is automated, the participation of a professional orthopedist is the key to quality therapy without unpleasant consequences.
Specialists provide a full range of dental and orthopedic services, advise patients and offer optimal solutions to problems. Sign up for a consultation by phone or leave a request on our website, and we will contact you as soon as possible.
Stages of manufacturing and installation of cast pins
Prosthetics with core inlays involves a number of clinical and dental measures. In particular, the main steps in the manufacture and installation of cast pins are:
- preparing a damaged tooth for installation of a stump inlay (unsealing the root canals by 2/3 of their length, preparing the tooth aimed at eliminating possible undercuts);
- taking a two-layer silicone impression from both jaws;
- covering the prepared tooth with a temporary filling (crown);
- transfer of the silicone impression to the dental department;
- making a plaster model based on the cast made;
- modeling a cast wax pin;
- casting of the prosthetic structure in the dental department;
- transfer of the finished cast pin from the dental laboratory to the dentist;
- fitting and fitting of the prosthesis;
- final installation of the core inlay and its fixation using dental cement (glass ionomer is most often used) or dual-curing composite.
- After fixing the cast pin, a suitable crown or prosthetic structure is installed on the stump.
Application of tabs in reconstructive surgery? dentistry
- An inlay is understood as a prosthesis designed to restore the anatomical shape and replace hard tissue defects
Indications for use of tabs
:
- Defects in dental crowns of various origins that cannot be replaced by filling
- Counter inlays on the side teeth prevent increased abrasion, being a means of its prevention
- With small included defects in the dentition, the inlays can play the role of supporting elements of the bridge.
- Splinting teeth for periodontitis using inlay (beam) splints
Contraindications to the use of tabs :
- Very deep and poorly accessible cavities submerged under the gum
- Defects in teeth with low and flattened crowns
Main advantages of tabs :
- The inlay manufacturing technique eliminates the possibility of incorrect cavity formation
- Pre-fitting makes it possible to create an inlay without overhanging edges, maintaining the sphericity of the proximal wall and correct interdental contact
- When making a metal inlay, creating a rebate along the edge of the cavity and covering it with the cast part of the inlay protects the border enamel prisms from breaking off and eliminates the possibility of secondary caries.
- Possibility of polishing all external surfaces, including proximal ones, before cementation
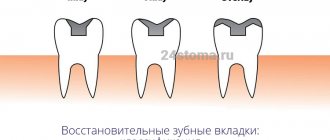
Classification of inlays by position in the tooth :
- Inlay - a box-shaped shape located inside the tooth that accurately follows its anatomical shape and occlusal surface
- Onlay - with fold outwards
- Overlay - one wall of the tooth is saved, the rest is from the tab
- Pinlay - an inlay with additional cavities or pin inclusions for fixation
By material
:
- Metal (gold, cobalt-chrome alloy, silver-palladium alloy)
- Plastic
- Ceramic (IPS system = Empress, Cerec, E-max)
- Combined (metal + plastic, metal + ceramics)
- From zirconium oxide
By manufacturing method :
- Direct method
- Indirect method
General principles for forming cavities for inlays
- The cavity is given the most appropriate shape, such that the tab can be removed unhindered
- When forming a cavity to prevent recurrence of caries, expansion
- The bottom and walls of the cavity must be resistant to chewing pressure
- When forming a complex cavity that covers several surfaces, you should create points
- The cavity must have sufficient depth, sink into the dentin and not shift under chewing pressure
- The cavity should be asymmetrical or have additional recesses that serve as a guide when inserting the tab
- Prevention of chipping of thinned enamel edges is carried out by creating a bevel along the edge of the cavity or cast chewing surface
Indications for use of onlay tabs
:
- Carious cavities of class 1 according to Black
- Large defects of dental tissues in premolars and molars
- Restoration of bumps
- Preventive restoration of cusps
Clinical manufacturing steps
- Patient examination
- Anesthesia
- Preparing a cavity for an inlay
- Coating the inner surface with insulating varnish
- Taking a two-layer impression
- Closing the cavity with a temporary bandage
- Fitting the tab in the oral cavity
- Etching the enamel edge of the cavity during 45 sec.
- Fixing the inlay in the tooth cavity using Dual-cement
- Final polishing of the edge of the inlay
Technical stages of production
- Making two working models from supergypsum and regular gypsum and auxiliary models
- Treatment of a working model made of ordinary plaster with a separating liquid
- Modeling a composite inlay
- Polymerization of the inlay on the plaster model in the apparatus
- Polishing the outer surface of the inlay and sandblasting its inner surface
- Processing the inlay on a working model made of super plaster with control of occlusal contacts in the articulator
Application of ceramic inlays
:
- Cerec system
- Empress ceramics
- Fiberglass ceramics
Classification of dental ceramics
:
- Conventional slip ceramics (increased content of crystalline phase)
- Casting ceramics (mica-based glass ceramics)
- Ceramics obtained by mechanical processing using a computer program (ceramics, zirconium oxide CAD/CAM)
- Pressable ceramics (feldspathic ceramics reinforced with leucite)
- Glass-saturated ceramics
Long-term results of orthopedic treatment with ceramic inlays
Efficiency over a 6-year service life:
- Conventional slip ceramics - 92%
- Casting ceramics - 90%
- Ceramics obtained by mechanical processing using a computer program (CAD/CAM) - 91-100%
- Pressed ceramics - 94%
Stages of making ceramic inlays
Clinical stages .
1st stage:
- Determination of shade using shades before tooth preparation
- Anesthesia and cavity preparation for an inlay
- Applying a pulp isolation pad
- Obtaining a two-layer print
2nd stage:
- Fitting in the oral cavity, preparing the cavity for fixation
- Preparing the tab for fixation, fixing the tab
- Final processing, finishing, polishing of the inlay
Technical stages of production
1st stage:
- Production of two models: a working collapsible one made of supergypsum and an auxiliary one made of solid gypsum
- Plastering models into the articulator
- Modeling a hard wax inlay on a working model in an articulator
2nd stage:
- Composing the sprue tree and molding it with fire-resistant investment material
- Ceramics injection molding stage
- Freeing the sprue tree from investment material and removing the sprues
3rd stage:
- Fitting the inlay to the model in the articulator
- Applying an enamel layer and transparency to the outer surfaces of the tab
- Application of dyes and glazing
Natural color concept . Systematization of visual selection .
Visual color detection system:
- Color space is selected according to a natural pattern
- The arrangement of color samples corresponds to the logical construction of the dental color space and is clearly divided into areas: yellow, orange and red
- The effect of metametry between color samples and facing material is excluded, because color samples are made of identical ceramics
- The effect of contrast enhancement is eliminated by using a gingival mask
The perception of color is influenced by :
- Lighting
- Gum color
- Surrounding tissue
- Type and structure of the color indicator
- Test sample placement
- Individual human ability to see color
- Experience in color determination
- How the eye works
Advantages and disadvantages of prosthetics with stump inlays
Prosthetics with cast pins, just like any other dental procedure, has a number of advantages and disadvantages.
Benefits of Tabs
The positive features of using core inlays to restore damaged teeth are:
- the possibility of completely restoring the natural shape of the replaced crown (lateral enamel ridges on its chewing surface, cusps, etc.);
- rapid normalization of the functions of the masticatory apparatus;
- monolithic structure (no risk of separation of the stump and pin);
- tight fit of the prosthesis to the root surface (minimizing wedging load).
Disadvantages of microprostheses
The main disadvantages of orthopedic dental treatment with cast pins include:
- the need for extensive preparation of the damaged tooth;
- long lead times for the manufacture and installation of a prosthetic structure (the presence of a laboratory stage, during which the pin is cast by a dental technician);
- high cost of stump inlays compared to standard pins.

