- Types of products
- Ceramic inlay e max: main indications
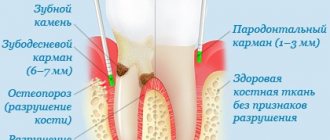
- Contraindications for installing ceramic inlays
- Ceramic tooth inlay: advantages and disadvantages of products
- Manufacturing and installation stages
- Ceramic dental inlay: care features
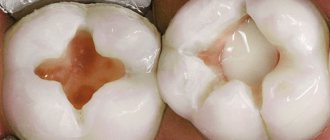
If it is necessary to carry out extensive restoration, they often resort not to filling material, but to ceramic inlays (onlays).
They are one of the best methods of dental restoration and provide high-quality results. Ceramic inlays are a microprosthesis that is fixed in the tooth cavity. Such orthopedic structures are characterized by high aesthetics and durability; they are completely identical to healthy enamel, due to which they have become widespread. The e max ceramic inlay is in particular demand; it can be installed in a reliable dental clinic “A-medic”. The company's pricing policy is loyal, the cost of the service starts from 15,000 rubles. Before installing a microprosthesis, dentists conduct an examination and diagnosis to identify possible contraindications. In dentistry, a ceramic inlay is installed in just 2 stages, which allows you to quickly make your smile more attractive. An individual approach to each patient is guaranteed.
What is a core inlay for a crown?
A stump inlay is an orthopedic structure that serves as a support for installing an artificial crown on a severely damaged tooth. This prosthetic element is also called a pin stump inlay, since its root part resembles a dental pin. It is inserted into the dental root canal, and a crown is placed directly on the coronal tip of the inlay, similar to the stump of the prepared tooth. The post-stump inlay should not be confused with a regular dental inlay, which is used as an alternative to fillings.
Advantages of using stump tabs
- The core inlay is made according to individual impressions of the patient and completely reproduces the space of the canals of the tooth to be restored with a crown.
- The stump inlay also has an upper part - in the shape of a tooth ground for a crown. This structure of the microprosthesis ensures uniform load distribution even under strong pressure while chewing food.
- The core tab may have several pins to restore a multi-rooted tooth.
Care
The care regimen is quite simple. Every day you need to brush your teeth at least 2 times: after breakfast and before bed. For better cleaning of the oral cavity, you can use an irrigator. The device delivers a stream of water that penetrates even the most difficult to reach areas, including interdental spaces.
Dentists recommend professional cleanings at intervals of 3-6 months. The hygienist will remove plaque and tartar, which will prevent tooth decay. The procedure includes polishing the onlay, this helps preserve the color and shine of the ceramic.
Installing an all-ceramic inlay is an effective way to restore teeth. The insert has an attractive appearance, is durable, easy to clean and durable.
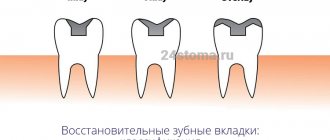
Types of materials for stump inlays
According to their structure, stump inlays in dentistry are divided into cast stump inlays and collapsible stump inlays. Non-separable stump inlays consist of a stump part and 1 - 2 pins, therefore they are used for prosthetics of teeth that have no more than two channels. Collapsible stump pin inlays differ from cast stump pin inlays in that they are used for teeth that have 3-4 canals, and are equipped with a corresponding number of root pins, which are specially made removable, since otherwise it will be impossible to insert them into the root canals. Depending on the materials of the stump inlays, the following types of these microprostheses are distinguished, described in the table below.
| Metal stump inlay | The metal stump inlay can be made of an alloy of chromium and cobalt; there are also silver stump inlays and gold stump inlays. They are reliable, but not aesthetic, therefore, in modern dentistry, gold core inlays and silver microprostheses are used quite rarely and only for prosthetics of chewing teeth. |
| Metal-ceramic core inlay | A core inlay made of metal-ceramics is quite strong, but its quality is worse than that of inlays made from other materials due to the difference in thermal expansion of metal and ceramics. Therefore, such microprostheses often fall out. |
| Ceramic core inlay | A ceramic core inlay best preserves the aesthetics of a smile, since ceramics in its properties and appearance are as close as possible to natural tooth enamel. In this regard, the stump inlay for the front tooth is made from this material. |
| Zirconium core inlay | The advantage of such structures is not only their high strength, but also the white color of the stump inlay made of zirconium dioxide, which does not show through the crown. Therefore, as an answer to the question “Which stump inlays are better?” Along with a ceramic inlay, we can safely call a pin-stump inlay made of zirconium oxide or dioxide. Thus, the stump inlay for the front tooth can also be made from zirconium. |
| Composite stump inlay | A type of core inlay with a pin that adheres to the tooth tissue better than others, but is not strong enough compared to inlays made from other materials. |
NeoStom – Dentistry website
This is an operation of excision in a certain sequence of hard tissues of the tooth crown to give the cavity the desired shape. Like any surgical intervention, preparation of a cavity in vital teeth under an inlay may be associated with the development of early or delayed complications: • postoperative tooth sensitivity; • opening of the tooth cavity; • acute and chronic pulpitis; • secondary caries. The development of complications may be due to the action of local damaging factors: mechanical trauma, drying, hyperthermia, vibration, microbial invasion. Therefore, to prevent the development of complications, the formation of cavities for inlays in teeth with preserved pulp is performed with adequate pain relief, in compliance with the general rules, principles and preparation regimes.• Preparation of vital teeth for inlays, more than for other types of orthopedic structures, is associated with the risk of damage to the pulp (traumatic pulpitis). Therefore, when preparing a cavity for an inlay, it is necessary to take into account the anatomical and topographical features of the tooth being prepared: the structure and thickness of hard tissues in different areas, the topography of the tooth cavity. Excision of hard tissues should be carried out under X-ray control and taking into account safety zones (Abolmasov N.G., Gavrilov E.I., Klyuev B.S., 1968, 1984), with control of the depth of preparation. • Dissection should be carried out intermittently, with well-centered, sharp instruments, under full air-water cooling (50 ml/min). The water temperature should not exceed 35 °C. • When preparing, it is necessary to observe the speed modes of preparation for enamel and dentin. • To prevent the development of secondary caries, it is necessary to control the quality of removal of infected dentin. • After preparation, the prepared dentin must be protected. • Preparation of a carious cavity consists of the following stages: — excision of all hard tissues affected by the carious process and complete removal of infected dentin (necrotomy); — preventive expansion of the cavity; — formation (special preparation) of a cavity of the desired shape. When forming cavities for inlays, carbide and diamond burs of the following shapes are used: spherical, cylindrical, cone-shaped, flame-shaped. By sequentially using diamond and carbide burs of the same shape and size, the most optimal conditions for preparation are created. Removal of infected dentin and preliminary formation of a cavity in dentin is recommended to be carried out using carbide burs with a small number of blades. At the main stage of cavity formation, it is advisable to use diamond burs, at the final stage - carbide burs with a large number of blades (finers) or diamond burs with red markings. General principles of forming cavities for inlays The main features of preparing teeth for inlays, as opposed to fillings, are the creation of relative parallelism of the side walls for the possibility of introducing the finished structure, as well as the need for preparation to a depth that ensures sufficient strength of the inlay. To ensure reliable fixation of the inlay while maintaining cavity edges that are resistant to chewing pressure and to prevent relapse of caries during cavity formation, certain principles must be observed. • The cavity is given the most appropriate shape, such that the insert can be easily removed from it in only one direction. In this case, the vertical walls of the cavity should be parallel or slightly diverge (diverge). The slope of the walls is not a constant value and can vary depending on the depth of the cavity: for superficial cavities the slope should be less, for deep ones it should be greater. • The bottom and walls of the cavity should be able to withstand chewing pressure well, and their relationship should contribute to the stability of the inlay. The design of the angle formed by the outer walls and the bottom of the cavity has a certain significance for stability. The angle of transition of these walls into the bottom should be clearly defined and approach a straight line. • The bottom of the cavity should be parallel to the roof of the tooth cavity and be of sufficient thickness to protect the pulp from external influences. Depending on age, the safe thickness of dentin above the pulp cavity can range from 0.6 mm for teeth whose root formation process has already been completed, and 1.4 mm for teenage and young adult teeth with wide and open dentinal tubules.
• To prevent relapse of caries, it is necessary to carry out preventive expansion of the cavity. • When forming a complex cavity that involves several surfaces of the tooth, retention elements should be created to prevent the inlay from moving in different directions. Additional retention points should be created if at least one outer wall is missing or its height is insignificant. Fixation elements can have different shapes: cross-shaped, T-shaped, dovetail. • The cavity for the inlay must have sufficient depth with mandatory immersion into the dentin. • The formed cavity should be asymmetrical or have additional recesses that serve as guides when inserting it into the cavity. There should be no undercuts that would interfere with the removal and insertion of the inlay. In each specific clinical case, the method of preparing hard dental tissues for an inlay will differ depending on the class of hard tissue defect and the material used to make the inlay. Thus, the peculiarities of cavity formation in the manufacture of metal inlays include the creation of a bevel (rebate) in the enamel with a width of at least 0.5 mm at an angle of 45° relative to the internal walls of the cavity, which ensures an accurate marginal fit of the inlay to the enamel, increasing its retention area ( Fig. 1-2).
Rice. 1-2. A finally formed cavity with the creation of a bevel (rebate) during the manufacture of a metal inlay. In the manufacture of metal-free inlays, the creation of bevels in the enamel is contraindicated due to the properties of the materials - their fragility in the presence of a thin layer in the area of the transition to the tooth enamel. In addition, when making metal-free inlays, the internal corners of the cavity should be slightly rounded, the outer boundary of the cavity should be within the enamel (Fig. 1-3). When forming a cavity for composite, ceramic inlays, the edges of the cavity are not finished to ensure a high degree of fixation.
Rice. 1-3. The final formed cavity for the manufacture of a non-metallic (ceramic, composite) inlay
Preparation of class 1 cavities according to Black Class 1 cavities (Fig. 1-4) are characterized by the preservation of all outer walls, which, if the cavity is formed correctly, prevent displacement of the inlay. The stability of the inlay is ensured by the depth of the cavity and the angle between the bottom of the cavity and its walls.
Rice. 1-4. View of a mandibular molar after completion of the formation of a 1st class cavity under the tab. 1st class cavities located on the chewing surfaces of molars and premolars are formed at the locations of fissures and intercuspal fossae. The cavities are given a typical shape: they should follow the fissure pattern without the formation of sharp corners (see Fig. 1-4). When forming a cavity, elements are created (bottom, walls of the cavity, bevels, etc.) that have a certain functional significance. The main wall of the cavity, which takes on most of the chewing pressure, is the bottom. It is formed parallel to the chewing surface and perpendicular to the long axis of the tooth. The tilt of this cavity wall is permissible only towards the strong outer wall. The tilt of the cavity bottom towards the weakened wall can cause a fracture of the tooth crown. When forming deep cavities to prevent perforation, one should not strive to form a flat bottom by grinding off the hard tissues of the tooth. If the bottom of the cavity is concave, it is subsequently leveled with lining material. To prevent recurrence of caries during the formation of class 1 cavities, enamel prisms that have lost contact with dentin must be ground off. For this purpose, the enamel wall must be given the most favorable slope, taking into account the radial direction of the enamel prisms along the edge of the tooth defect.
When forming cavities of the 1st class, you should not make them with symmetrical contours (round, oval) - this will complicate the fit and may cause incorrect fixation of the inlay in the tooth crown. To add asymmetry, the cavity is slightly lengthened or expanded towards one of the fissures. If there are two or more cavities on the occlusal surface, they are combined into one. Preparation of class 2 cavities Class 2 cavities are characterized by destruction of the contact surfaces of the chewing group of teeth. The preparation of a 2nd class cavity begins with separation, which is carried out with a thin diamond head to the level of the tooth neck. The separation plane must be strictly vertical or slightly inclined towards the center of the tooth crown. Then, using a fissure bur, a cavity is formed on the contact surface to create a ledge and an additional area on the chewing surface (Fig. 1-5). The gingival wall of the cavity should be located at the level of the gingival margin. An additional area on the occlusal surface is intended both for preventive expansion of the cavity and to prevent displacement of the inlay towards the missing wall. On the chewing surface, hard tissues are excised, bypassing the intact slopes of the tubercles, and the cavity acquires a complex shape, which ensures good fixation of the inlay. If both contact surfaces of the tooth crown are affected, it is necessary to form a three-sided cavity (both contact and chewing surfaces are prepared) even if there is a filling on one of the contact surfaces. In this case, separation is carried out and, according to general rules, cavities are formed on both contact surfaces, which are then connected to each other by the cavity formed during excision of the chewing groove. To prevent chipping of the vestibular or oral walls of the cavity, which are under load during chewing, it is often necessary to grind off the tubercles, then restoring them with the inlay material.
Preparation of class 3 cavities There are three degrees of destruction of the tooth crown with caries of the contact surface: • without disruption of the labial or oral surface; • with damage to one of them; • with simultaneous destruction of the labial, contact and oral surfaces. Depending on the degree of destruction of the crown, the method of forming cavities changes. When only the contact surface is affected, the cavity is formed in the form of a triangle with the apex facing the cutting edge and the base parallel to the gingival edge. The bottom of the cavity should be convex, repeating the contours of the contact surface of the crown. The formation of such a cavity is possible in the absence of adjacent teeth.
Rice. 1-5. View of a mandibular molar after preparation of a class 2 cavity for making an inlay
Rice. 1-6. View of the maxillary canine after completion of the formation of a class 3 cavity for the inlay. In case of combined lesions of the contact and oral (or labial) surfaces, the cavity is formed taking into account the path of insertion of the inlay and the creation of an additional fixation platform (usually in the form of a “dovetail”). An additional cavity is created in proportion to the main one, immersing it in dentin. The transition from one cavity to another is designed in the form of a step. When forming a cavity under the inlay, cavity elements are formed, each of which carries a certain functional load (Fig. 1-6). With the simultaneous destruction of the contact, oral and vestibular surfaces, additional depressions are created in the dentin from the labial and oral surfaces to hold the inlay. At the same time, the axial wall of the cavity is preserved in the form of a roller, which will protect the pulp chamber. If there are cavities on both contact surfaces, they are connected by a fairly wide groove passing through the blind fossa.
Preparation of class 4 cavities The nature of the formation of class 4 cavities depends on the structural features of the cutting edge. Teeth with destruction of the cutting edge are divided into two groups depending on its width. As a rule, teeth with a wide cutting edge are found in older people, in patients with increased wear of hard dental tissues. In such teeth, between the layers of enamel there is a fairly thick layer of dentin, which makes it possible to create a cavity or an additional fixing platform in it. In this regard, the need to prepare the palatal surface of the tooth crown is eliminated, and the inlay located on the cutting edge protects the tooth from further abrasion. The shape of the prepared main cavity located on the contact surface must be such that the path of insertion and removal of the inlay coincides with the long axis of the tooth, and the gingival wall is perpendicular to the long axis of the tooth. In addition to the main cavity, an additional platform is created in the cutting edge in the form of a groove, commensurate with the main cavity and the width of the cutting edge. This groove may end with a recess in the form of a channel, into which a pin fixed in the inlay will subsequently enter, improving its fixation, or it may move into a cavity on the other contact surface (in case of damage to both contact walls of the tooth). In teeth with a thin cutting edge, the formation of the main cavity is carried out in the middle third of the tooth crown, perpendicular to the palatal surface. This direction determines the insertion path of the tab. The bottom of the main cavity becomes the labial wall of the tooth crown. To ensure fixation of the inlay, an additional platform is formed in the area of the blind fossa at the base of the dental tubercle with immersion in the dentin. If both contact surfaces are affected with a violation of the angles of the cutting edge, the latter is used to form a step and create a saddle-shaped connection of the proximal cavities. When the cutting edge is chipped, it is ground off, creating a bevel from the oral surface. Then a cavity is formed taking into account the topography of the tooth cavity with the creation of vertical channels for the pins. The canals should run midway from the pulp to the enamel edge.
Preparation of class 5 cavities When forming cavities in the cervical region, it is necessary to take into account the proximity of the cavity to the equator and the danger of opening the pulp chamber located close to the surface of the tooth. The expansion of the cavity is carried out to the greatest curvature of the tooth crown in the area of the equator and contact surfaces. The bottom of the cavity is formed convex, especially on the front group of teeth. The gingival wall is formed at the level of the gingival margin, except for those cases when there remains a section of intact hard tissue at least 2 mm wide between the edge of the cavity and the gum. The mesial and distal walls of the cavity must be at a certain angle to each other, and the wall facing the cutting edge (or occlusal surface) and the gingival wall must be parallel. This ensures retention of the tab. Protection of prepared dentin After preparation, to protect dentin from irritating factors, its dentinal tubules are sealed using desensitizers - materials whose operating principle is based on sealing dentinal tubules in various ways. The main effect of using desensitizers is to reduce the sensitivity of prepared dentin. During the production of the inlay, the cavity formed in the tooth must be closed with a temporary filling, which protects the tooth from thermal, chemical, mechanical and microbial influences in the postoperative period.
We recommend reading:
- Preparation of teeth for veneers. Fixation of veneers
- Theoretical foundations of tooth preparation
You might be interested in:
- Manufacturing of temporary dentures using matrix technology
- Manufacturing of temporary dentures
- Methods for making veneers
- Treatment with veneers
- Methods for making inlays
Related materials:
- Application of tabs (classification of tabs)
- Types of dentures
- Examination methods for defects of hard dental tissues
- Pathology of hard dental tissues
Making a core inlay for a crown
For the manufacture of stump pin inlays, direct and indirect methods are used. The direct method of manufacturing a stump insert has the following steps.
- After preliminary treatment of the tooth canals and its preparation for the stump inlay, the cavity is treated with Vaseline.
- The plastic, heated to a viscous state, is poured into a syringe and squeezed into the cavity through a wide needle to form an inlay.
- The pin is processed with the same material and inserted into the canal.
- After the plastic structure has hardened, the finished model of the inlay is removed from the cavity and sent to a dental laboratory for the manufacture of a microprosthesis from the material chosen by the patient.
The indirect method includes the following stages of manufacturing a stump inlay:
- After preliminary preparation of the tooth and canals, the doctor takes an impression and transfers it to the dental laboratory.
- The technician casts a plaster model and creates a prototype of the inlay from wax.
- Based on the wax sample, a metal stump inlay is made.
If we talk about stump inlays made of zirconium or ceramics, then CAD/CAM technologies are used for their production, which involve computer modeling of a microprosthesis, transferring the model to a milling machine and subsequent “cutting out” of the inlay from the workpiece.
Preparation for the procedure
To carry out restoration, you need to prepare the tooth for the inlay. To do this, you need to contact your dentist. The doctor will treat the diseased tooth. Through dissection, the specialist will remove the affected tissue, thoroughly clean and seal the roots. It is very important to treat the canals correctly. If this is not done, inflammation may develop after some time.
To prevent infection, you should not leave the root exposed; it is better to install a temporary crown. It looks aesthetically pleasing, like a real tooth. This is important, especially if the frontal incisors are damaged. This will make the patient feel more comfortable until a permanent insert is placed.
The production of the inlay is carried out by an orthopedic dentist. The specialist will unseal the canals to the length of the future inlay and take an impression, which is used to make restorative inlays in the dental laboratory. At the next visit, the finished structure is installed in the oral cavity.
Installation of the stump tab
Before prosthetics with stump inlays, it is necessary to remove the nerve and carry out endodontic treatment of the canals in order to eliminate their inflammation and seal them properly. After this, the tooth is prepared for an inlay, the canals are unfilled to 1/3 or 2/3 of their length, they are made wider and given a conical shape, and then procedures typical for the direct or indirect method of manufacturing a microprosthesis are carried out.
Stages of installing the stump tab
- All teeth are disinfected with alcohol and dried.
- The stump tab is degreased and covered with cement along with the pins.
- The holes in the channels are filled with a solution, and a microprosthesis is installed in them.
- For final fixation of the stump tab, the doctor applies strong pressure on it.
After this, all that remains is to take impressions from the stump insert installed in the tooth to make a crown from the material chosen by the patient.
Manufacturing and installation stages
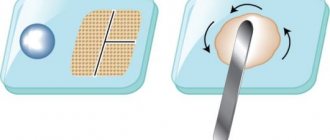
Manufacturing and installation of an orthopedic structure is not difficult and does not take much time. At the initial appointment, the dentist examines the oral cavity to determine indications and contraindications for the procedure. If contraindications are identified, they are eliminated, after which they proceed to therapy. If necessary, endodontic treatment and hygienic treatment of the diseased tooth are carried out. By analogy with standard filling, the specialist removes all destroyed tissue from the tooth, forming an area for a microprosthesis. After this, a cast is made that exactly repeats its shape.
The production time for an emax ceramic inlay based on the impression obtained (3D modeling results) is about 5-10 days. At this time, a temporary filling material is placed in the patient's cavity. The onlay is made in laboratory conditions, taking into account the individual characteristics of the patient’s dental system. The orthopedic structure is fired and covered with layers of ceramics. At the secondary appointment, the patient’s temporary filling is removed and a finished microprosthesis is installed. It is attached using special cement, which firmly adheres to the ceramics and enamel of the tooth. This guarantees a secure fit. At the end of the process, the surface is polished. The whole procedure takes no more than 120-150 minutes.
What is the difference between a pin and a stump inlay?
The fundamental difference between a pin and a stump inlay is that it is placed under a filling. Previously, a similar technique was used to treat severely damaged teeth when it was not possible to install a crown. Subsequently, this method discredited itself with a large number of complications in the form of secondary caries. Moreover, detecting a carious process under an extensive filling on a pin was quite problematic. Often, such treatment led to severe damage to the tooth by caries and, as a consequence, to its removal.
Let's compare the disadvantages and advantages of the pin stump insert and the pin presented below:
Pros and cons of the stump Pros and cons of the pin
tabs
- a tight fit protects the tooth from pathogenic bacteria and the development of secondary caries;
- withstands significant chewing loads;
- has a long service life;
- does not require replacement in case of wear of the artificial crown.
- established in two visits to the doctor;
- involves significant grinding of living tooth tissue;
- costs more than a regular pin.
- costs less than stump inlays;
- installed in one visit;
- involves a smaller volume of preparation of living tooth tissue;
- unable to withstand the usual chewing load, over time the seal on the pin begins to collapse;
- the pin can be installed in only one dental canal;
- a loose fit allows bacteria access into the dental cavity, which provokes the appearance of secondary caries;
- lasts no more than 2-3 years.
Answering the question “Which is better - a stump inlay or a fiberglass pin,” most experts are inclined to favor dental inlays. Considering the unreliability of installing a filling on a pin, such a service can be found extremely rarely in modern dentistry. The most correct option would be to use a stump tab and then install a crown on it. The choice is due to the fact that this microprosthesis not only strengthens the crown, but also protects the tooth from further destruction throughout life.
Ceramic inlay e max: main indications
Many people mistakenly believe that ceramic inlays are a type of regular filling. In fact, they belong to the category of high-tech microprostheses. Its parameters and characteristics significantly exceed any, even the most modern and high-quality filling material. Among the main indications for installing ceramic inlays are:
- destruction of the coronal part by 30% or more;
- preparing a molar or premolar for the installation of permanent orthopedic structures, for example, bridges;
- increased abrasion of enamel;
- the presence of a large cavity that was formed as a result of an advanced carious process;
- increased sensitivity of molars or premolars to external factors;
- mechanical damage.
If, after fixing the orthopedic structure, pronounced painful sensations occur, you should not delay your visit to the dentist. Most often, pain and discomfort are a sign that the product was installed incorrectly. To avoid such situations, treatment should be carried out only in trusted dental clinics.
How much does it cost to fix a stump tab?
The price of a stump inlay in Moscow depends on the material of manufacture, its size, type and number of pins. A single-root stump inlay made of chromium and cobalt alloy will cost from 2,000 rubles. And when a tooth has several roots, the cost of a cast stump inlay for a metal tooth can increase to 5,000 rubles. The price of a stump pin insert made of composite is approximately 6,000 rubles, and of ceramics - about 12,000 rubles. The cost of zirconium core inlays starts from 15,000 rubles. If we are talking about a collapsible design, then the price of a stump inlay for a crown will be slightly higher than that of a solid-cast stump inlay.
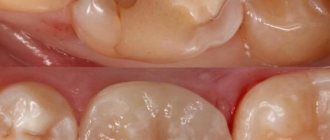
Ceramic dental inlay: care features
The ceramic inlay and onlay do not require complex care. You need to care for your teeth like you would for regular teeth - brush twice a day, use floss and mouth rinses after each meal. It is worth noting that ceramic inlays, due to their physical properties, do not require additional care (unlike light fillings) - professional cleaning.
In order to promptly detect leaks in the Emax tab, you need to regularly visit the dentist’s office (once every six months). When a dark stripe appears, there is a high probability that pathogenic microorganisms have begun to penetrate under the ceramic inlay, which provoke the development of a carious process. On average, the service life of ceramic structures is about 7-8 years. Subject to all rules and hygiene standards, as well as the absence of increased stress, they can last several years longer.
You can install a ceramic inlay in Moscow at the reliable A-Medic clinic. Qualified specialists with extensive experience work here, which guarantees a positive result. The orthopedic design is no different from natural teeth and can last for many years. In the event that there are contraindications to the installation of this product, A-Medic dentists will be able to select another method of tooth restoration.