The introduction of an artificial root into the jaw is only the first stage of restoring an extracted tooth. After the titanium rod has “engrafted,” a supragingival structure is installed on it. Manipulations in this case may differ from those performed when attaching a prosthesis to an abutment tooth. Because they place a crown on an implant not only using a special fixing compound, but also in another way.
Features of cement fixation of the prosthesis
When using this method, the prosthesis is fixed on the abutment in the same way as on a ground abutment tooth. For this purpose, special dental cement is used. First, preparatory manipulations are carried out:
- Transfer installation. This detail helps to accurately position future crowns when creating an impression.
- Applying impression material and obtaining an impression on the basis of which the prosthesis will be made.
- Installation of abutments - adapters from the implant to the crown.
After the structures are manufactured, they are first fitted to identify inconsistencies. Then the installation area is dried and the crowns are fixed to the implants. The doctor fills the prosthesis with dental cement and carefully places it on the abutment, pressing and holding it. After hardening, excess fixing material is removed.
Fixing crowns on natural teeth
Installing crowns is a fairly lengthy process that takes several stages. First, the patient undergoes an examination and diagnosis, during which indications and contraindications for crown installation are determined. An X-ray examination allows you to assess the extent of tooth damage and create an optimal treatment plan. Immediately after diagnosis, the main stages of tooth restoration begin.
- Tooth preparation.
The abutment tooth is turned to install a crown or prosthesis. The depth of treatment largely depends on the material of the crown (for ceramics 1 millimeter is enough, for metal ceramics - 2 or more millimeters). In the vast majority of cases, before installing a crown, the patient undergoes a tooth depulpation procedure (due to the presence of diseases and the risk of their development under the crown). - Taking an impression
for subsequent making of a crown. - Installation of a temporary crown.
To hide the aesthetic defect and protect the tooth from the external environment, the patient is given a temporary crown, which is fixed with temporary cement. - Trying on a permanent crown.
To understand how accurately the crown is made and whether the patient will be comfortable with it, a fitting is performed before installation. Sometimes a permanent crown is fixed with temporary cement to make it easier to remove if discomfort or complications arise. However, modern digital diagnostic and manufacturing techniques, in particular CAD/CAM, have made it possible to manufacture products with perfect accuracy. - Permanent fixation of the crown.
The reliability of fixation largely depends on the quality of the cement. There are different types of dental cement: glass ionomer, composite, zinc oxide (temporary). The type of cement is selected depending on the type of structure (single or bridge prosthesis), as well as taking into account the characteristics of a particular clinical case.
Features of screw fixation of the prosthesis on the implant
Let us now consider how crowns are attached to implants without the use of cement. Using this method, the prosthesis is connected to the abutment outside the mouth, in a laboratory setting. The prefabricated structure is then screwed to the artificial root using a screw.
The peculiarity of such crowns is the presence of a hole. A screw is inserted into it, which is then tightened using a special tool. After installing the crown, the retainer is masked with filling material.
Indications for using the cement fixation method
Factors that determine the advisability of using an adhesive include:
- Complete or partial dentition;
- Local restoration of problem areas;
- Angulation of implants, limiting the functionality and aesthetics of prostheses;
- Using several structures with a non-parallel slope at once;
- Patient's wishes.
It should be taken into account that the implementation of the protocol in question is possible only if a number of requirements are met:
- The height of the upper part of the fastening must be at least 5 mm;
- The gum tissue surrounding the structure should be 3-5 mm long;
- The volume of the bone wall around the implant is from 2.5 mm;
- The ratio of the crown and the body of the rod is 1 to 1.5;
- The antagonist elements have the correct anatomical position.
Compliance of the indications is determined during the preliminary examination. The presence of deviations necessitates the selection of an alternative orthopedic protocol.
General points for installing a crown on an implant, regardless of the method of fixation
When using both screw and cement fastening technologies, impressions are first created on the impression mass using transfers. The installation of a crown is done in different ways, but after fixing the prosthesis on the implant, the dentist always checks the contact points between the teeth with a special matrix. Then he controls the closure of the teeth so that the chewing load is subsequently distributed adequately.
The bite should be correct, uniform and dense. If there are errors, the service life of structures may be reduced. Therefore, if necessary, correction is carried out. A correctly installed denture has maximum contact with the base and has optimal gaps with the gum and adjacent teeth.
Prosthetics of defects in hard dental tissues with solid and combined crowns.
Solid metal crowns
Classification by design:
- Solid cast (without facing)
- Solid cast with plastic lining (metal acrylic)
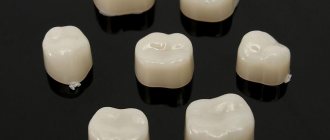
- Metal-ceramic
Classification by material:
- From the noble Me
- From base (Co-Cr, Ni – containing) Me
Advantages compared to stamped crowns
- They fit more precisely to the teeth in the cervical area, causing less trauma to the gum tissue, since the edges of the crown can be positioned depending on the clinical requirements at a given level
- Does not create retention points for food retention
- Better restoration of the anatomical shape of teeth and occlusal contacts
- They wear out less or almost not, because they are thick-walled
- When using porcelain or plastic cladding, a high aesthetic effect is achieved
- Disadvantages include the need for slightly more preparation of hard dental tissues, as well as the difficulty of removing cast crowns.
Indications for use
- Caries,
- Shape anomalies
- Anomalies in the structure of dental tissues
- Pathological abrasion
- As a support for a bridge prosthesis or combined structures, arch prostheses, plate prostheses.
The teeth to be prepared are carefully examined, the degree of stability of the tooth and the integrity of the fillings are assessed. X-rays are used to evaluate the thickness and ratio of the hard tissues of the coronal part to the pulp, as well as the condition of the periodontal tissues. Periapical tissues should be free of pathological changes.
Stages of manufacturing cast crowns:
- Tooth preparation
- Taking impressions
- Manufacturing of temporary (protective) crowns
- Obtaining collapsible models
- Determination of central occlusion or central relationship of the jaws
- Fixing models in the occluder
- Applying insulating layers to the model of the tooth stump (a compensation layer for metal shrinkage, a distance layer to create a distance between the tooth stump and the crown, in order to shrink on cement)
- Obtaining a wax or plastic cap using the tightening method
- Modeling the wax composition (on the cap)
- Obtaining a metal crown by casting (replacing a wax composition)
- Crown fitting (first on the model by a technician, then at the clinical stage in the oral cavity)
- Finishing and polishing
- Fixing a crown on a tooth
Tooth preparation
The cast crown should have an average thickness of 0.3 – 0.5 mm. Compared to a stamped crown, a solid-cast crown requires more grinding of hard tissue from the occlusal surface. Preparation is carried out economically, taking into account safety zones in order to prevent complications. Metal separation is carried out with a diamond disk, flame-shaped or needle-shaped diamond head. The approximal surfaces should have a slight taper towards the surface of the closure of the teeth (3 – 50), if the taper is greater, there is a complication: decementation.
The preparation of the occlusal surface is carried out intermittently using abrasives of various styles and sizes with uniform grain size. Round spherical burs. Extended fissure, cone and torpedo-shaped diamond heads. The preparation is carried out with a reduction in the diamond (so that the stump is smooth).
The vestibular surface is prepared by creating 2-3 vertical grooves with a small-diameter diamond disk with special stops or marker burs. Grooves are created on the vestibular surface starting from the neck of the tooth and ending in the area of the cusps. At the end of the preparation, the crown is given a uniform truncated cone shape towards the chewing edge. The corners between the occlusal and lateral surfaces should be rounded (no more than 5 - 7). Increasing the convergence angle worsens fixation. Removal of tissue from the occlusal surface up to 0.5 mm (evenly)
Preparation can be done with or without creating a ledge. In the cervical region of the frontal teeth and P1, at the level of the gum and the ledge under the gum. On the vestibular side, the width of the ledge is 0.3 – 0.5 mm. It is not necessary to make a ledge on P2, M1-M3, on teeth with a bare or narrow neck, on contact surfaces and oral ones. The level of the ledge - sub- or supragingival - is determined by the doctor. A prerequisite for inserting the edge of the crown into the gingival crevice (sub) is its location no deeper than the middle of the vertical dimension of the gap, with the thickness of the edge (taking into account the width of the ledge) not widening the gingival crevice.
After preparation, a two-layer impression is taken (sandwich or two-layer two-stage method).
To create a cap, brown wax is placed in a wax melter (SU-wax); light-curing waxes can be used. They are softened in a wax melter, a tripod is placed there, the edges are removed and polymerized. After creating a wax cap, the cervix is modeled with cervical wax. In our domestic cervical waxes, the wax is red. Cervical wax is softer and reflects the neck of the tooth very well. It is needed: after the stamp is immersed to the ledge, the wax is removed and the edge of the ledge is formed using cervical wax. For tight contact in the neck area. If a splinting construction is used, connecting waxes are used, as well as for integrally cast bridges. Modeling waxes are used to create the anatomical shape of the tooth. All waxes have a working melting point.
The cast and cast crown should fit smoothly onto the stump in the oral cavity and ensure a tight fit to the teeth and to the ledge. The relationship to the gingival tissues is checked using silicone corrective masses. Check the presence of contact points using carbon paper and the relationship with antagonist teeth in various occlusions.
When there is overbite, supra-contacts are eliminated by grinding.
A cast crown that does not tightly cover the tooth and does not have contact with adjacent and antagonist teeth must be remade.
Before fixation, the tooth and crown are thoroughly degreased with ethyl alcohol, ether or liquid for disinfection and drying. The mixed cement should have a medium consistency. If the consistency is thick, the crowns may be under-planted and the bite will be too high.
Cast crowns with plastic lining
A crown lined with plastic or special composites is more accurate and more aesthetic. The absence of elastic deformation is ensured by the Me frame; this increases the density of the entire structure, and the creation of a ledge at the edge of the frame allows the plastic to not be pushed into the gingival crevice. The veneering is done from the vestibular side or from all sides of the crown. A deeper preparation is performed on the vestibular side. The remaining walls are similar with cast crowns. To hold the plastic along the edge of the crown or along the entire lined surface, retention points are created, when making a combined crown according to Mate, or specially made retention wax or polymer balls (pearls, villi) with a diameter of 0.4 - 0 are applied to the heated surface of the wax bed for plastic. 6 mm cast together with the frame, they create undercuts on the surface of the crown and ensure reliable fixation of the plastic.
After fitting the crown frame in the mouth, the color of the veneering plastic or composite material such as “Isozit” (Ivoclar), ARLGLASS, is determined.
Metal-ceramic crowns
Indications for use:
- Violation of the anatomical shape and color of the crowns of natural teeth due to both acquired pathological conditions (caries, trauma, wedge-shaped defects, color changes due to fluorosis, after filling or after taking medications - “tetracycline teeth”), and congenital (anomalies in size, shape, position of teeth , structures of TV tissues – hereditary lesions of the enamel (amelogenesis imperfecta), etc.).
- Hanging TV abrasion of dental tissues (only with a combination of Me-ceramic and solid cast, occlusal surface made of Me).
- The presence of non-removable prostheses in need of replacement, which violate aesthetics
- Small included defects in the anterior and lateral regions (as a support for bridges)
- Phenomena of allergies to plastic linings of fixed dentures.
- In all of the above cases, Me-ceramic crowns are indicated provided there is sufficient thickness of the tooth walls (the supporting teeth should have clinical crowns of pronounced size, when grinding their hard tissues to the thickness of the Me-ceramic crown is possible without the danger of opening the tooth cavity, assessment of the pulp chamber so as not There were thin walls left and there was no breakage of the tooth stump).
Contraindications:
- Prosthetics for children and adolescents with living dental pulp
- Lower, small or flat clinical crowns, insufficient thickness in the vestibulo-oral direction.
Relative contraindications:
- Malocclusions with deep incisal overjet
- Mandibular incisors with living pulp and a small clinical crown
- Increased abrasion of hard dental tissues
- Parafunctions of the masticatory muscles
- Some authors (Glazov O.D. et al., 1983; Kalamkarov H.A. et al., 1987) consider the use of these prostheses to be a contraindication for severe forms of periodontitis, when the high hardness of the ceramics and the rigidity of the Me ceramic design can cause functional overload of the supporting teeth and their antagonists
When using tooth depulpation, Me-ceramic structures are one of the disadvantages. During depulpation, a large layer of TV tissue is removed. In this case, the stump is weakened, the reasons for this are:
- The cavity is filled with a filling material that is inferior in strength to dentin
- After depulpation, the strength of hard tissues sharply decreases, as metabolic processes are disrupted. When preparing a tooth with a ledge, the dimensions decrease, and the weakened stump with filling material inside turns out to be less resistant to chewing pressure and the tooth stump may break off
- In young patients, it is advisable to preserve teeth with living pulp. Therefore, during preparation, the preparation regime should be observed (proper anesthesia; after preparation, the teeth are covered with provisional crowns, which protect the abutment tooth with living pulp from mechanical, chemical and physical factors).
In cases where pulpless teeth are used, the abutment tooth is carefully examined; there are tissues that cannot withstand the load; a cast stump pin inlay is made, and the pin is immersed in the crown by at least 2/3 of its length. You can also use anchor or fiberglass pins after removing the tooth pulp. To avoid breaking off the stump, you can use neighboring teeth.
Manufacturing stages:
- Tooth preparation
- Taking impressions, with gum retraction
- Making temporary crowns for prepared teeth
- Casting of collapsible models
- Making a plastic cap on a model of prepared teeth - modeling a metal frame
- Metal frame casting
- When fitting the frame in the mouth, it is important to look at how the frame or the edge of the cap adheres to the surface of the ledge. Estimates the thickness of the cap for KHS at least 0.3 mm, for gold alloys 0.4 mm. dental check.
- Ceramic lining of the coping
- Fitting the finished prosthesis
- Fixation of the prosthesis with cement
This crown is more stable and durable than the jacket crown
Metal-ceramics is and remains the main material for the manufacture of crowns for lateral groups of teeth, and is also indispensable for prosthetics on implants. Since ceramics do not swell and have no negative effects on the mucous membrane, less plaque is formed.
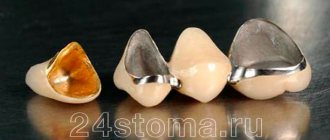
Structure of a Me-ceramic restoration
The frame of the crown should support the ceramics as much as possible so that the metal does not show through; the frame is covered with a layer of appaker. At least 2 layers of appaker are applied to the Me frame, fired, and only then the ceramic mass is applied and fired. If there is insufficient space for the ceramic mass, this opaque layer may have a negative impact on the esthetic properties of the restoration.
To improve aesthetics in the area of the gingival edge of the crown (so that the Me frame is not visible), the frame is shortened and ceramic edges are formed. If aesthetic requirements increase, it is possible to form a short vestibular ceramic shoulder of the crown (shoulder masses in the area of the neck or ledge).
Loads exceeding the proportionality limit lead to destruction of the ceramic layer; ceramics can withstand limited elastic deformation; to avoid chipping, the Me frame must be rigid at least 0.3 mm. Me-ceramic restorations are currently the most common
Advantages:
- Nice great aesthetics
- Excellent fit of the Me frame
- Reliable solder areas on bridges (when gold alloys are used)
- Removal of less tooth tissue
- Better value for money (durability)
- Well known, simple technology
Flaws:
- Possible allergy to Me
- Unaesthetic Me edges
- Insufficient transparency (due to insufficient grinding of tooth tissue)
- Ceramic chips
- Wear of antagonist teeth
- High price
To protect ceramics from cracks or chips under stress, it must be in a state of compression before firing and final correction. For this purpose, the coefficient of thermal expansion of Med b is slightly higher than that of the ceramic mass during cooling to room temperature, then a slight pressure occurs on the Me ceramics, which increases the strength of the connection and retention of the ceramic mass on the surface of Me
Connection of ceramics and Me
One of the most important components is the connection of ceramics and Me frame and their thermal compatibility. The level of Me oxidation determines the durability of the compound. The connection occurs due to the oxide film, which, due to adhesion, forms bonds with the ceramic layer. If during the firing process there is a bad oxide film, the connection is broken, chipping is possible.
Cracks in the Me-ceramic structure can be localized:
- In the opaque layer
- Between the opoka layer and the oxide film
- In an oxide film
- Between the metal and the oxide film itself
Advantages and disadvantages of shoulder ceramics:
- Improved aesthetic quality
- Risk of chipping during cementation(-)
- Use only in the frontal area of the upper incisors (-)
- Requires special shoulder ceramic mass(-)
- High price(-)
- Time costs (-)
How to reduce the risk of chipping:
- Accurately take an impression and make a high-quality model
- Do not use on highly stressed molars.
- Do not use for the manufacture of bridges (supports)
- Use adhesive fixation methods (with polymer cement)
Errors and complications when using CLC and Me-ceramic
It is necessary to significantly grind down the hard tissues of the teeth
Complexity of the technological process.
- When preparing intact teeth - traumatic pulpitis, as a result of traumatic preparation, poor cutting instrument, uncentered bur, loose tip. Cutting instruments use 1 bur per no more than 5 teeth for preparation.
- Continuous treatment of the tooth – overheating of hard tissues and burns of the pulp
- No cooling
- Low cutting tool rotation speed
- Pulp trauma when it is impossible to clinically correctly judge the location of the pulp cavity (in case of dental anomalies, with previously performed prosthetics or preparation)
To prevent these complications, the topography of the pulp is first studied.
X-ray examination of supporting teeth is required
Traumatic pulpitis can develop in the long term after preparation:
- If temporary protective covering of teeth is not carried out
- Temporary crowns were made at the patient's premises from quick-hardening acrylic plastics or relining of acrylic crowns (chemical and thermal damage)
- Temporary crowns are not securely fixed with medicinal pastes
A separate group of complications consists of the preparation of teeth with carious lesions of hard tissues or early filled and underprepared teeth (with repeated prosthetics).
Secondary caries. Occurs when decay of hard tissues susceptible to caries is incompletely removed and when the quality of the filling is not reviewed.
Necrosis of hard dental tissues under the crown. This may be a consequence of using a previously denture-treated tooth as a support, without assessing its viability.
The complication rate is high.
Secondary caries can be caused by errors not related to tooth preparation.
- When fixing the crown, thick or medium-thick cement was used; if there is an excessive amount of it, this leads to loose fixation of the crown and damage (exposure) to the cervical part of the tooth.
- Poor-quality wide crowns, incorrectly taken impression, poor-quality production of working models - a thick layer of compensation varnish, application of varnish to the cervical area due to engraving on the model of the stump of a prepared tooth, poor-quality production of the cap (incomplete heating of the plastic/wax, leading to loose compression of the die). The absence of precervical wax/refining rim in the cervical area or its deformation during removal of the wax reproduction from the model, with poor-quality casting, mechanical expansion of the crown when fitting on the model or in the clinic.
- If the tooth being prepared is excessively shortened, decementation of the crown and poor fixation of the prosthesis are observed; chipping of the coating is possible if, with a shortened stump, it is necessary to restore the height by thickening the coating layer rather than the Me frame.
- If the stump is insufficiently shortened and the relationship of the antagonist teeth in various occlusal movements is not taken into account, there is insufficient occlusal space and, as a consequence, chipping of the coating layer or overload of the periodontium of the abutment tooth or antagonist tooth (direct traumatic node), abrasion of the antagonist tooth, or fracture of the abutment tooth.
- It is important to maintain the taper of the stump of the abutment tooth (optimum 5); if the taper is small, it will be difficult to apply the prosthesis; then internal stress may arise in the frame - chipping of the ceramic coating. This can also cause a loose fit of the crown in the neck area during fixation, due to the fact that the release of excess cement from the supporting crown is difficult.
When preparing abutment teeth, especially frontal ones, it is necessary to create a vestibular ledge, if not:
- Chipping of the ceramic coating in the cervical area due to deformation of the metal frame or chipping of the coating due to the action of sliding forces along the line of connection of the latter with the ME and the absence of a cervical stop
- Aesthetic defect of the crown in the neck of the abutment tooth.
How to install an artificial crown on cement
As part of the general algorithm for prosthetics, fixation is the final stage, and provides for the following procedure:
- The prepared abutment is sandblasted with an abrasive machine, resulting in a rough surface.
- The crown, prepared in advance on the basis of an anatomical cast, is tried on the base, excluding discrepancies in fit.
- An adhesive composition is applied to the inner surface of the prosthesis, after which the product is tightly applied to the abutment.
- The finished structure is irradiated with a special lamp, which accelerates the intensity of polymerization of the fixing layer.
- Excess cement that appears during pressing of the crown is carefully removed from the surface.
Loading of the restored unit is allowed within an hour after the procedure, however, on the first day after surgery it is recommended to avoid excessive pressure on the area.
Advantages and disadvantages of technology
The positive aspects that determine the popularity of the technique include:
- There is no need to form an additional hole, which reduces the aesthetics of the finished prosthesis, which is especially important when prosthetics of frontal units;
- Possibility of correcting the fit of the superstructure - flaws in carelessly performed implantation are leveled out by cement fixation, which ensures the correct position of the crown even with axial deviation of the integrated rod;
- The option of primary fitting outside the oral cavity, which increases the accuracy of the connection and eliminates the development of inflammatory processes;
- Maintaining the strength of the connection in the long term.
The only drawback of the technology is the difficulty of dismantling the crown if new problems arise with the restored area. Fitting with cement will require re-manufacturing of the prosthesis, since removing the previous one without disturbing the original configuration is not possible.