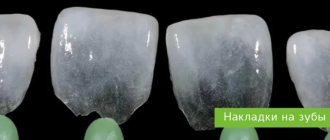
Porcelain crowns for front teeth
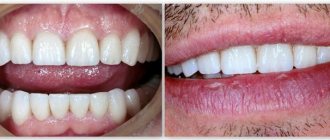
The main distinctive feature of porcelain crowns is that they do not contain metal impurities, so their use is especially justified if the patient is allergic to metal. Materials for porcelain crowns are special porcelain-based mixtures that are inert and therefore do not stain or irritate soft tissue.
Just a few years ago, in most cases, prosthetics with porcelain crowns were carried out in the anterior part of the jaw, since it was believed that such products were too fragile for chewing teeth, which bear heavy loads. Indeed, conventional porcelain crowns are more fragile compared to their metal counterparts, but the use of a zirconium dioxide frame made it possible to achieve the necessary strength and make it possible to use them in any area of the jaw. In general, the indications for use of porcelain crowns are almost the same as for other structures of a similar type.
Stages of treatment: how to prepare, install a crown on a tooth
Below we will analyze in detail each of the stages of prosthetics with crowns, and if you want to get advice directly from a specialist, call and make an appointment with the orthopedic doctors of our dental clinic in St. Petersburg - “Unident”. An initial consultation with an orthopedist at our clinic is provided free of charge!
Inspection and diagnostics
The treatment process begins with a visit to the office of an orthopedic dentist.
The specialist will carefully examine the patient’s oral cavity, identify existing problems, and, if necessary, prescribe a number of additional diagnostic measures. Based on the information collected from the clinical case, the orthopedist will draw up a detailed treatment plan and also offer the patient all possible prosthetic options. A well-designed treatment plan necessarily takes into account not only the installation of a dental crown, but also additional procedures:
- Removal of teeth, restoration and treatment of which is impossible for objective reasons;
- Preliminary treatment of diagnosed diseases of teeth and gums;
- Treatment of tooth canals and their filling (carried out when deciding to depulp a tooth before installing a crown);
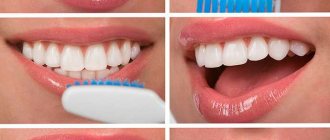
- Professional oral hygiene. Sanitation of the oral cavity before prosthetics must be carried out to completely remove hard and soft plaque from the surface of the teeth. The event will allow you to most accurately select the crown to match the color of the patient’s natural tooth enamel, and will also have a positive impact on the quality of treatment.
The preparation of a treatment plan is completed by selecting a specific type of dental crown, after which the total cost of prosthetics is calculated and the timing of its implementation is specified.
Preparatory stage
The duration of the preparatory stage depends on what procedures will need to be carried out before prosthetics to ensure a high-quality and durable result. Below we will consider in detail all the possible stages of preparation for dental prosthetics with crowns.
Depulpation
A few years ago, before installing crowns, teeth were depulped without fail.
But modern orthopedists, if the clinical case allows, strive to keep teeth viable and do without removing the nerve. A tooth with preserved pulp is not deprived of adequate nutrition with minerals and nutrients, and does not acquire increased fragility. Crowns installed on living teeth last longer, but unfortunately, it is not always possible to refuse pulp removal. Most often, the front teeth are depulped, but the chewing dental units are kept alive. They have a fairly large area of the natural crown, in them the distance from the enamel to the pulp chamber is much greater, and therefore the risk of nerve bundle burns when installing a crown will be minimal.
The decision on the advisability of preliminary pulp removal is also made based on the number of roots, which may vary for different teeth. If you plan to install a crown on a single-rooted tooth, the depulpation procedure is mandatory. When treating single-rooted teeth, the risk of pulp burn is too high, and thermal damage to the sensitive nerve bundle is fraught with the occurrence of an inflammatory process under the installed crown. To prevent such negative consequences, single-rooted teeth are depulped, the canal cavities are treated with antiseptic agents and filled with gutta-percha.
Treatment of diseases of teeth and gums
If, during a visual examination of the oral cavity, the doctor discovers caries, signs of the development of an inflammatory process - these conditions must be eliminated before installing crowns.
If the tooth is significantly destroyed by caries, the doctor removes the affected tissue and restores the crown part by installing a durable filling. Pulpitis and periodontitis are treated according to a more complex scheme, which includes treatment of dental canals and filling them. A high-quality and durable filling must be placed on the tooth, otherwise it may fall out, and the installed crown will fall out along with it. In case of severe destruction of a dental unit, its coronal part can be restored in different ways:
- Installing a seal on the pin. A pin is a special structure in the form of a rod, which is inserted into the root canal of the tooth and acts as a reliable support for the filling;
- Stump tab. Inlays for dental restoration are made in a dental laboratory and are installed, like a pin in a canal, but are also fixed in the crown of the tooth.
If a tooth is severely damaged, it is recommended to restore it with an inlay, which is considered more reliable and durable than a conventional filling or installation of a filling on a pin.
Preparatory activities are completed with professional oral hygiene. Sanitation is necessary for the complete and high-quality elimination of dental plaque, which is a favorable environment for the proliferation of pathogenic organisms, in addition, the procedure will allow you to accurately select the color of the crown for installation so that it matches as closely as possible the shade of the natural enamel of the patient’s teeth.
Preparation
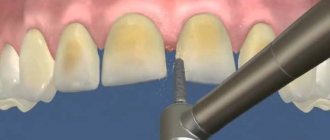
Preparation or grinding of teeth is a procedure that the doctor performs before taking impressions.
During the preparation, the tooth enamel will be ground down to the thickness of the future crown. During the grinding process, a drill is used: with its help, the tooth is given a certain shape that can provide the most durable fixation to the installed crown. If living, non-pulp teeth are subjected to preparation, the procedure can be very unpleasant and painful for the patient, and therefore local anesthesia is used before it is performed. The thickness of the enamel removal will depend on the type of crown that will be subsequently placed on the prepared tooth. A maximum of natural tissue is removed from the tooth to install ceramic and metal-ceramic crowns; the enamel is ground down to a minimum before prosthetics with cast crowns.
After the tooth has been prepared, a stump remains, from which the doctor will take impressions to produce crowns.
Laboratory stage
An impression is taken from the ground teeth. To obtain a high-quality, anatomically accurate impression of teeth, a specialized highly elastic mass is used to produce a crown. Using impressions, a dental technician in the laboratory will make a plaster model of the patient’s teeth, which will be used to make crowns for further installation. Dental crowns can be made from a variety of materials - alloys of precious and non-precious metals, ceramics, zirconium dioxide, metal ceramics. The type of crowns for installation is selected based on the characteristics of a specific clinical situation, the patient’s preferences, his wishes for the level of aesthetics, as well as financial capabilities.
The timing of its production will depend on the type of raw material from which the crown will be made. The company has been producing crowns made of ceramics and metal-ceramics for a long time. So that the patient does not have to walk with an unsightly stump during the entire period of crown production, a temporary immediate prosthesis is placed on it for this period. Temporary crowns are made of plastic, and their installation allows you to relieve the patient from psychological discomfort, as well as protect prepared and vulnerable teeth from the action of pathogenic microflora and harmful environmental factors.
Fitting and installation of dental crowns
When the dental technician makes the crown frame, the patient will be invited to the clinic for fitting.
During fitting of the frame part of the crown, the tightness of its fit to the surface of the tooth stump is assessed. If the fit is insufficient, food debris and bacteria will get under the installed crown, and all this can lead to the onset of an inflammatory process. If during fitting the crown fits perfectly on the stump, the frame is sent to the laboratory, where it will be covered with ceramic mass. The finished crown is tried on a second time and during the second fitting it will be fixed with temporary cement mortar. A second check is required to assess the quality of contact between the prosthesis and the opposing teeth, and if it goes well, the crown will be installed on the tooth using permanent cement. The process of permanently installing a crown on a tooth takes place according to the scheme described below:
- The inside of the crown is covered with a layer of cementing solution, after which the crown is put on the tooth;
- A tooth with a crown is exposed to light, which accelerates the hardening process of the cement mortar;
- All excess cement mixture is carefully removed, since it is a rather caustic substance and, if it comes into contact with soft tissue, can cause severe burns.
The treatment ends with a detailed consultation from the orthodontist on the care of the prosthesis and oral cavity after prosthetics. Compliance with the specialist’s recommendations guarantees the absence of negative side reactions and complications after crown installation.
Indications and contraindications for the installation of porcelain crowns
| Indications: | Contraindications: |
|
|
Medical Internet conferences
Basic principles of tooth preparation for metal-ceramic crowns.
In the technology of manufacturing fixed structures, the most critical link is the preparation of the supporting teeth, since the process itself is irreversible, unlike other stages, and making gross errors is unacceptable. Therefore, I believe that geometrically correct preparation of the supporting teeth, as well as careful processing of hard tissues in the area of the edges of the future structure, is a very important factor in ensuring the durability of the structure and its biological compatibility with surrounding tissues.
In general, when preparing abutment teeth, it is necessary to create a retention form of the stump, as well as the proper interocclusal space necessary to accommodate an aesthetically satisfying and load-resistant structure. In this case, it is desirable to avoid excessive grinding of hard tissues and trauma to the marginal periodontium. In some cases, a larger volume of grinding of hard tissues and a subgingival location of the preparation border are possible, justified by aesthetic requirements or to increase retention.
Types of ledges
Professor Martignoni offers a choice of three types of ledges
- Shoulder (covered with ceramics and metal)
- Shoulder with bevel (overlaid with metal)
- Rounded ledge with bevel (shamfer with bevel) (overlaid with metal)
The bevel of the edge of the ledge is necessary in order to achieve a tighter fit of the crown to the tooth. The angular shoulder (50 degrees), which Kuwata proposed, according to Professor Martignoni, must be covered with metal, otherwise it will not be possible to create an accurate outer contour of the crown.
The preparation scheme proposed by Martignoni is as follows.
On the vestibular surface there is a shoulder, on other surfaces there is a shoulder or a rounded ledge with a bevel. The width of the ledge is on average 1.2 mm; on proximal surfaces the width can be reduced to 0.8 mm.
Domenico Massironi suggests creating a ledge in the form of a modified rounded slope (a long rounded slope). This ledge is universal and suitable for any type of crown. The practitioner can control tissue reduction by using half the diameter of the diamond bur to prepare the preparation and by keeping the center of the bur as close to the final preparation line as possible. The angle of the ledge is approximately 60 degrees.
Two-plane preparation.
Picture 1
The theory of two-plane preparation was developed and described in detail by Kuwata, a famous Japanese dental technician. According to his theory, the vestibular surface of all teeth and the palatal (lingual) surface of molars and premolars has 3 planes:
- Cervical (which corresponds to the direction of the root plane)
- The main one (which coincides with the plane of the gum of the alveolar process)
- The plane of the cutting edge (in incisors and canines) or tubercle (in premolars and molars).
When preparing for a crown, it is necessary to take into account 2 planes: the main one and the cutting edge. The cervical plane will be important when creating a crown; ideally, the contour of the crown at the margin should coincide with the cervical plane and the direction of the root. Overcontouring of the crown will lead to chronic inflammation of the gums. Three-plane preparation is performed when processing the vestibular surface of the tooth for veneer.
Advantages of two-plane preparation.
- Sufficient space is created for the manufacture of an aesthetic metal-ceramic crown. This is especially important in the area of the cutting edge of the incisors and canines.
- Tooth tissue is preserved in the area of the middle third of the stump. Excessive tooth preparation is avoided.
- A more retentional shape of the stump is created due to less taper in the lower and middle third, that is, the so-called “retention zone” of the stump is not lost.
Conclusion
Planning the preparation of abutment teeth should be based on the following principles:
- maximum preservation of dental tissues performance of two-plane preparation
- providing conditions for retention of the future structure, creating a minimum angle of occlusal convergence
- compliance of the shape and surface of the prepared tooth with the requirements of a specific restoration manufacturing technology (casting, CAD/CAM milling);
- integrity of marginal periodontal tissues,
- dividing the preparation into 2 stages allows you to correct errors made during primary processing, avoid exposing the final preparation line in individuals with a thin periodontal biotype, and makes it possible to make an individual mini or full tray to obtain a one-stage impression.
Making porcelain crowns
The production of porcelain crowns requires the presence of expensive equipment and experienced specialists on the staff of a clinic or dental laboratory. Today, two methods are used to produce such crowns - layer-by-layer application of porcelain mass and injection molding technology. The second method is considered more modern (as it provides the finished structure with greater strength) and is used in most dental laboratories. The production of a porcelain crown takes place in several stages.
Stage 1 - preparatory
Preparation of teeth for a porcelain crown and selection of color for the future prosthesis.
Stage 2 - taking an impression
The doctor takes impressions of the teeth, which are then sent to a dental laboratory.
Stage 3 - matrix production
Thin platinum foil is used as a mold for the future dental crown, which is placed on the model and filled with porcelain mass.
Stage 4 - firing
The crown goes through several stages of processing under the influence of high temperatures.
Stage 5 - product processing
The dental technician makes adjustments to the structure so that its shape and surface perfectly match the patient’s teeth. At the final stage, the finished structure is painted and glazed.
Clinical aspects of tooth preparation in the manufacture of porcelain veneers
The article is devoted to a practical issue - an algorithm is proposed for the use of abrasive tools in the manufacture of porcelain veneers (porcelain adhesive veneers, hereinafter FAO).
In a number of publications one can find judgments that preparation for veneers is a fairly simple manipulation that does not require significant skill. However, most experts, with whom we completely agree, consider this type of microprosthetics to be a very complex section of orthopedic treatment. Opponents of this point of view would like to object: “If it’s simple, then why such a price?”
Currently, the standards of basic dental education in the Russian Federation do not provide for the treatment of patients with defects in hard dental tissues with veneers. This leads to the fact that young specialists have a very vague understanding of the possibilities of this treatment method and only a few of them are able to qualitatively prepare a tooth for adhesive veneering. Most beginners, trying to impress their colleagues, “treat” patients, ultimately discrediting this type of microprosthetics. In our opinion, this is what leads to the fragility of these structures and prevents their wider use in everyday practice.
I would like to warn my colleagues against some incorrect approaches when treating patients using porcelain veneers. Considering that FAO is most often used to replace defects in the hard tissues of anterior teeth, a certain sequence should be observed. In other words, it is necessary to first replace existing defects in the lateral areas of the dentition, correct occlusal and articulatory relationships, taking into account the characteristics of the bite. It is important to take into account the presence of parafunctions of the masticatory muscles, somatic pathology, and in general all anamnestic data that allows orthopedic treatment with a long-term favorable prognosis.
Your view on the sequence of preparation and the peculiarities of working with abrasive instruments at the clinical stages of manufacturing FAO can be demonstrated using a clinical example of complex treatment of patient K., 55 years old. The primary clinical picture, the sequence of stages of preparation for orthopedic treatment and prosthetics are presented in Fig. 1–3.
Rice. 1. The dentition of patient K. at the stage of preparation for prosthetics.
Rice. 2. Orthopantomogram of the jaws after the manufacture of metal-ceramic crowns and a removable supported prosthesis on the lower jaw with a beam fixation system.
Rice. 3. Dentition after the end of the adaptation period and before the production of FAO for teeth 1.1, 2.1.
The production of veneers should begin only after replacing defects in the dentition and completing the period of adaptation to a removable denture.
As can be seen in Fig. 4, the maxillary central incisors have old composite veneers that do not meet clinical requirements. Unfortunately, dentists rarely encounter clinical situations where a veneer is made on a tooth that does not have any defects or old fillings. Therefore, for demonstration, we chose a rather complex clinical situation, and for clarity of manipulations, a similar tooth preparation was carried out on a phantom.
Rice. 4. Appearance of old direct composite veneers on 1.1, 2.1 teeth.
Anesthesia and opening of the periodontal groove with a retraction thread to ensure good access to the gingival area of preparation and quiet work of the doctor is a necessary condition (Fig. 5).
Rice. 5. Creation of marking grooves to control the depth of preparation of the vestibular surface.
The first stage is the preparation of the vestibular surface of the teeth with the creation of marking grooves that determine the volume of subsequent grinding. Considering that in the classic version, veneers are located within the enamel and their minimum thickness, which gives the porcelain mechanical strength, is 0.6–0.7 mm, marking bur 834-021M-FG is used, the design of the working part of which allows you to create grooves with a depth of 0. 5 mm (Fig. 5, 6).
Rice. 6. Marking grooves (view from the cutting edge).
It is better to apply the grooves in a vertical direction from the area located in the gingival part towards the cutting edge. This stage is important for determining the volume of tissue to be sanded and the thickness of the veneer being made.
The second stage is the formation of a gingival groove 0.5 mm wide and 0.5 mm deep (Fig. 7).
Rice. 7. Creation of a gingival groove with a depth and width of 0.5 mm.
This is conveniently done with a bur 868A-018M-FG with a rounded tip with a diameter of 1 mm, immersing it half the diameter into the hard tissues of the tooth. If you have confident manual skills, you can use burs 881-012С-FG or 882-012С-FG. The level of the groove depends on the condition of the enamel in this area. If the enamel is not destroyed or discolored, it is possible to create a groove up to the gingival margin. You should be very careful to create enough space for the porcelain lining. In other cases, the groove must be positioned more apically, but immersed no deeper than 0.5 mm into the periodontal groove. Insufficient preparation can lead to violations of the “biological width” of the gingival margin and the creation of a hypercontour of the restoration with subsequent negative reactions from the marginal periodontal margin (gingivitis, bleeding, recession).
Subsequent preparation of the vestibular surface can be carried out immediately along its entire plane with the simultaneous creation of grooves on the proximal edges, or first, approximal grooves are formed that connect to the gingival groove (Fig. 8–10)
Rice. 8. Creation of the approximal boundaries of the cavity and preparation of the vestibular surface of the bur.
Rice. 9. Depending on the height of the clinical crown, burs 881-012F-FG or 882-012F-FG are used.
Rice. 10. View of the treated surface from the side of the cutting edge.
Then the hard tooth tissues are ground down along the entire vestibular surface to the depth programmed by the depth marker.
Depending on the height of the clinical crown, burs with different lengths of the working part are used: 882-012F-FG, 881-012F-FG. It should be noted that in any case, when creating the approximal boundaries of the prepared cavity, they must be located as close as possible to the contact points. This allows you to make the edges of the veneer invisible and improve the aesthetics of the microprosthesis. If possible, interdental contacts should be maintained, but given that the edges of the veneer should not be very thin, in order to avoid chipping, the proximal grooves should have a depth of up to 0.5 mm. In some cases, it is necessary to open approximal (interdental) contacts. In our opinion, such preparation transforms the microprosthesis from veneers into the category of half-crowns. In this case, it is necessary to stabilize the teeth with temporary structures to prevent their displacement. In addition, this complicates the laboratory stages of manufacturing prostheses and their subsequent fitting.
Preparation of the incisal edge is the most controversial issue in the manufacture of veneers. Various options are offered: an oblique bevel of the incisal edge, or its thinning, a fenestrated overlap of the incisal edge, or with the creation of an oral sulcus. Thus, two groups can be distinguished: with and without overlap of the cutting edge.
As literature data and our own observations show, the most successful option is with a shortened cutting edge and the creation of an oral groove for strength and reliability of veneer fixation. This should also be taken into account because quite often there are clinical situations when it is necessary to change the length of the cutting edge.
To prepare the cutting edge and create an oral groove, burs 379-023F-FG or 881-012C-FG are used, although only the latter can be used (Fig. 11, 12).
Rice. 11. Shortening the cutting edge and preparing the oral surface, using a bullet-shaped bur 379-023F-FG.
Rice. 12. Creating a groove on the oral surface of the phantom tooth with bur 881-012C-FG.
The final treatment of the cavity is carried out with burs with green markings 882-012C-FG or 881-012C-FG. This achieves the creation of a surface with good characteristics for subsequent adhesive fixation of FAO (Fig. 13).
Rice. 13. Final treatment of the cavity to create a better adhesive bond. Cylindrical burs 882-012C-FG or 881-012C-FG with a round tip and green markings are used.
The final appearance of the formed cavities is shown in Fig. 14–17.
Rice. 14, 15. View of the prepared cavity from different angles, vital teeth before taking impressions.
Rice. 16, 17. ... on a phantom.
Speaking about preparation, we should dwell on some controversial issues regarding the “exposure” of dentin during grinding and the need to make temporary veneers. From our point of view, it is possible to “expose” the dentin to create sufficient thickness of the FAO. In addition, existing modern systems for fixation ensure long-term reliable adhesion to both enamel and dentin.
The production of temporary veneers is mandatory and, due to the availability of composite self-hardening materials for this in the dentist’s assortment, does not cause much difficulty. We made direct temporary veneers (Protemp 4 Garant 3M ESPE) based on the impression taken before preparation. Their temporary fixation is carried out by spot application of adhesive on the contacting surfaces of the provisional veneer and tooth, without etching and with short-term photopolymerization (Fig. 18).
Rice. 18. Provisional veneers were made.
After removing the temporary veneers, we used A-silicone (Expess XT Penta Putty and Ultralight body, 3M Espe) to obtain a working impression, and the veneers themselves were made of low-temperature sintered Noritake ceramics using the Accu Trac system for casting models and obtaining fireproof dies ( Fig. 19–21).
Rice. 19–21. AccuTrac dismountable model system, FAO fitted to the model.
FAO was fixed with Relyx ARC composite cement (3M Espe) of the appropriate shade (Fig. 22, 23).
Rice. 22, 23. Stages of FAO fixation (Relyx ARS composite material, 3M Espe).
In some cases, after fixing the veneer, it becomes necessary to correct its shape from the vestibular surface or in places of contact with antagonist teeth. The first is carried out with a conical bur with a rounded tip 850-014SF-FG, the second with an olive bur 379-023SF-FG, both with yellow markings. In our clinical case, only an olive-shaped bur was useful for shortening the FAO on the left incisor.
Removal of excess material should also be carried out with abrasive tools. It is not advisable to use manual instruments (excavators, probes), as this can lead to marginal chipping of the veneer as a result of uncontrolled pressing on them. For these purposes, we used a carbide finisher H48L-012-FG (Fig. 24).
Rice. 24. Removal of excess material from the cervical area 1.1; 2.1 teeth carbide finisher H48L
012-FG.
If the glazed surface of the FAO was corrected after its fixation, there is a need to treat these areas with ceramic polishing heads. We used aluminum oxide polishers P0362 (Cerapink), P0372 (Cerasupergrey) (Fig. 25).
Rice. 25. Use of ceramic aluminum oxide polishers for polishing areas of veneers ground off after glazing P0362, P0372.
The results of orthopedic treatment of patient K. are presented in Fig. 26–27.
Rice. 26. Appearance of the dentition after permanent fixation of the FAO.
Rice. 27. The result of orthopedic treatment of patient K.
Thus, our recommended set of abrasive instruments for performing the clinical stages of producing FAO includes 11 types of instruments:
379-023SF-FG, diamond bur, oval
Correction of the glazed surface of the veneer at points of contact with antagonists
834-021M-FG, diamond bur, depth marker
Drawing grooves on the vestibular surface to determine the amount of grinding
850-014SF-FG, diamond bur, round tip cone
Correction of the shape of the vestibular glazed surface of the veneer
868A-018M-FG, diamond bur, round tip cone
Creation of the gingival groove
881-012C-FG, 881-012F-FG, diamond bur, round end cylinder
Final treatment of the cavity to create a surface with good adhesion conditions
882-012C-FG, 882-012F-FG, diamond bur, round end cylinder
Creating proximal preparation margins
H48L-012-FG, carbide finishing, flame
Removal of excess composite material after permanent veneer placement
P0362, CeraPink polishers, medium grit
Polishing areas of porcelain in areas where the surface has been corrected after glazing
P0372, CeraSupergrey polishers, fine grit
Polishing areas of porcelain in areas where the surface has been corrected after glazing
All instruments manufactured by NTI-Kahla GmbH Rotary Dental Instruments, Germany
Authors: N. N. Abolmasov, M. S. Serdyukov, S. G. Tyman, O. Yu. Chebotarenko
Porcelain or metal-ceramic crowns?
Much more often we have to compare porcelain and metal-ceramic crowns. Structures with a metal frame have a number of advantages: they are stronger and significantly cheaper. At the same time, they lose greatly in aesthetics: all competent specialists will recommend putting porcelain crowns on your front teeth if you want your smile to be as natural as possible. It is believed that it is justified to install metal-ceramic crowns on chewing teeth, and porcelain crowns on incisors. However, if a porcelain crown has a zirconium dioxide frame, then it can be used to restore any tooth.
Preparation with a ledge: a necessity or a priority
With this approach, the boundaries between orthopedic dentists, therapists and surgeons are “blurred”. And it is no longer so important what specialty the doctor providing dental care is; what is important is the doctor’s choice in favor of one or another preparation technique.
Let's first figure out what is the meaning of creating a ledge on the stump of a prepared tooth. First of all, we note that the ledge is not a supporting element for the crown, although it takes on some of the load. The need to form a ledge is dictated, first of all, by the aesthetic and functional requirements of modern orthopedic dentistry. The thing is that any artificial crown has some minimum thickness; it consists of the thickness of the frame and the thickness of the facing material. For example, the minimum thickness of a base metal frame should be 0.3-0.4 mm. Let's add here the minimum possible layer of cladding to obtain the most modest aesthetics of 0.7 mm. As a result, we get about 1 mm of crown thickness in the edge area. According to modern requirements of dentistry, we must restore the anatomical shape of the tooth without creating overhanging edges, with a smooth transition of the crown into the contours of the tooth. And this, in turn, is impossible without the formation of a ledge. Automatically, the question of the possibility of a non-invasive preparation technique can be “removed” from the agenda. You can talk about the “ledge symbol” only in the case of making a crown with a complete circular metal garland, which can be polished almost “to nothing”, but it is quite difficult to do this efficiently, and you are guaranteed a clear loss in the aesthetics of the cervical area. So is there a need for barbaric preparation without a ledge, for creating a “ledge symbol” that is barely visible to a technician, if you can simply form a high-quality ledge using modern cutting burs? The technology for creating a full-fledged ledge today is as simple as a multiplication table. And in this publication we will try to present it in the form of a certain sequence of actions by a doctor with appropriate explanations. So, step number 1. Creation of occlusal separation. (Fig. 1). We recommend performing this step with a diamond bur No. 909-xxx
rice. 1. Disconnection for the thickness of an artificial crown using a diamond bur No. 909-xxx
Step #2. Removal of large volumes of tissue from the side walls of the tooth. (Fig. 2). We recommend performing this step with an aggressive grinding bur; a TDA series bur is ideal. This stage is usually accompanied by the formation of a preliminary ledge above the gum level.
rice. 2. Removal of large volumes of tissue from the side walls of the tooth with a TDA bur. At the same time we form a preliminary ledge.
Step #3. Formation of a completed ledge at or below the level of the gums (Fig. 3). This stage must be carried out with a carbide tool. The design feature of this bur is the end end of the working head. In Great White Ultra burs, it is increased in size and has a large radius of curvature, with the constant absence of horizontal notches on the curvature of the bur head. (Fig. 4.) This design of the bur makes it simply an ideal tool for forming the final ledge on the tooth stump and finishing polishing the ledge to a glossy surface.
rice. 3. Formation of a complete ledge at or below the level of the gums.
Rice. 4. Simultaneous formation of the final ledge on the tooth stump and final polishing to a glossy surface.
According to the literature, of the many forms of ledges, the most applicable today are ledges of 135 degrees and 90 degrees (most often, its modernized analogue with a semicircular transition between the “wall and bottom” is used).
Price for porcelain crowns in Moscow
The price of a porcelain crown per tooth in Moscow dentistry largely depends on the level of the clinic where the patient is being treated. In most cases, such a design is offered in dentistry at the “business” or “premium” level, where much attention is paid to the aesthetic side of prosthetics. At the same time, the price of porcelain crowns for the front teeth is practically no different from similar designs for chewing teeth.
| Type of dental crown | Price |
| Ceramic porcelain crown | 13,000 - 17,000 rubles |
| Porcelain crown on a zirconium dioxide frame | 19,000 - 25,000 rubles |
Stages of the procedure for installing a crown
The crown installation procedure is usually carried out in two stages.
Each stage is carried out separately, and the patient visits the dentist twice to install the crown.
The first stage includes: 1) preparing (grinding) the tooth, 2) taking an impression of the tooth, and 3) installing a temporary crown. The duration of the procedure is from 30 minutes to one hour.
Between the patient's two visits to the dentist, the crown is made in the laboratory of the adult dentistry clinic. This process usually takes about two weeks.
In the second stage, the dentist places the finished crown on the tooth, using filling material to secure it. The procedure takes about 20 minutes.
One-stage crown installation .
A variation of the main method is to install a crown in one step. If the dentist has all the necessary equipment at his disposal, the procedure will take an hour or two.
The first stage of crown installation
Preparing your teeth
Before the crown procedure begins, the dentist anesthetizes both the tooth and the surrounding gum area.
If the root of the dental canal is sealed, dental anesthesia is not needed. However, the dentist may consider it necessary to anesthetize the gums.
Preparation (grinding) of the tooth.
The tooth must be ground on all sides to reduce its size, since crowns must have a certain minimum thickness to ensure sufficient strength. Most crowns are about two millimeters thick. If the crown is porcelain, then the thickness of the porcelain layer should be sufficient to create visible natural translucency.
Additional reduction in tooth size.
During the process of grinding a tooth, the dentist is obliged to remove all damage from it, including poorly installed, “wobbly” or poor-quality fillings. As a result, most of the tooth may be removed. (There is no need to worry about this. The crown will be thicker in such areas).
The closer the tooth is in contact with the inside of the crown (the greater the correspondence between the contacting surfaces), the more firmly the crown will hold.
The prepared tooth must have a certain shape.
The dentist not only reduces the size of the tooth, he gives it the desired shape. The tooth must have a cone shape with a slight bevel angle so that a crown (a hard, inflexible shell) can be placed on it.
The correct shape of the ground tooth should ensure a tight fit and good fixation of the crown.
For a quality installation, it is not enough to simply place the crown on the filling material. The shape of the tooth is of great importance in ensuring a tight fit and reliable fixation of the crown.
The closer the shape of the ground tooth matches the shape of the inside of the crown, the better the crown will hold.
In cases where a large portion of the tooth is missing or significantly damaged, the dentist “builds on” the tooth with filling material (enlarges it) before filing the crown.
After grinding the tooth, the dentist must make an impression of it by applying impression material.
Most dentists use a special paste or powdered substance as an impression mass that has the properties of an impression mass.
It is also necessary to take impressions of the teeth located opposite the ground tooth (that is, the teeth that will come into contact with the crown when chewing). A bite impression is also taken to determine at what angle the patient's teeth meet.
How is the impression used?
The finished impression is sent to a dental laboratory, where a plaster copy is made of it to make a crown.
A plaster copy is an exact reproduction of the crowned tooth and adjacent teeth. Therefore, if the crown is made according to the dimensions of the copy, it will fit exactly on the tooth. In some cases, minor adjustments are still required.
Depending on the individual characteristics of the tooth, the work on making a crown in the laboratory takes about two weeks.
In addition to the procedure:
Some dentists have state-of-the-art milling machines that can be used to design and fabricate a crown right in the office.
Installation of a temporary crown
If the crown is made in a laboratory, you will have to wait about two weeks. At this time, you can install a temporary crown.
A temporary crown will protect your teeth and prevent them from moving.
A temporary crown is usually made of plastic, sometimes a metal-ceramic crown is available. Sometimes, for this purpose, blanks are taken and adjusted to a specific tooth, or they are made according to the dentist’s sketch.
The temporary crown is secured with a filling compound, which is easily removed before installing the permanent crown.
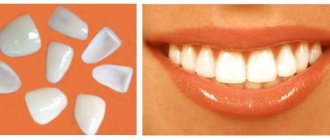
Choice of crown color.
If your new crown has a porcelain surface, your dentist will need to determine what shade of porcelain matches the color of the teeth adjacent to the crown.
The dentist uses a set of small samples in the form of teeth of different shades. This set of samples is called a “shade palette.”
Individual samples are applied in turn to the place where the crown will be installed, and the most suitable one is selected.
Crown installation stage.
Once the crown is made, the dentist can begin installing it.
- Removing the temporary crown
At this stage it is necessary:
Give anesthesia. This stage is not always necessary. Often the process of installing and securing the crown is painless for the patient.
Remove the temporary crown and remove any remaining filling material from the tooth.
- Assessing suitability and appearance of the crown.
Before placing a crown, the dentist must ensure that it is suitable and in good appearance. The assessment process includes:
Checking the strength of the attachment - the dentist places the crown on the tooth and checks the tightness of the fit using dental floss and tapping the tooth with an instrument, while the patient is asked to slightly squeeze the teeth.
After this, the doctor removes the crown, then puts it on again, slightly changing its position, removes it again, and this is repeated several times until the crown takes the desired position relative to adjacent and opposite teeth.
Checking the appearance. – Additionally, and in some cases mandatory, for example, when a dental crown is visible when you smile, the dentist should give you a mirror and ask you to evaluate the shape and color of the crown.
Do not hesitate to express your opinion and ask the doctor questions, and this must be done before the filling material hardens, then it will no longer be possible to make some changes (such as color changes and even some shape changes).
Planting the crown on cementing material
- Cementing the crown
If both you and the dentist feel that the crown is installed correctly and looks good, cementation can be done. For this:
Dental cement is placed inside the crown, after which it is placed on the tooth.
When the cement begins to harden, the dentist uses a dental instrument and scrapes off the excess cement that protrudes beyond the edges of the crown.
This completes the crown placement procedure.
Precautions after placing a crown
The dentist will explain to you what to do in the first hours after the crown is placed. For example, when using some types of dental cement, it is recommended to avoid impacting the crown (avoid eating too hard or sticky foods) until the cement has fully cured.
After administering anesthesia, caution should be exercised until the numbness subsides. Otherwise, you may bite your lip or cheek, and quite hard.
After the numbness has passed, the next day or a little later, lightly clench your teeth to make sure that the crown does not cause discomfort when opening and closing your mouth. If you feel discomfort, tell your dentist and he will correct the problem (usually by grinding the surface of the crown). If this is not done, complications, sometimes serious, are possible.
Purposes of preparation
In the process of turning teeth for crowns, the following is created:
- Prosthetic space for construction;
- The support stump is of a shape that will provide conditions for the application and fixation of the prosthesis;
- Correct relationship between the edge of the artificial crown and the periodontium.
Each of the above points is very important in the process of functioning of the structure. Prosthetic space is necessary to prevent overbite. The correct shape of the ground tooth will ensure the longest and most durable cementation. And it is worth mentioning separately about the correct interaction with the periodontium.