After installing a filling, artistic restoration with composite materials, or professional cleaning, teeth must be polished.
The tasks in each case are different, but the meaning is the same: to make the surface as smooth as possible, to remove microcracks, the smallest protrusions and grooves. The smoother the surface, the fewer bacteria there are, which means the lower the risk of infections and inflammation in the oral cavity.
- When used:
polishing restorations and fillings; after hygiene - Treatment period:
as needed - Type of anesthesia:
not required - Procedure time:
up to 40 minutes - Age restrictions:
from 18 years old (in our clinic)
Goals of the procedure
Composite restorations are polished to prevent the accumulation of bacteria in small cracks, and fillings are polished to smooth the transition between it and dentin and correct microdefects.
Grinding and polishing the enamel is the final stage of hygienic teeth cleaning and plaque removal. After the teeth are freed from deposits, their surface becomes rough, and microcracks appear in the dentin. This is a guarantee that plaque will form again and quite quickly. Polishing your teeth after brushing removes minor defects and remaining mineral deposits, preventing the formation of stone.
Finishing the filling. Manual
The rotation speed and the force of pressure on the working surface are the main parameters on which the final result of finishing the restoration depends. Turbine tips develop rotation speeds from 350,000 to 450,000 rpm. Finishing diamond and carbide burs and polishing stones can be used with turbine tips. The force of pressure on the working tool should not be large (less than 1 Newton), since excessive pressure at such a speed will lead to sudden overheating of tooth tissue, cracking of the filling surface, and damage to healthy enamel. All turbine finishing tools require adequate water cooling (average 30-40 ml/min).
The speed of the contra-angle handpieces directly depends on the type of micromotor and the reduction coefficient. Pneumatic micromotors have a minimum rotation speed of 2000 to 5000 revolutions and a maximum speed of 20,000 revolutions. For electric micromotors, these parameters range from 60 to 40,000 rpm, respectively.
The operating speed of most finishing tools ranges from 2,000 to 10,000 rpm, with an average of 5,000 rpm. At this speed, a tip without reduction (1:1), as a rule, does not have enough torque (torque), which reduces the efficiency of processing the filling. Increasing the speed leads to the same problems as when working with turbine tips. For pneumatic micromotors, the optimal contra-angle reduction is 4:1, for electric micromotors - 8:1. The maximum rotation speed of the tool in the handpiece is 5000 rpm with powerful torque. Finishing at these speeds can be done with or without water cooling depending on the type of tool.
STEPS OF FINAL PROCESSING OF FILLINGS
The idea of finishing fillings in the form of grinding and polishing stages does not correspond to the current state of affairs in this area. Since the correct sequence of processing a filling largely determines its quality, the main stages of finishing restorations are presented below (Fig. 2):
1. Contouring of the filling (rough initial processing) is carried out with highly abrasive tools using turbine and contra-angle tips.
2. Formation of the final anatomical shape of the filling (occlusal and proximal correction) is carried out with instruments with standard abrasiveness using turbine and angled tips. Assessment of occlusal relationships is carried out using a special
Are there any contraindications
There are no contraindications for polishing teeth, but procedures that precede this do have them.
For ultrasonic cleaning:
- presence of a pacemaker;
- treatment with immunosuppressants and corticosteroids;
- recent eye surgery;
- epilepsy;
- severe form of diabetes.
For AirFlow:
- taking medications for salt balance;
- hepatitis;
- AIDS;
- sodium-free diet;
- lung diseases, asthma.
In case of infections, diseases of the upper respiratory tract, exacerbation of general conditions, or the presence of ulcers in the mouth, it is worth postponing resurfacing until the condition improves.
Tools for grinding and polishing fillings
For grinding and polishing fillings the following are used:
• rubber and silicone abrasive heads (Fig. 2.75);
• polishing brushes;
• polishing discs.
Rice. 2.75.
Silicone polishing heads
Rubber and silicone heads can have varying degrees of abrasiveness. Rubber or silicone contains abrasive particles, so when grinding and polishing there is no need to use polishing paste. Treatment with such heads should be carried out at low speed with air-water cooling, so as not to overheat the hard tissues of the tooth.
Table 2.3.
Shape of the working part and area of application of rotary instruments
Continuation of the table. 2.3
Continuation of the table. 2.3
End of table. 2.3
Polishing discs are made on a paper or plastic base with an abrasive applied (usually on one side). In the center there is a hole for mounting on the disc holder. Polishing discs have several degrees of abrasiveness: highly abrasive (C), medium (M), low (F) and ultra-low abrasive (XF). Their consistent use allows achieving high quality surface polishing.
Polishing brushes are made of polymer bristles impregnated with abrasive particles. Thanks to this design, the brushes do not require the use of polishing paste and do not damage the enamel, surface and edges of the restoration. Used for polishing concave cavities of restorations, fissures, cervical areas and other hard-to-reach areas.
In addition, fine-grained diamond burs and carbide finishing materials are used for grinding and polishing restorations.
Rice. 2.76.
Set of cutters for orthopedic work
Rice. 2.77.
Set for preparation for solid crowns
When working with rotary instruments, you must adhere to the following requirements:
• necroectomy when preparing carious cavities should be started with a cutting manual excavator, and then a bur should be used;
• use sharp tools; the size of the rod must correspond to the collet of the tip and be firmly fixed;
• the bur must rotate when inserting and removing it from the carious cavity;
• when working with a turbine tip, air-water cooling must be used;
• movements with the bur should be intermittent, “stroking” with little pressure on the bur.
In order to unify the work of dentists, manufacturing companies have created sets of tools for various types of work (Fig. 2.76, 2.77).
HAND TOOLS
In the process of treating a dental patient, various hand instruments are used that are necessary to perform a particular operation. They can be divided into 3 groups:
• instruments for examining the oral cavity;
• instruments used during a therapeutic appointment for the treatment of caries and its complications, diseases of periodontal tissue, and the oral mucosa (Fig. 2.78);
• special instruments used in surgical and orthopedic procedures.
The following hand instruments are used during a therapeutic appointment:
• diagnostic instruments (mirror, probe, tweezers);
• instruments for professional hygiene (scalers, curettes, hoes, rasps);
• cutting instruments for the formation of a carious cavity (hatchets, chisels, hoes, gum edge trimmers);
• endodontic instruments;
• tools for applying filling materials and modeling fillings (trowels, fillers, carvers);
• auxiliary tools (retractors, packers). Dental mirror
(Fig. 2.79) consists of metal
a handle with a rod screwed into it, at the end of which a concave mirror is fixed in a metal frame at an angle of 110-120°, which allows examination of the oral cavity in areas inaccessible to direct observation (Fig. 2.80). It is also used to retract and hold soft tissues and illuminate dark areas of the oral cavity. Since the mirror is concave, the image in it turns out to be enlarged, virtual, inverse. These properties create certain difficulties at the beginning of work, which are quickly overcome with the acquisition of practical skills.
In dental practice, mirrors of various shapes, sizes and with different magnifying powers of the mirror surface are used, as well as flat ones without magnifying the object. The most commonly used are round mirrors with a diameter of 20, 22, 25 mm with magnifying
Rice. 2.78.
Therapy tray
Rice. 2.79.
Dental mirror
Rice. 2.80.
Using a dental mirror
Rice. 2.81.
Bayonet probe
Rice. 2.82.
Angled dental probe
Rice. 2.83.
Periodontal button probe
Rice. 2.84.
Furcation (crescent) probe
ability up to 30%. Some mirrors are equipped with additional lighting. In recent years, endodontic micromirrors have become widely used. The working part of these tools is a perfectly polished metal surface with a diameter of 2.5-9 mm.
Dental probe
used to examine the fissures of the tooth crown, carious cavities, root canal mouths, overhanging edges of fillings or enamel, fixed orthopedic and orthodontic structures, the presence of softened dentin, and identification of dental plaque. A distinction is made between a straight (bayonet-shaped) probe (Fig. 2.81) and a probe bent at an angle (Fig. 2.82).
To diagnose disorders of the periodontal junction, button-shaped probes are used (Fig. 2.83) with a gradation millimeter scale applied to the working part. To determine bone tissue atrophy in the area of root furcation, a furcation probe is used (Fig. 2.84). For patients with implants, it is necessary to use special periodontal probes with a plastic working part.
Dental tweezers
(Fig. 2.85) at the ends they have cone-shaped branches, the inner side of which is either transverse
Rice. 2.85.
Dental tweezers: a - with a clamping mechanism; b - without clamp
Rice. 2.86.
Enamel knife: a - in the process of work; b - view of the working part
Rice. 2.87.
Excavator
notched or smooth. They are used for introducing and removing various auxiliary and diagnostic accessories from the oral cavity (cotton rolls, articulating paper), inserting pins into the tooth cavity, medicines on turundas, capturing small instruments (burs, endodontic instruments), as well as for determining tooth mobility (at present, this method of determining mobility is being eradicated: many authors advise determining mobility
teeth with the handles of two instruments). Depending on the manipulations performed, straight tweezers or tweezers curved along a plane are used. Both can be equipped with a clamping mechanism.
Enamel knife
(Fig. 2.86),
a dental chisel
and
a trimmer
are used when processing the edges of a cavity, if a rotary instrument can damage adjacent teeth, in the absence of conditions for traditional treatment (ART-method), in pediatric practice. These tools require constant sharpening as they become dull over time.
Excavators
(Fig. 2.87) serve to remove necrotic tissue, food debris and temporary dressings from the carious cavity. They are a handle, at the ends of which there are sharp spoons located at an angle with sharp edges facing in opposite directions. Can be of different sizes (No. 1-3) and shapes.
Rice. 2.88.
Dental spatula
Rice. 2.89.
Double sided iron
Rice. 2.90.
Double-sided stopper
Rice. 2.91.
Stopper for filling with amalgam
Rice. 2.92.
Plugger-stroker
When filling carious cavities, spatulas, smoothers, and fillers are used.
Putty knife
(Fig. 2.88) consists of a handle, at both ends of which there are elongated straight spatulas. Using a spatula, filling materials, pastes, and medications are mixed. Spatulas can be metal or plastic (for working with materials that can become colored upon contact with metals). In surgical departments, disposable wooden spatulas are also used to push back, press and hold soft tissues.
ironer
consists of a handle and a working part in the form of a straight or curved spatula, located in different planes relative to the handle. It is used to introduce filling material and medicinal dressings into the treated carious cavity. It is used to form a filling (Fig. 2.89). In surgical dentistry, periodontal fibers and soft tissues are separated with a sickle-shaped trowel. Currently, there is a huge range of ironing irons on the market, varying in size and shape; single- and double-sided, combined with plugger.
Stopfer
(Fig. 2.90-2.92) serves to seal the sealing
Rice. 2.93.
Amalgamotregger
of material in the treated carious cavity. Based on the type of working part, there are spherical, cylindrical with a rounded working part, cylindrical with a flattened working part, cylindrical with a scalloped working surface (for compacting amalgam), cone-shaped, reverse-cone-shaped (planator) pluggers, return-action plugger and retrograde plugger for retrograde filling.
Amalgamotregger
(Fig. 2.93) serves to introduce amalgam into the treated carious cavity. It consists of a handle,
at the end of which there is a cylinder intended for collecting amalgam; the latter is then pushed into the carious cavity using a piston and a lever system.
When filling carious cavities on the contact surfaces of teeth, various types of matrices are used.
The shape differs between contour and strip matrices.
Contour matrices
have shaped walls that give the surface of the filling the correct curvature according to the group affiliation of the tooth.
Tape matrices
are used mainly to delimit contact points of adjacent teeth. Based on the material, matrices are divided into metal, lavsan and combined (Fig. 2.94).
Rice. 2.94.
Various types of matrices
Matrix holders
(Fig. 2.95) are designed for fixing matrices and are represented by two groups of tools: tape matrix clamps (Nystrom matrix-holder) and sectional matrix clamps (Ivory matrix-holder).
There are many special instruments for surgical, orthopedic, orthodontic and periodontal work that are not discussed in this manual.
Rice. 2.95.
Matrix holder
What is used
After removing plaque with ultrasound or an air-abrasive device (AirFlow), the dentist begins grinding the teeth.
For this we use:
- Special polishing attachments.
Rubber cups are filled with abrasive paste and all surfaces are thoroughly treated. To treat the tooth crown after the cup, brushes are used. - Strips.
To polish between the teeth, dental tapes (strips) are used. They do this very carefully, trying not to damage the gums. - Abrasive pastes.
To enhance the abrasive effect, use: - Zircon:
an abrasive that perfectly removes age spots and yellowness in smokers. - Silicon dioxide:
suitable for post-scaling polishing, fillings and artistic restorations - Aluminum hydroxide:
depending on particle size, used for both plaque removal and final polishing - Titanium dioxide:
polishes enamel and closes tubules in dentin
Dental filling. Filling technique
As you know, the most common materials for filling teeth are light-curing composites. Taking this fact into account, let’s consider the technology for installing a photocomposite filling.
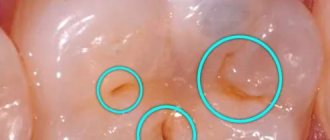
The method of filling a tooth directly depends on the volume and depth of the carious process. Based on the depth of the carious cavity, caries is classified as: superficial, medium and deep. With superficial caries, the carious defect is located within the enamel. In moderate cases, the enamel is affected and the dentin is affected. With deep caries, the enamel is damaged and a significant layer of dentin is destroyed by caries.
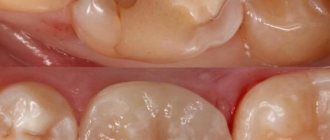
Superficial caries
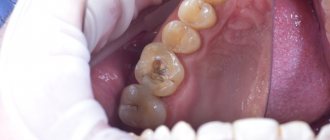
Average caries
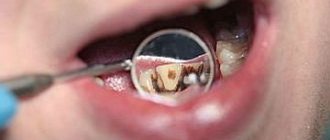
Deep caries
After the carious cavity is prepared for filling, the tooth must be isolated from saliva. Failure to comply with this requirement can lead to wetting of the prepared cavity with saliva and, as a result, cause a violation of the tightness of the filling to the tooth. This leads to caries at the interface between the filling and the tooth, and can also cause the dental filling to “fall out”.
To isolate teeth from saliva, cotton swabs are used, or a more reliable method is isolation using a rubber dam. A rubber dam (or rubber dam) is a thin sheet of latex rubber. Using a special technique, the rubber dam sheet is placed on the tooth, creating a dry working field. Saliva is removed from the mouth using a saliva ejector.
Figure 1: Rubber dam sheet.
Fig. 2: Clasps are metal clips for fixing the rubber dam to the tooth.
Figure 3: Tooth isolated with rubber dam.
Then acid etching of the prepared cavity is carried out using 37% phosphoric acid. This is done in order to remove the so-called “smear layer” and increase the contact area between the surface of the tooth cavity and the filling. During etching, the acid dissolves the inorganic components of the tooth tissue, creating a rough surface. After 20–60 seconds, the acid is washed off with water and the tooth is dried with air.
The next step is to introduce the so-called “bond” into the cavity - its function is to create an “adhesive” layer for reliable “adhesion” of the filling to the tooth tissue.
Applying bond to the walls of the prepared cavity
After bonding, the walls of the cavity are covered with a special special flowable composite. Thanks to its fluidity, it penetrates into all microcavities, creating a thin and smooth “adaptive” layer. This layer helps relieve mechanical stress from the walls of the tooth cavity. Then the flowable composite introduced into the cavity is cured with the light of a special dental lamp.
Dental curing lamp
Light curing of fillings
The filling material is directly introduced into the cavity in portions and evenly distributed in it. After which it is cured with lamp light. So, layer by layer, the entire cavity is filled. It is very important that the thickness of each layer does not exceed 2 mm. This requirement is associated with polymerization shrinkage of the photocomposite (reduction in volume during curing) and the inability to polymerize a “thick” layer of the composite with lamp light. If this rule is not followed, a microgap may form between the filling and the tooth tissue, which leads to recurrent caries. This mistake can also cause pain after the filling is placed.
So, the light seal is “installed”. Now it should be processed, i.e. give the restored tooth the correct anatomical shape and polish the filling. Pre-treatment of the filling is carried out using diamond or carbide burs. Excess filling material is removed, sharp edges are smoothed, and the filling is given a relief characteristic of a given tooth. To control the full contact between the restored tooth and the antagonist (a similar tooth in the opposite jaw), carbon paper is used. When the teeth are closed, the paper leaves an imprint on the filling in the place where the contact is excessive. This point is sanded. This operation is repeated until optimal contact between the antagonists is achieved. For final processing of the filling, polishing rubber bands, abrasive discs and strips are used. After which the filling is polished with a special polishing paste and coated with a protective varnish.
Clinical example of dental restoration with heliocomposite
A: Initial situation (amalgam fillings requiring replacement).
B: The fillings are removed and the resulting cavities are etched and covered with bonding agent.
C, D, E: Stages of restoration of the second upper premolar.
Type of completed dental restoration
Features of treatment of medium and deep caries
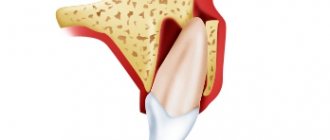
In medium and, especially, deep caries, the layer of tooth tissue separating the bottom of the carious cavity from the pulp chamber (the inner part of the tooth where the “nerve” is located) can be very thin. As a result, after placing a filling, a complication may occur - pulpitis (inflammation of the nerve of the tooth). Pulpitis, in this case, can be provoked by chemical irritation of the pulp by dental preparations used to treat the carious cavity.
Also, a significant area of exposed dentin (the inner tissue of the tooth containing nerve endings) can cause pain after tooth filling. In order to prevent these undesirable consequences, before placing a filling, the inner surface of the prepared cavity is covered with a thin layer of glass ionomer cement. The cement layer promotes the regeneration of tooth tissue and isolates sensitive dentin from the irritating effect of the etchant acid.
In case of deep caries, a special therapeutic pad is applied to the bottom of the cavity. It contains calcium hydroxide, which helps restore dentin from the pulp chamber. Then a layer of glass ionomer cement is applied over the treatment pad, after which a filling is placed.
A “good” filling will be obtained if the above principles of caries treatment are observed. In other cases, the filling will most likely not be “good” enough.
How do we do this?
Our specialists will painlessly, efficiently and reliably carry out re-filling. The doctor will select the color and model the shape of the new filling. Filling materials are like paints in an artist’s palette: they can be selected individually for a specific case, for each person, and the color, brightness and transparency of the tooth can be very carefully adjusted. Filling occurs in layers, taking into account the anatomical features of the tooth. As a result, the work of a dentist is not noticeable to others.
Nowadays, the latest filling materials are widely used for dental treatment, which help to cope with several tasks at once - therapeutic, aesthetic and preventive. Their number is growing from year to year, and the quality is improving, which allows us to do better and better work.
However, remember, dear patients, that not in all cases you can limit yourself to replacing the filling. If the destruction process is too advanced, you will be offered a ceramic orthopedic inlay or crown instead of a filling. These materials are more reliable and durable, and will help extend the life of your tooth for a long time. In any case, after a preliminary consultation, our specialists will be able to choose the best option for you.