Why is manipulation needed?
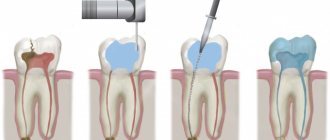
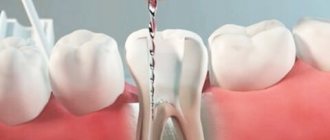
Trephination is the initial stage of endodontic therapy. It involves opening and removing the pulp located in the crown to gain access to the canals located in the roots.
The procedure is also known as endodontic crown preparation. It should be noted that trepanation does not involve changing the anatomy of the tooth or penetrating the internal canals. The sole purpose of trepanation is to gain access to the root orifice by opening the coronal cavity.
Treatment
When a permanent tooth with an unformed root is damaged, therapeutic actions should be aimed at preserving the vitality of the pulp to ensure further root formation. To do this, direct pulpotherapy is performed.
The method of direct pulpotherapy consists of applying a therapeutic pad based on calcium hydroxide to the pulp, which is covered with an insulating pad on top and then the tooth is restored. The method is effective if no more than two hours have passed since the tooth injury, and the surface of the opening of the tooth cavity is no more than 1 mm in diameter.
If it is impossible to use the method of direct pulpotherapy, the method of partial pulpotomy is used - removal of the surface layers of the inflamed pulp to preserve the viability of the rest of it. After partial pulpotomy, the wound surface of the tooth is covered with therapeutic and insulating pads, and the condition of the pulp and developing roots is subsequently monitored.
If the pulp dies as a result of injury, the apexification method is used to stimulate the formation of the root apex - cleaning the root canal and filling it with calcium hydroxide paste, which is removed after the root apex is closed. Calcium hydroxide also prevents resorption (resorption) of the roots of pulpless, injured teeth.
If the injury occurs on permanent teeth with fully formed roots, the pulp is completely removed, then the tooth is restored.
Complete fracture of the crown at the level of the neck
Examination of the patient reveals the absence of a crown, severe pain and bleeding in the area of the injured tooth. An x-ray is performed to rule out a root fracture.
Treatment consists of removing the pulp, followed by filling the root canal and restoring the tooth using core inlays. If a permanent tooth has been injured and its root has not yet formed, apexification is performed; After the root has formed, the root canal is filled with permanent materials and the crown is restored.
If a complete fracture of the crown occurs on a temporary tooth, it is depulped or the tooth is completely removed. Before the permanent one erupts, the missing baby tooth is replaced with a temporary removable denture to prevent the development of anomalies in the child’s dental system.
Corono-root fracture
This type of fracture is rare and cannot always be determined by visual examination. The injury occurs after a vertical blow to the tooth; the fracture gap passes through the crown and root simultaneously.
Patients experience mobility of part of the tooth and pain when chewing food. The fracture is confirmed by radiography.
The treatment method is chosen depending on the degree of damage to the tooth: endodontic treatment is carried out, followed by the installation of a root pin and tooth restoration, or the tooth is removed and prosthetics are performed.
Root fractures
The frequency of fractures of the roots of primary teeth is 0.5%, permanent - 2% of the total number of tooth fractures. A fracture can occur in the apical, middle or coronal third; more often, its transverse direction is diagnosed, less often - oblique. Sometimes two or more fracture lines are found, which indicates a comminuted fracture.
A root fracture is usually combined with tooth dislocation; patients complain of tooth mobility, aching pain in the tooth that occurs spontaneously and intensifies when biting and closing the jaws.
Indications
Manipulation is prescribed in cases where it is necessary to gain access to the inside of the tooth for:
- vitalization or removal of the nerve;
- canal obturation;
- pin installation, etc.
As a rule, trepanation is performed for deep carious cavities in the coronal part with a thinned septum between it and the pulp chamber. Pathogenic microorganisms can penetrate through the thinned wall, which leads to infection of the dental nerve. Trepanation is also indicated for pulpitis in chronic or acute form, or any form of periodontitis.
Crown fracture without opening the pulp chamber
This fracture affects not only the enamel, but also the dentin; the pulp is not exposed. Patients complain of pain when eating, caused by thermal, chemical and mechanical irritants. The closer the pulp is to the fracture plane, the more severe the pain.
A dental examination reveals:
- defect of part of the crown limited to dentin;
- pain on percussion;
- pain when probing the exposed dentin surface.
X-ray diagnostics are performed to exclude a root fracture, EDI and transillumination examination.
Treatment
To treat this type of fracture in baby teeth, a protective bandage is applied to the exposed dentin, covered with glass ionomer cement on top. The tooth is left in this condition until it is replaced with a permanent one. If the integrity of the bandage is damaged, the bandage is changed; X-ray monitoring of root formation is periodically carried out if it has not been formed.
Subsequently, thermal diagnostics and EDI are carried out to check the viability of the pulp: one, three and six months after the injury, then every six months until the root is formed.
When treating permanent teeth, sharp edges are ground off, teeth are restored with filling materials and crowns. If the non-viability of the pulp is detected due to a strong blow, it is removed.
Contraindications
Trepanation is not advisable in the following cases:
- if it is necessary to extract a tooth, if restoration of its functions is impossible;
- with impassable root canals with curvatures;
- for severe periodontal pathologies;
- for tooth root fractures.
In these cases, the tooth must be removed.
Stages of the procedure
Trepanation includes several stages:
- administration of local anesthesia;
- applying a rubber dam to isolate the element;
- crown opening;
- performing trepanation.
For preparation, a turbine drill with a diamond or carbide tip (with coolant) is used:
- The doctor opens the crown by drilling a point contact between the carious cavity and the inner surface of the tooth.
- The crown is opened by removing overhanging fragments of the enamel-dentin layer.
- To remove the coronal part of the pulp, a sharp excavator is used, while EDTA is supplied to the oral cavity to soften the surface dentin, as well as the disinfectant sodium hypochlorite. Cavity walls and canal mouths do not require additional preparation.
The most important task of trephination is to provide access to the tooth canals. Once achieved, trepanation is considered complete. After this, subsequent endodontic therapy is carried out as prescribed by the doctor.
Opening and formation of the access cavity and localization of root canals
Author: American Association of Endodontists
The endodontic triad, including biomechanical preparation, disinfection and complete obturation of the root canal space (RC), remains the basis of endodontic treatment (ET). However, even if access to the ostia of the CC and apical foramina is ensured correctly, achieving the goals of this triad will still be labor-intensive. The main goal of EL is to create conditions in which the body can heal on its own. Adequate access is the key to achieving this goal and, accordingly, the success of EL. The purpose of this article is to assist the practitioner in understanding the technique of providing access to the dental cavity and orifices of the oral cavity. A systematic approach to addressing this issue is described below.
Basic principles
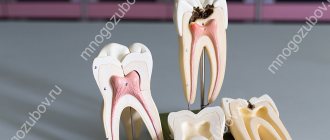
The pulp complex is a continuum (continuous structure) starting from the pulp horns and ending at the apical foramen. In order to completely remove the pulp, access to the coronal part must be ensured in such a way that the localization and cleaning of the CC can be carried out fully and without weakening the coronal dentin and enamel.
The process of cleaning and forming the access cavity and CC can be divided into 4 stages: analysis of access, removal of the roof of the tooth cavity, identification of the tooth cavity and the mouths of the CC, instrumentation of the CC.
Access Analysis
Removal of pulp tissue begins with an analysis of the anatomy of the tooth being treated and the anatomy of the surrounding tissue. To completely remove all pulp tissue, it is necessary to identify the coronal and root parts of the pulp complex. According to Krasner and Rankow, the cavity of each tooth is centrally located at the cemento-enamel junction, a feature called the “law of centrality.” Confirmation of this law can be seen in Fig. 1A and 1B.
Rice. 1. Sample slices demonstrating the law of centrality.
The law of centrality can be used to guide the initial formation of access. However, the operator must understand that this law is valid only at the level of the CEJ and is not related to the anatomy of the chewing surface.
Therefore, the initial penetration into the tooth cavity must be made in the center of the central epithelium. Therefore, the doctor must make an approach, mentally imagining the localization of the central epithelium, while ignoring the anatomy of the clinical or artificial crown. As can be seen in Fig. 2, artificial crowns disorientate clinicians, since their anatomy is not centered relative to the CEJ.
Rice. 2. Localization of the central epithelium, which does not correspond to the anatomy of the artificial crown.
Step 1
The first step in gaining access to the dental cavity is physical identification of the shape and location of the CEJ. This is done with the help of a periodontal probe, which is used to examine the circumference of the CEJ to get a mental picture of its size and boundaries, as shown in Fig. 3 A-D.
Rice. 3.AD. Periodontal probing to localize the central epithelium.
After visualizing the CEJ on the occlusal surface, a penetration point is selected. On the surface of the restoration, this point may not be related to the anatomy of the occlusal surface. This can be seen in Fig. 3E, where the correct penetration point on the chewing surface is marked with a blue circle. This point was determined using radiographic examination, periodontal probing, and a mental representation of the CEJ perimeter.
Rice. 3. E. Localization of the primary penetration point, based on determining the perimeter of the central epithelium.
Visualization of the final contour of the tooth cavity can be supplemented by the use of another law related to its anatomy - the law of concentricity. This law states: “the walls of the tooth cavity at the level of the CEJ are concentric with respect to the external contour of the tooth.” The law of concentricity is shown in Fig. 4.
Sample slices demonstrating the law of concentricity.
This law helps clinicians to correctly open the tooth cavity. If there is a convexity of the CEJ, the tooth cavity will also have a corresponding convexity. For example, if a tooth is narrowed mesiodistally, the tooth cavity will also be narrowed in that direction, as shown in Fig. 5a and 5b.
Step 2
The second step is to determine the angulation of the tooth (mesio-distal inclination). This is done using radiography (Fig. 6) and clinical examination. CBCT can provide information about the vestibulo-oral inclination of the tooth.
Rice. 6. Determination of angulation using radiography. You should pay attention to the inclination of the second molar of the HF. Step 3
The third step, as shown in Fig. 7, is the measurement of the distance from the top of the tubercle to the furcation using a radiogram. Once this distance is determined, a shorter length bur is placed in the handpiece to avoid perforation of the furcation. If a shorter bur is directed directly along the center of the central joint, parallel to the long axis of the tooth, then perforation is practically eliminated.
Rice. 7. Measuring the distance from the occlusal surface to the furcation. Step 4
After all parameters are determined, the primary access point is selected. Its location may vary relative to the occlusal surface of the tooth and will depend on all of the above factors. All recommendations regarding starting access from holes or depressions are erroneous. In some extraordinary cases, the primary access point may even be on the tubercle. The principle follows from this: the internal anatomy of the pulp chamber determines the external contours of the crown. The shape of the crown can be triangular, trapezoidal or irregular.
Access technology
Step 1
Before starting the mechanical component of access formation, all defective restorations and carious tissues must be removed to avoid bacterial contamination during the treatment process.
Step 2
The type and shape of the working surface of the bur is selected individually by the clinician. The most commonly used are spherical carbide (carbide) or diamond and fissure burs. For orthopedic structures, special burs are used to cut metal. After selecting the bur, penetration of the occlusal surface is carried out at the point determined by the above characteristics. The bur must move towards the center of the mentally imagined CEJ until the moment of “falling through” or until the head of the tip touches the tubercle of the tooth. However, “sinking” is felt only when the depth of the tooth cavity is at least 2 mm.
When a doctor evaluates the possibility of treatment on his own or referral to another specialist, it is necessary to take into account the distance from the roof of the tooth cavity to the bottom. Patients with a calcified dental cavity, as shown in Fig. 8, it is better to refer to more experienced specialists with appropriate equipment.
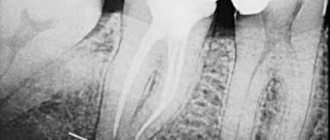
Rice. 8. X-ray of a molar with calcified CC. Step 3
The goal of proper access is to completely remove the roof of the tooth cavity. During the process of removing the roof, there is no need to search for the mouths of the roof, since after its complete removal and, accordingly, completion of the formation of the access, the mouths can be found without much difficulty.
The roof of the tooth cavity can be removed in two ways: place the bur parallel to the long axis of the tooth and open the tooth cavity with lateral movements, or place a spherical bur in the access cavity and, grasping the lateral overhanging edges of the roof, move the bur towards the chewing surface (Fig. 9).
Using various burs to remove the roof of the tooth cavity. The roof of the tooth cavity is sequentially removed, after which the formation of the access can be considered complete. One of the most important steps during this process is when it is determined that access has been completed. In order to accurately determine this point, the doctor needs to know the “law of color change.” The law states that the color of a tooth cavity is always darker than that of the surrounding walls. As long as the walls are light, there is a place where they transition into the darker bottom of the tooth cavity. This connection between the wall and the bottom is shown in Fig. 10, passing through the entire bottom of the tooth cavity.
Rice. 10. Sample section showing the connection between the walls and the bottom of the tooth cavity. Fig. 11. Sample slice demonstrating full access.
The operator knows that the access formation is completed in case of a complete view (360 degrees) of the connection of the bottom and walls of the tooth cavity (Fig. 11). If this connection is not fully visible, the operator will need to remove additional overhanging structures (restorative material, reparative dentin, or overhanging edges of the roof of the dental cavity). This intervention to provide a complete view can be seen in Fig. 12.
Clear visualization of the wall-floor junction is one of the main aspects of providing access for endodontic treatment.
If the doctor cannot carry out this manipulation for any reason, then he must refer the patient to another specialist. In Fig. Figure 12 shows a defective approach where a full view of the wall-to-bottom connection is not visible.
Rice. 13 illustrates full access, where the transition of the walls to the bottom is visualized along the entire perimeter of the tooth cavity.
Rice. 12. Sample of defective access.Fig. 13. Sample of full access.
Estuary localization
The number of CC orifices in each specific tooth should be known in advance before treatment. Although radiographs help in some cases to determine the number of roots, and the average values of the number of roots and CC for each tooth are also known, most often the number and location of the orifices of the CC remain unidentified.
So how does a clinician determine the exact number of CB orifices without causing iatrogenic destruction to the tooth? The only effective and safe way to visualize all formations of the floor of the dental cavity is to use a variety of anatomical landmarks.
There are several laws for identifying the localization of the mouths of the CC:
- I law of symmetry: with the exception of the molars of the HF, the mouths of the CC are equidistant from a line drawn in the mesio-distal direction through the center of the bottom of the cavity (Fig. 14);
- II law of symmetry: with the exception of the HF molars, the mouths of the CC lie on a line perpendicular to the line passing in the mesio-distal direction through the center of the bottom of the tooth cavity (Fig. 15);
Rice. 14.Fig. 15.
- law of color change: the color of the bottom of the tooth cavity is always darker than the color of the walls (Fig. 16, A and B);
Rice. 16. A-B.
- I law of localization of the mouths: the mouths of the CC are always located at the point of transition of the walls into the bottom of the tooth cavity (Fig. 17);
- II law of localization of mouths: the mouths of the CC are located at the tops of the wall-bottom connection (Fig. 18).
Once the wall-bottom connection is clearly visualized, all laws of symmetry and location of orifices can be used to determine their exact position and number.
If you look at the localization of the mouths at the bottom of the tooth cavity in Fig. 19, then knowledge of the l and ll laws of symmetry indicates not only the presence of the 4th mouth, but also its exact location.
The laws of localization of mouths l and ll can be used to determine their number and location. Since all orifices may be located along the wall-bottom junction, any black spots, indentations or white spots that are observed elsewhere (on the walls or dark bottom) should be ignored to avoid perforation. ll law of localization of mouths helps to focus on their exact location. The vertices or corners of the geometric shape of the dark bottom of the tooth cavity will indicate the exact location of the orifices. If the CC is calcified, then this apical position will determine the need for the bur to penetrate the reparative dentin of the upper part of the CC (Fig. 20).
Rice. 19. Localization of mouths using symmetry laws. Fig. 20. Sample sections showing the vertices of the floor of the tooth cavity. l and ll laws of localization of orifices in combination with the law of color change are often the only possible indicators of the presence and localization of the second CC in the bucco-medial root of the first molar of the HF (Fig. 16). In Fig. 16A shows the bottom of a tooth cavity; along the wall-floor junction there is an angle between the orifices of the bucco-medial and palatal CC. l and ll laws of localization of orifices indicate the presence of a second CC in the buccal-medial root, as can be seen in Fig. 16B. This orifice is present in the vast majority of HF molars; it can be located at different distances from the orifice of the first CC, but is always located along the line of connection between the wall and the bottom of the tooth cavity.
All of the above laws apply to all teeth with the exception of high-frequency molars. They are especially valuable in cases of unusual anatomy. Pay attention to the schematic representation of the bottom of the tooth cavity of the second premolar tooth in Fig. 21(A). Knowledge of the laws of the anatomy of the bottom of the tooth cavity will immediately indicate the presence of three CCs in this tooth (Fig. 21 (B)).
Localization of the mouth of the third CC using the laws of the anatomy of the bottom of the tooth cavity. Another example of the value of knowing the anatomy of the bottom of the tooth cavity can be seen in Fig. 22(A), which shows a LM molar sectioned along the CEJ. In accordance with the laws of the anatomy of the bottom of the tooth cavity, it can be argued that there are only two CCs in this tooth. Their location is shown in Fig. 22(B). However, the physician should be aware that the number of orifices does not always correlate with the number of CCs. Sometimes there may be several CCs at one mouth.
Anatomy of the dental cavity, demonstrating the presence of two CCs in the molar of the lower jaw. Despite all our attempts to ensure high-quality access, problems may still arise during the treatment process. Listed below are the most common problems faced by practitioners and how to resolve them.
Schematic representation of problems and options for eliminating them
Problem: inability to localize the bottom of the tooth cavity due to excessive bleeding. Cause: pulp tissue of the tooth cavity or CC. Methods of elimination: 1. Expand access by removing the roof of the tooth cavity without touching the bottom (you cannot touch the bottom of the tooth cavity without completely visualizing the wall-bottom connection). 2. Place a hemostatic agent into the tooth cavity. 3. Use a pulp extractor to remove pulp tissue.
Problem: inability to determine the location of the bottom of the tooth cavity due to inadequate removal of the roof of the tooth cavity. Reasons: 1. Wrong choice of primary access point. 2. Inability to visualize the wall-bottom connection at 360 degrees. Elimination methods: return to the previous bur (spherical or fissure) and continue opening the tooth cavity until the wall-bottom connection is completely visualized.
Problem: inability to determine the location of the bottom of the tooth cavity due to inadequate lighting. Reasons: 1. Too little access. 2. Presence of crowns or restorations. 3. Lack of smooth surfaces on the walls and bottom of the tooth cavity (usually due to the use of too small spherical burs). Methods of elimination: 1. Enlarge the access cavity until the wall-bottom connection is completely visualized. 2. Remove the restoration material. 3. Use additional lighting devices (LED headlamps or operating microscope) if you have a crown. 4. Smooth out all irregularities on the walls and bottom of the tooth cavity using spherical burs.
Problem: calcifications, denticles. Cause: degenerative processes in the pulp Methods of elimination: after completely removing the roof of the tooth cavity and stopping the bleeding, use a non-aggressive spherical bur to smooth the bottom of the tooth cavity to remove calcification and clearly visualize the wall-bottom connection.
Problem: inability to determine the location of the bottom of the tooth cavity due to the overhang of the restoration material over the tooth cavity. Reason: inadequate removal of all restoration material before the start of access formation (in particular, with carious cavities of class 5, the restoration material can be introduced into the tooth cavity). Remedy: remove all restoration material before starting access.
Problem: inability to localize the bottom of the tooth cavity due to loss of landmarks. Reasons: 1. Using the occlusal surface as the starting point for access formation. 2. Problem with determining the inclination and rotation of the tooth. 3. Loss of landmark in the form of a circle along the central nervous system. 4. Wrong choice of angulation for primary access. Methods of elimination: 1. Correctly determine the orientation of the tooth before starting access formation. 2. Correctly mentally imagine the CES. 3. Remove the rubber dam to avoid loss of landmarks. 4. Select the appropriate penetration angle for the bur during initial access.
Problem: perforation of the bottom of the tooth cavity. Reasons: 1. Premature attempt to identify the mouths of the CC. 2. Incorrect measurement of the distance from the occlusal surface to the furcation. 3. Incorrect identification of the wall-to-bottom connection. 4. Inadequate access. Elimination methods: 1. Remove the roof of the tooth cavity before determining the location of the mouths of the CC. 2. Obtain a 360 degree view of the wall-bottom connection. 3. Use a bur of shorter length than the distance from the occlusal surface to the furcation. 4. Direct the bur along the center of the CES perimeter.
Problem: perforation of the lateral wall of the tooth cavity. Reasons: 1. Misconception about CES. 2. Incorrectly chosen angle when creating access. 3. Using the occlusal surface as a guide to begin penetration. Elimination methods: 1. Remove the roof of the tooth cavity before determining the location of the mouths of the CC. 2. Obtain a 360 degree view of the wall-bottom connection. 3. Direct the bur along the center of the CES perimeter. 4. Select the primary point of penetration based on the idea of the central nervous system.
Conclusion
To increase the likelihood of success of endodontic treatment, it is necessary to remove the pulp as completely as possible. In order to achieve this, it is necessary to find the mouths of all CCs. The only rational way is to use the laws of the anatomy of the bottom of the tooth cavity. To do this, it is necessary to create an access in such a way as to visualize the connections of the walls and the bottom of the tooth cavity along the entire perimeter. This article describes clinical conditions that may interfere with such imaging. The article is also supplemented with a schematic representation of possible problems that arise during the treatment process, and options for their prevention and elimination.
Amet Tabakov Kirill Kulik