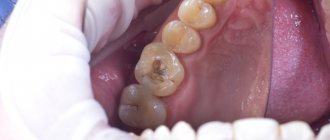
A patient came to us with a 3.5 tooth. This is a pulpless tooth - the lower five, it does not have any periapical changes or inflammation in the area of the root apex. On the tooth there is a lack of the upper half of the coronal part of the tooth, that is, the upper half. On tooth 3.5
Initially there was a filling, a metal stump insert was installed in the tooth, it was quite deep, and a filling was already installed on top.
Here's a “puff sandwich”:
The filling “safely” broke off from the metal dental inlay. Metal generally does not have the best adhesion both to the tooth and to fillings and ceramic structures. The tooth also had numerous caries.
Naturally, the decision was immediately made to make the tooth new, that is, to update this tooth by installing a ceramic inlay using CEREC technology. Within two minutes, the metal insert was removed from the tooth.
How to remove a metal tab
If the metal dental inlay is single-rooted or double-rooted, then a small notch is made in the form of a step and the metal inlay is removed from the tooth using gentle kinetic movements and tapping.
Since metal has poor adhesion to the root, to fillings and to ceramics, it can be completely removed with almost the slightest tap, absolutely naturally, without breaking. As a result of atraumatic extraction, the bone was preserved, nothing cracked: neither the root nor the remaining bone structure. I can add that not once, in all the years I have been removing metal tabs in this way, has anything cracked, and I always remove all the tabs from a tooth in literally two minutes. It's just all about experience.
Making a tab for Cerek:
- removed the tab, leveled the root, removed caries:
- prepared the tooth for the manufacture of the missing module in the form of the crown part of the tooth with the root part together monolithically.
- scanned the tooth
- created a tab model on CEREC:
- perfect color choice,
- made a tab,
- tried the inlay on the tooth:
Installing a ceramic inlay
The color of the ceramic inlay matched very nicely. Next, I glazed the CEREC inlay and fixed the manufactured inlay to our patient. And as a result, the patient received in 1.5 hours
, consisting of only
two parts
:
- the first part is your tooth (root)
- the second part is the missing ceramic module.
Two parts and one connecting seam in the form of cement:
Sergey Samsakov
Pros and cons of stump inlays
A significant advantage of these microprostheses is their high reliability and preservation of the anatomical structure of the tooth. The root is intact, so the dental unit receives full load when chewing. This means that the bone tissue of the jaw does not degrade, and normal bite and diction are maintained.
The installation procedure is minimally invasive and usually easy to tolerate.
Advantages of a Cerek inlay over a metal dental inlay
Benefit #1. Physical.
If we compare the CEREC inlay with a metal inlay, then the Cerec solution is much better in terms of the physical strength of the structure than the “tooth + metal inlay + crown” model, since these are three components that connect two seams.
Benefit #2. Aesthetic.
If there is metal in the tooth, then it is almost impossible to use metal-free structures because:
- firstly,
there will be poor adhesion, - secondly,
metal always shines through a little.
Let me explain advantage #2:
When using metal inlays, it is impossible to make a natural tooth color similar to nature, because If you make a ceramic crown on top, the metal inlay will shine through it, since high-quality ceramics have the transparency of your own tooth. And if you put a crown made of zirconium dioxide, the inlay will not be visible through it, but you will immediately see that the tooth is not your own, because Zirconium is very dense in itself and matte. Any structures made from solid ceramics have some transparency, which is also inherent in our natural teeth. Therefore, today we always extract any metal from a tooth. This is always done very simply if you have the appropriate experience.
Benefit #3. Chemical.
Metal is also the cause of galvanism
. There are laws of chemistry associated with dissimilar metals. And in our case, such metals are located in the oral cavity. If two different types of metal are installed in the oral cavity, for example, nickel, various cobalt-chromium alloys, molybdenum alloys - and if these are different metals, then a phenomenon called galvanism can occur in the mouth.
That is, chemical ionic bonds arise between these metals, which lead to periodontitis. Therefore, ideally, there should be no metal in the mouth at all.
Types of pins and their main features
The pins are either fiberglass or metal. Fiberglass is used when installing tile crowns. Such an instrument does not show through the crown. It is quite easy to remove it if necessary. However, metal knitting needles are stronger, which is why they are used more often. Sometimes they are also called anchor.
Anchor pins are made from materials such as titanium, palladium or stainless steel. There are also pins made of brass and precious metals. They are used in the most difficult cases. Anchor pins are very popular because they make it possible to restore an almost completely destroyed tooth. It is only important that its root is intact.
The pins are fixed in the canal with phosphate cement. The use of ultrasound can help destroy it. This has to be done when repeated caries begins around the pin. Excessive strength of the material often causes displacement of the pin when chewing food, which can lead to damage to the prosthesis. In this case, the entire structure will need replacement or correction. Most often, the violation is detected already at the stage when it is already quite difficult to cure the tooth. In this case, you have to remove the pin along with the tooth. In some cases, the tooth can be saved. In this case, a small part of the dental tissue is removed around the pin using a drill, and then the pin is carefully unscrewed. After removal, re-treatment is carried out, the canals are properly processed and fillings are placed again.
Parapulpal pin wires are non-metallic. They are made from gold or special stainless steel, and then they are necessarily coated with polymer. Such knitting needles are used for retention of fillings and their reinforcement. A special feature of parapulp pins is that they are installed in hard tissue without touching the pulp. The absence of actions inside the tooth cavity ensures the complete elimination of the likelihood of contracting any infection or the development of inflammatory processes in the oral cavity. The disadvantage of such tooth strengthening means is the limited possibilities of use. The fact is that these products are located very close to the surface. They often break teeth and need to be reinstalled.
Dentists divide pin instruments into two groups: standard and special. The first ones are used to eliminate minor damage, and are available in the form of cylinders or cones. Special devices are made in a variety of shapes. Pin devices are also distinguished by fastening methods. Among screw materials, the main drawback is the danger of the tooth part breaking off during screwing.
RESULT OF TREATMENT:
In our case, when the metal inlay was removed, a ceramic module was installed on the tooth root in one step on a fresh surface. The duration of the entire work is only (!) 1.5 hours
.
The patient is incredibly satisfied, and the tooth is very beautiful and aesthetic. And most importantly - very reliable
.
CEREC inlays instead of metal inlays are a super motivational treatment in my opinion. And, according to many of my patients, nothing can be cooler than this treatment
.
Author:
Sergey Samsakov
orthopedic dentist
born 02/02/1989
Education:
2011 — Graduated from the Moscow State Medical and Dental University named after. A.I.Evdokimova
2012 — Internship in the specialty “Orthopedic Dentistry”, Moscow State Medical University named after. A.I.Evdokimova
2014 - Residency in Orthopedic Dentistry, Moscow State Medical University named after. A.I.Evdokimova
More examples of treatment
Depulped tooth Caries of the tooth root Destruction of the canine on the lower jaw
Replace the anchor pin with a CEREC tab
The front wall of the fang is made in the form of a filling, which has fallen apart from the cutting edge, darkened and is aesthetically unattractive. There is an anchor pin inside the tooth.
CEREC inlay for anterior tooth Removal of anchor pin Professional hygiene
more details
Depulped tooth Caries under filling Absence of the crown part of the tooth
Restoration of the seventh lower tooth 4.7 with a CEREC inlay
Patient Oleg A., 53 years old, came to me for help. Prior to this, the patient’s seventh lower tooth 4.7 was previously depulped and a temporary Septo-pack filling was installed. The tooth canal was filled with gutta-percha.
Module crown + tooth root CEREC
more details
Clinical case
A 30-year-old patient came to the clinic with complaints of darkening of fillings. The patient was interested in an aesthetic restoration with a long service life, so it was decided to restore the teeth with ceramic inlays. The initial situation is shown in Fig. 1. After collecting complaints, anamnesis, and conducting an examination, a diagnosis was made: K02.1 Dentin caries of a tooth 3.6, class II according to Black. K02.1 Dentin caries of tooth 3.7, Black class I.
Rice. 1.
At the clinical stage, the tooth was cleaned of plaque. After anesthesia, the color was determined using the standard VITAPAN Classical scale, the color of future indirect restorations is A2.
The preparation and formation of cavities of class I and II according to Black were carried out according to generally accepted principles in compliance with all stages with the obligatory use of a rubber dam to isolate the working field.
A small carious cavity was found on the medial contact surface of tooth 3.6, without destruction of the marginal ridge and without communication with the main carious cavity on the chewing surface. After preparing the carious cavity on the medial contact surface of the tooth, filling was performed using a fluid composite material.
Before taking the main impression, immediate dentin bonding was performed according to a traditional adhesive protocol. After polymerization of the adhesive, the undercuts in the area of the cavity walls were closed with a layer of flowable composite. The next step was to apply glycerin to the inner surface of the prepared cavity and illuminate it with a photopolymer lamp to remove the oxygen-inhibited layer in order to prevent possible interaction with the vinyl polysiloxane impression material during impression taking. The final view of the prepared cavity before taking an impression is shown in Fig. 2.
Rice. 2.
Impressions were taken with A-silicone impression material, temporary restorations were made using Clip material.
A follow-up visit took place 1 week later to fix the IPS e.max ceramic inlay. Previously, before admitting the patient, we assessed the marginal fit of the ceramic inlays on dismountable models (Fig. 3-6).
Rice. 3.
Rice. 4.
Rice. 5.
Rice. 6.
The second clinical stage began with cleaning the tooth from plaque. After anesthesia and the application of a rubber dam, the temporary restorations were removed, the cavity was cleaned of temporary cement residues, followed by fitting and preparation of ceramic inlays for fixation (Fig. 7-10). The indirect restoration was cemented using Calibra dual-curing adhesive composite cement (DENTSPLY).
Rice. 7.
Rice. 8.
Rice. 9.
Rice. 10.
After positioning the restoration, excess fixing material was removed in the area of the contact surfaces. Next, excess material was removed from other surfaces of the teeth. After 3 - 4 minutes, the surface of the fixing material was covered with a layer of glycerin and the final illumination of the restorations was carried out from each surface for 20 seconds.
At the final stage, an occlusion check was carried out. The view of the restoration immediately after fixation is shown in Fig. 11.
Ceramic restorations look natural, no different from your own tooth tissue.
Rice. eleven.
The appearance of the restorations 5 years after fixation is shown in Fig. 12.
Rice. 12.
Do you want to restore a tooth with a ceramic inlay?
Always at your service - Sergey Samsakov, orthopedic dentist with more than 10 years of successful experience, Moscow. Expert in 3D digital smile modeling, veneers and CEREC technology.